
Why am I receiving Secure-access pop-ups
Does your browser program often show advertisements from Secure-access? One of the many reasons why it happens is that you either acquired a program that contains virus or gave an unknown site permission to show adverts and redirect you to different sites.
It may show up in the bottom right portion of the display for computers and at the notifications panel for mobile phones.
The ads could be intruding because it will show up almost every few minutes and affect the surfing experience of the user. Moreover, it will slow down the device performance noticeably due of the amount of graphical resources they take up.
Browser-related infections redirects users to dating sites, gambling sites, VPN websites and drive-by download domains where a malicious executable file (exe) would suddenly download unexpectedly.

More Details about Secure-access
This particular type of promotional marketing is frequently used by many third parties to advertise their goods and services on the internet. Nevertheless, since it is usually successful on gaining online visibility, malware actors have also been known to use it to infect many user’s computer by spreading their malicious codes.
Malicious threats like this one infection is particularly made by dangerous hackers to gain profit from their affiliates by purposefully delivering intrusive adverts and redirections to website visitors. There are much more different adverts it can display and it is crucial not to interact with what Secure-access shows you.
The main objective of this intrusive pop-up is to trick web users into giving it permission to show adverts on their machine. On the other hand, the creators of this website will profit from the content they promote.
The major cause of how Secure-access pop-up virus got into the computer is through the installation of advertising software on the machine. Another likely cause is by giving authority to the said website to allow the displaying of pop-up advertisements on the browser. The permission message may look similar to any of the following:
- Click allow if you are not a robot
- Press allow to if you are an adult
- Press allow to download your file
- You have to click allow in order to continue
If you have encountered a site stating the same as the following message shown above, then you may have allowed the website to show push notification ads. It is not a big deal because removing the pop-up advertisements is as simple as previously pressing the allow button for these push notifications.
Performing the steps listed below will help you remove the unwanted website and prevent the threat from continuing to perform operations on your device.
Secure-access Removal Procedure
The following procedure will guide you to fix your browser problem. It will also help on getting rid of other malware lurking on your system that is why we recommend you do not skip a step.
We have provided a basic step-by-step instructions below . Given that our staff has tried and tested the guides, we are confident they will work effectively.
Important Note: If you've only experienced a single redirection or pop-up and haven't noticed any notification-based ads. It's probable that you just landed on a website and clicked on one of their ads.
It's advisable to run a comprehensive antivirus scan just to be safe, but if the results are negative, then you probably don't need to follow the rest of the removal guide. Your computer is likely not infected.
Summary of Contents
Step 1: Remove the Virus Automatically with Malwarebytes
When it comes to removing malware-related problems on the computer, it is best to utilize the anti malware software provided by Malwarebytes. We have determined that it can remove most types of malicious threats when we conducted malware tests.

Additionally, since the free version of this application can remove Secure-access by itself, using it costs you nothing. Malwarebytes also offers a free 14-day trial when you download it for the first time, so you might want to use the remaining time of the trial to test out the premium features.
1 Click the button above to download the latest version of Malwarebytes Anti-malware.

2 Open the installation file after the download and follow the procedure shown.
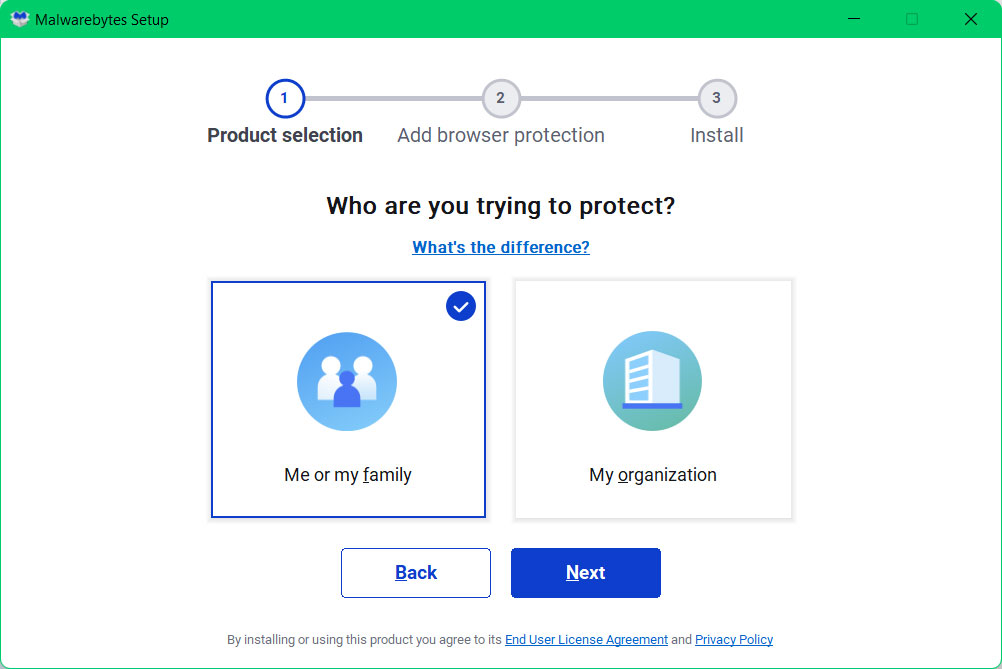
3 After following the software setup instructions, wait for the application to finish installing.

4 Once the application is installed, you may now run your first computer scan and wait for it to finish.
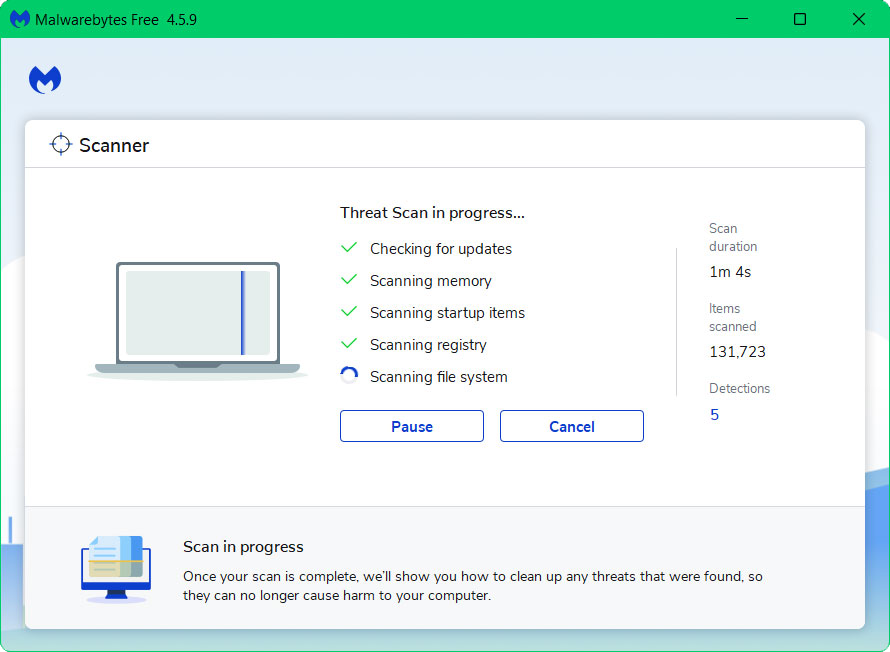
5 All discovered malware on the computer will be displayed on the screen, and you can eliminate them by pressing the "quarantine" button.

The malware lurking on your system would have been removed now and your computer has become safer to use now. As we have stated above, downloading Malwarebytes for the first time will grant you a premium trial. You may utilize Malwarebytes Real Time Protection to protect your device from malicious threats and viruses as soon as they surface.
You have the option to uninstall the application if you wish to do so after getting rid of the malware from the computer. While doing so will turn off Windows Defender Real Time Protection, you can use this guide to activate it once more after removing Malwarebytes.
Step 2: Remove Secure-access from Browser Permissions
Your web browser's settings will undoubtedly be altered by malicious pop-up ads. Reversing the changes made in the browser settings will certainly fix the issue.
In addition, you might have clicked "allow" on a certain page, which is another reason why you keep getting redirected and seeing pop-up ads.
The steps below will also work for mobile devices and the only difference is that the screen resolution is bigger on a computer. If you are infected with the Secure-access virus on mobile, the steps below will also be applicable to you.

For Google Chrome
1 Open the Chrome application then go to the upper right corner of the browser window and click the three dots menu button.
2 From the left panel menu, select Settings, then Privacy and Security.
3 Scroll down to Notifications under Site Settings.
4 It will then provide a list of sites that are permitted to display notifications. Identify and delete the suspicious website.
5 To remove the site, click the three dots next to the link and then select remove.

For Mozilla Firefox:
1 Launch Mozilla Firefox browser then open the menu by clicking on the three horizontal lines located in the upper right corner.
2 Click the Settings option then hover over to the Privacy and Security panel.
3 Scroll down until you find the “Permissions” section then click settings.
4 A window will open alongside websites with permission to show notifications.
5 Remove the website by selecting on the URL and clicking the Remove Website button.
6 There will be an option called "Block new requests asking to allow notifications" if you do not wish to allow sites to further ask for notifications then you may tick the box.
7 After making the modifications, click Save changes.
![]()
For Microsoft Edge:
1 Run Microsoft Edge on the computer and click the three dots icon on the upper right corner.
2 Click on the Settings button.
3 Select the Cookies and site permissions on the left sidebar.
4 Find and click Notifications then under the allow section, find the suspicious website and remove it.
5 Toggle the three dots on the right end of the website link then click remove.
For Safari
1 Open the Safari browser then click on Safari on the Menu Bar on top.
2 Choose Preferences from the drop menu.
3 A window should appear, then click the Websites tab.
4 On the left side panel select Notifications.
5 Remove the website from Safari by selecting the URL and clicking the Remove button.
 For Android Devices
Click here to access the instructions for iOS if you use an Apple device.
Removing the notification permission on android devices is also as easy as removing it on computer. Please follow the step-by-step procedure below.
Remove Permission on Google Chrome
1 First open Google Chrome then go to the upper right corner of the browser and click the three dots menu button.
2 From the shown menu, select Settings.
 3 Scroll down and click Site settings under the advance section.
4 Once Site settings menu appear, click Notifications.  5 Find Secure-access from the websites list and remove it's access by blocking it.
 6 To be safe just in case, go back to the Site settings menu and go to Pop-ups and redirects.
  7 Block Pop-ups and redirects from the browser.
  8 Go back to the Site settings again and go to Ads.
  9 Block Ads by toggling the switch off.
Remove Permission on Mozilla Firefox
1 Launch Mozilla Firefox browser then click the three horizontal dots on the lower right corner to open the menu.

2 Click the Settings option.

3 Hover over to the Privacy and Security section and click Site permissions.

4 Click Notifications from the Site permissions menu.

5 Set Notifications to Blocked.

For Apple Devices
Since there are no browser permissions on iOS devices, you may utilize the Content & Privacy Restriction feature to blacklist the website itself from the settings.
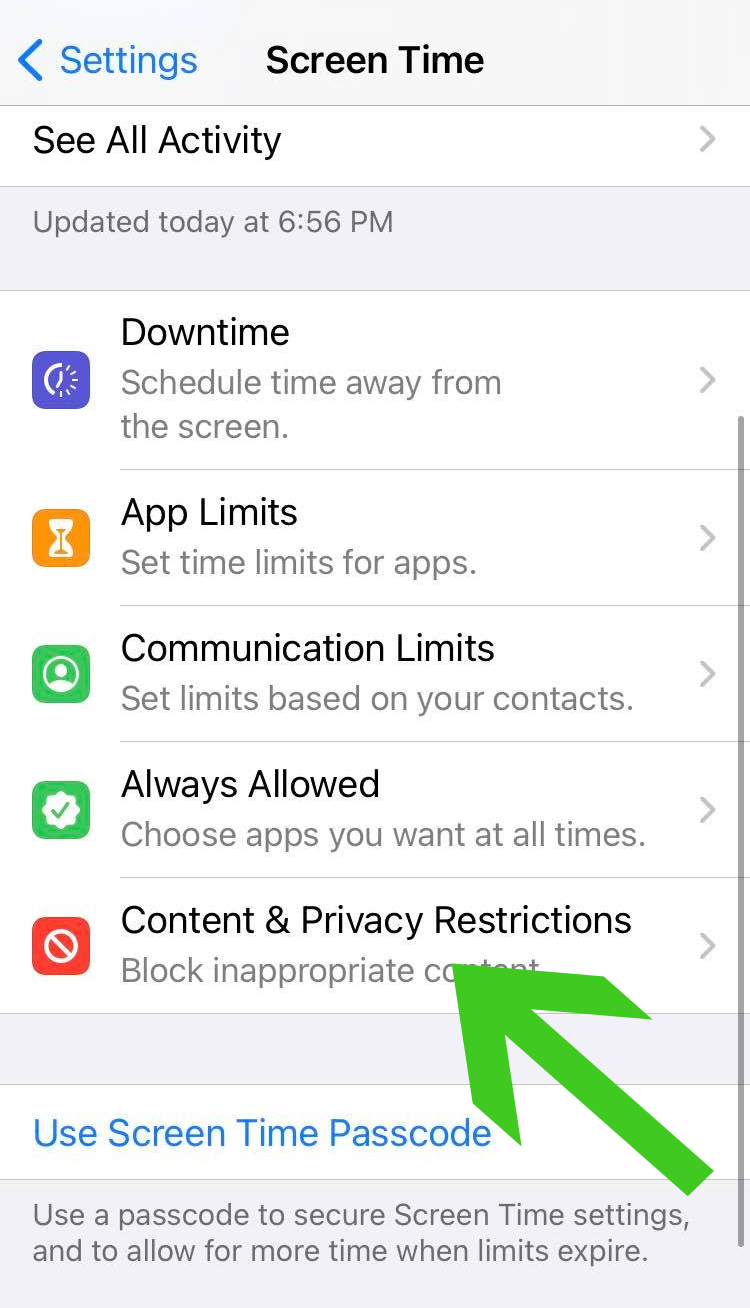
1 To start off, head over to the Settings application of your device, scroll down and click the Screen Time option with the hourglass icon.
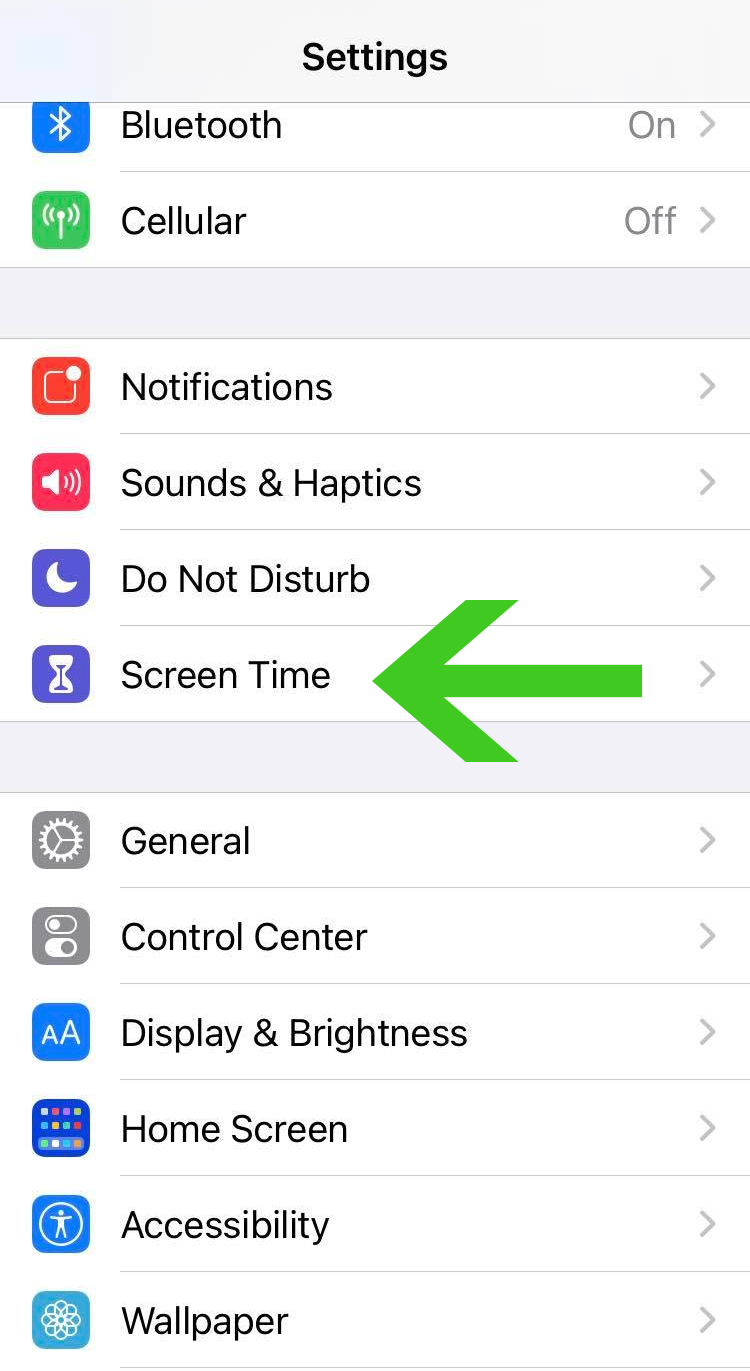
2 From the Screen Time settings, click on the Content & Privacy Restrictions option as seen from the image below.
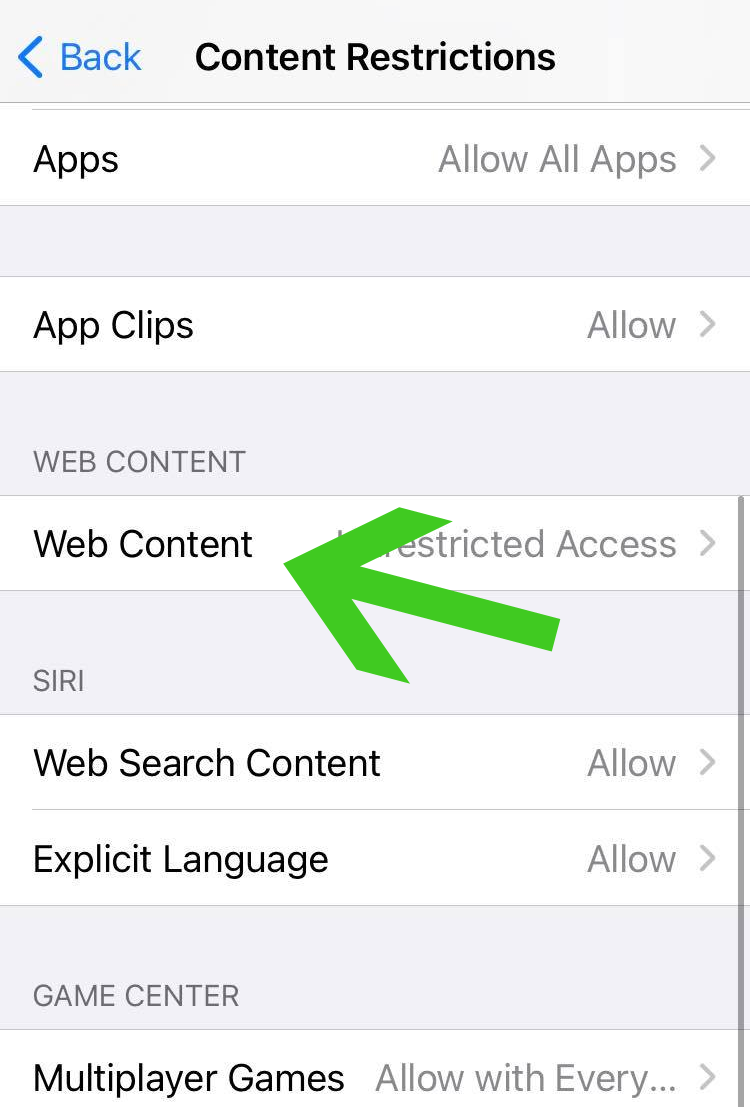
3 Once inside the Content & Privacy Restrictions settings, scroll down and click Web Content from the list of features and options it have.
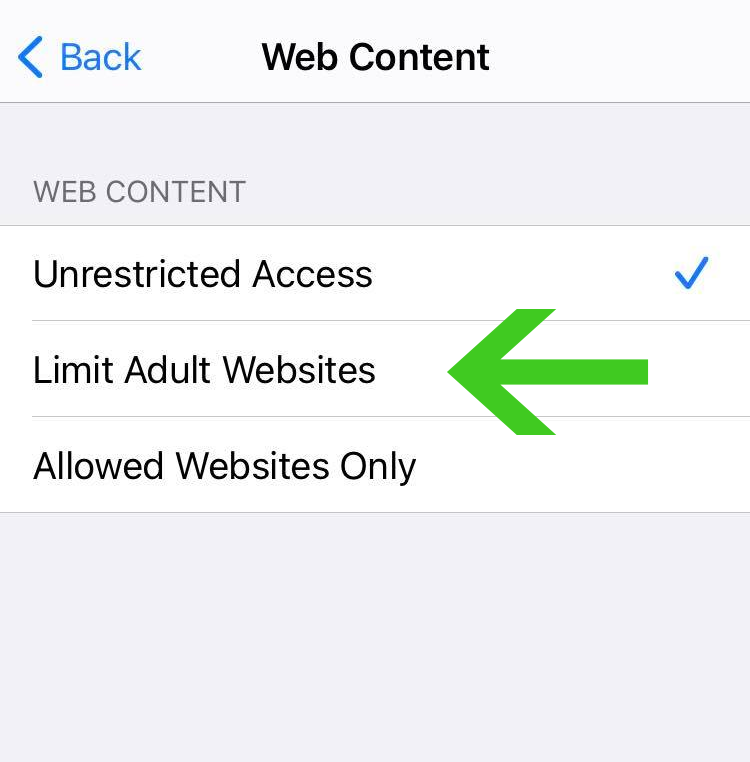
4 From here on you are presented with three options, unless you have never used this feature, it will be set to default with Unrestricted Access. Click on the Limit Adult Websites as we are going to use this option to block Secure-access from the browser.
5 Two options should show up after clicking the Limit Adult Websites button. Click the "Add Website" button under the Never Allow section.
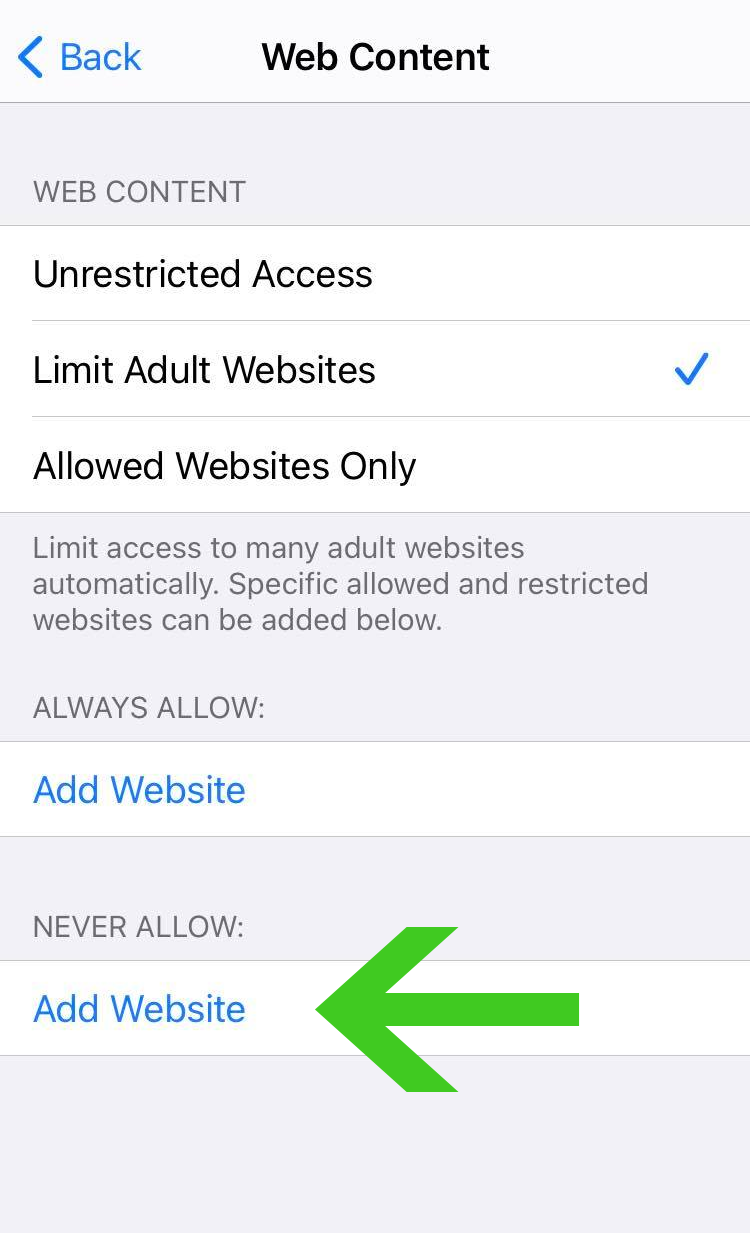
6 A URL bar should display after you click the Add Website button so you can insert the URL of the website you want to block. In the URL bar, enter Secure-access and press Done.
Now, the domain that you blocked will never again appear in the browser. You can use this feature once again if you want a particular unwanted website to not show up. However, because the Block Pop-up function was enabled, it is unlikely that you will ever see these websites again.
Step 3: Remove Unwanted Programs Installed by Secure-access
As we previously said, malicious hackers also employ pop-up ads and redirection to install their harmful software on users' computers.
If you think that while Example.com was displaying adverts on your computer, a certain executable file was installed. It is best to uninstall any doubtful and undesired apps that have been installed, if any, as a certain drive-by download may have taken place.
It is worth noting that locating the program can be tricky because many malicious programs disguise as legitimate programs or system files.
You may locate the program by utilizing the Task Manager and finding suspicious applications that are currently running when you are facing the browser hijacker symptoms.
Remove Program via Control Panel

1 Search Control Panel in the Windows search bar then click it.
2 The Control Panel should open, from there click Programs then Programs and Features.
3 A list of installed software will show on the screen after a moment.
4 Scroll down and find Secure-access or any suspicious programs you did not download then right click the application and select Uninstall.
Remove Extension from Browser
Secure-access will most likely install a browser extension within the web browser itself if you don't notice any strange files or applications on your computer.
Google Chrome:
Click the three dot buttons in the right hand corner of Chrome Browser. Find and click More Tools from the drop menu, then select Extensions.
A new tab will appear with all your installed extensions. Find which extension is suspicious and delete it. In order to deactivate the extension, toggle the blue switch to disable the program. Then click the remove button to fully uninstall it from Google Chrome.
If the switch is disabled: You have to remove the extension from within the extensions folder manually. Go to the Google Chrome extensions folder by using the following directory:
C:\Users\YOUR NAME\AppData\Local\Google\Chrome\User Data\Default\Extensions
You will see a list of folders with different hashes, to find what you need to delete, tick the Developer mode in the Google Chrome extensions tab to show the id of downloaded plugins.
Find the one matching the id of the extension you wish to remove to the one in the folder then delete it. Restart Google Chrome and the extension should be gone.
Mozilla Firefox:
Click the Menu button in the right corner of Firefox once it's open. Then go to Add-ons and Themes then select Extensions.
Toggle the blue switch to disable the suspicious extension after finding it. Click Remove from the three dots icon on the right side of the extension you want to remove.
![]()
Microsoft Edge:
Open Microsoft Edge application then click on the three dots on the upper right. A drop down menu will show then click Extensions.
New tab will open and show all installed extensions on the browser. Find the suspicious extension that you might have not installed.
Slide the blue switch to disable the use of the extension. Click on the remove button just below the extension.
Safari:
Open the Safari browser then click on Safari on the Menu Bar on top. Choose Preferences from the drop menu. A window should appear, then click the Extensions tab.
remove button.
Utilize Revo Uninstaller
For computer users who are not sure of what to do. You may resort to using Revo Uninstaller since it is much more effective and easy to use. Revo Uninstaller is a very useful tool for Windows users.
This uninstaller not only removes programs from the computer but it also deletes their changes from the Windows Registry, Host File and etc.
1 Click the button above and download the latest software that is compatible with your system.
2 Open the downloaded file and it should guide you through the setup.
3 Follow the installation procedure and wait until the installation of the software is complete.
4 After the installation is finished, tick the box that says Launch Revo Uninstaller then click finish.
5 Once the software has launched, find the unwanted application that is needed to be removed, double click the program to uninstall.
6 Click on the Continue button and follow the procedure to start uninstalling the program.
7 Once it is uninstalled, a window will pop-up. Select the Advanced option for the scanning mode then click Scan to find remnants of Secure-access.
8 A window will pop-up and show all of the leftovers and changes made by the program uninstalled a while ago.
9 Click the Select All button and hit Delete to remove the leftovers found on the Windows Registry.
10 Some leftover files may be found, click Select All then Delete them as well.
Once the window closes, you have successfully removed the adware threat from your system.
Step 4: Run a Second Opinion Scan with Kaspersky Antivirus
If you visit numerous forums and websites, you will see most users agree that Kaspersky is one of the best antivirus tool available.
There is a chance that malware may still be present in the computer system specially if you have already encountered drive-by download malware.

Since each antivirus application has its own threat database, Kaspersky's detection technology may be able to find viruses that the prior program missed.
To ensure sure Secure-access and other viruses are totally and undetectably removed from the system, we advise running a scan just in case. If you are downloading the application for the first time, you will also receive a 31-day premium trial.
1 Download the Kaspersky Security Cloud by clicking the button above.

2 Once the setup has finished downloaded, open the file and start the installation.

3 Wait until the wizard finds the latest version of the application or click Skip to install the current version stored.

4 Review the License Agreement. If you agree to its terms, click Continue.

5 Follow the installation instructions as shown then finally click install. (You may choose to uncheck the options shown if you do not want those features.)

6 Wait for the application to finish installing, then after the process is complete, click done.

7 Apply the recommended settings then start the application by clicking apply. Feel free to untick the options you do not desire.

8 You will be prompt to create an account and once you are finished, you will be redirected to the main screen. Select the Scan tab then click the run full scan and wait for it to complete. (Before scanning, we recommend you update the database to ensure any new malware variants are detected.)

9 After the scan has finished, the detected threats will be deleted from the computer.

Common Internet Safety Tips
- Websites with distinctive domain extensions should be avoided. Domain extensions other than .com, .org, .net, and .edu should be avoided because most infected websites have very distinct TLDs, always check the last section of a domain to make sure you're on a safe site, unless it's been reputable for a long time.
- Never download software or programs from unknown sources. This is one of the most popular ways for adware and other malware to infiltrate your computer. Download only from recognized and legal sources. To be secure, avoid torrent downloads and cracked software download sites, as the files will almost always contain viruses.
- One of the most reliable ways to be safe online is to use a firewall. It protects users from potentially hazardous websites by acting as a first line of protection. It keeps intruders out of the user's network and device. In today's world, a firewall will protect a user from the risks that lurk on the huge internet.
- Anti-virus software must be kept up to date. These programs should always be updated on a computer since hundreds of new malware threats are produced every day that aim to infect the machine's weaknesses. Antivirus updates contain the most recent files needed to combat new threats and protect your computer.
- Only visit websites with a secure connection. Since HTTP connections do not encrypt the data they receive, they are not considered secure. Entering personal information like email addresses, phone numbers, and passwords on a website that uses an HTTP connection is hazardous since your information could be stolen. Websites that use HTTPS connections, on the other hand, are more secure because data is encrypted and attackers are less likely to obtain access to information shared within the site.
Final Thoughts
If you're still unsure on how your browser is currently configured, you can reset it by following these instructions. This will return all settings to their default settings, but it won't delete your saved bookmarks or website passwords, so you don't need to worry.
You may bid farewell to annoying giveaways, phony virus alarms, and pop-ups about girls near your locations now that Secure-access has been removed from the computer.
The appropriate removal tools makes removing malware a straightforward process. Nonetheless, it's crucial to start safeguarding your device now to avoid the dangers posed by viruses, which are much more harmful than pop-ups and redirects.
We are proud of our expertise in this area and are pleased to have assisted you with your malware issue. If you happen to face another virus on your system, SecuredStatus will be readily available to offer support once again.