
The “Your Browser is Managed by Your Organization” problem with browsers is one that a lot of users have experienced.
If the managed browser issue mentioned above was not caused by you or the company you worked for, we will be explaining how to fix the issue in this article.
Having the “Your Browser is Managed by Your Organization” message does not necessarily mean that the device is compromised with malware.
However, if it’s not your personal laptop, it’s quite common for the browser to be controlled by a company like your employer or institution.
The IT department of your company may have installed a security layer on your device in order to detect whether you have been acting inappropriately while at work.

This is also to ensure that you do not engage in inappropriate behavior while at work or cheat on your online examinations.
Your business or institution will have access to the websites you visit, whether you used incognito mode, installed extensions, or conducted nearly all of your online activity with this general browser permission.
This is not fully a privacy invasion because you do not even have to enter your social media or bank account information, especially if it is on a company computer.
When “Your Browser is Managed by Your Organization” is used by cybercriminals
Due to the browser policy granting institutions access to all of your website data, cybercriminals also know how to take advantage of this capability to impose these on users’ personal computers and track and steal the user’s data, such as bank accounts and personal login details.
If “Your Browser is Managed by Your Organization” appeared on your personal computer rather than a device owned by your company, there is a great likelihood that it was bestowed upon your browser by malware actors and not your company or your institution.
When hackers take over a computer, they simultaneously install this policy and a malicious browser extension on the user’s equipment.
When the user tries to uninstall the malicious extension, the browser will then be blocked by the “Your Browser is Managed by Your Organization” policy because the person who set it up configured the setting not to remove it.
In this situation, things get problematic because exposing everything to third-party entities, such as hackers, creates a security risk that may result in financial losses and data breaches.
Not to mention, if this is installed on your computer, you should fix this browser issue right away because cybercriminals will have access to everything you do online.
Adware and other potentially undesirable programs that have been installed on the computer are another reason for these exploited browser policies.
It displays ads to users and sets up this policy on the user’s computer so that it cannot be blocked by the user and continues to display the annoying ads.
Remove “Managed by Your Organization” Browser Policy
The methods provided below are intended to help you remove the misused browser policy for Google Chrome, Mozilla Firefox, and Microsoft Edge.
As a result of the browser policy being in place, we will also make sure that any potential malware on the computer is completely removed.
We made the instructions below easy to understand so non-tech-savvy users can still remove the browser threat without needing help from tech support or a computer technician.
Step 1: Use the Command Prompt to remove all known group policies
When specific malware is installed on a personal computer, it triggers the “Managed by Your Organization” browser message.
To make sure there isn’t only one policy on the computer, it is advisable to remove all the policies that were set up on the computer by unidentified sources.
In order to accomplish this, we will use Command Prompt to delete all the policies from the machine and browser, ensuring a secure environment.
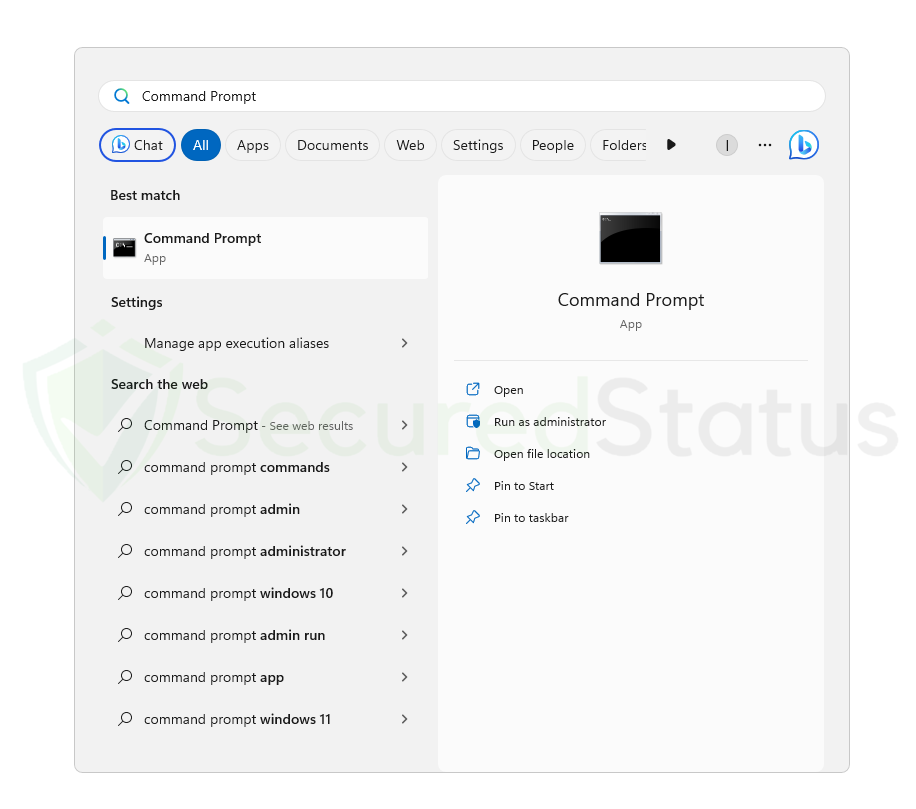
1. To open the command-line interpreter program, press the Windows button and type Command Prompt into the integrated Windows search bar, as seen in the image below.
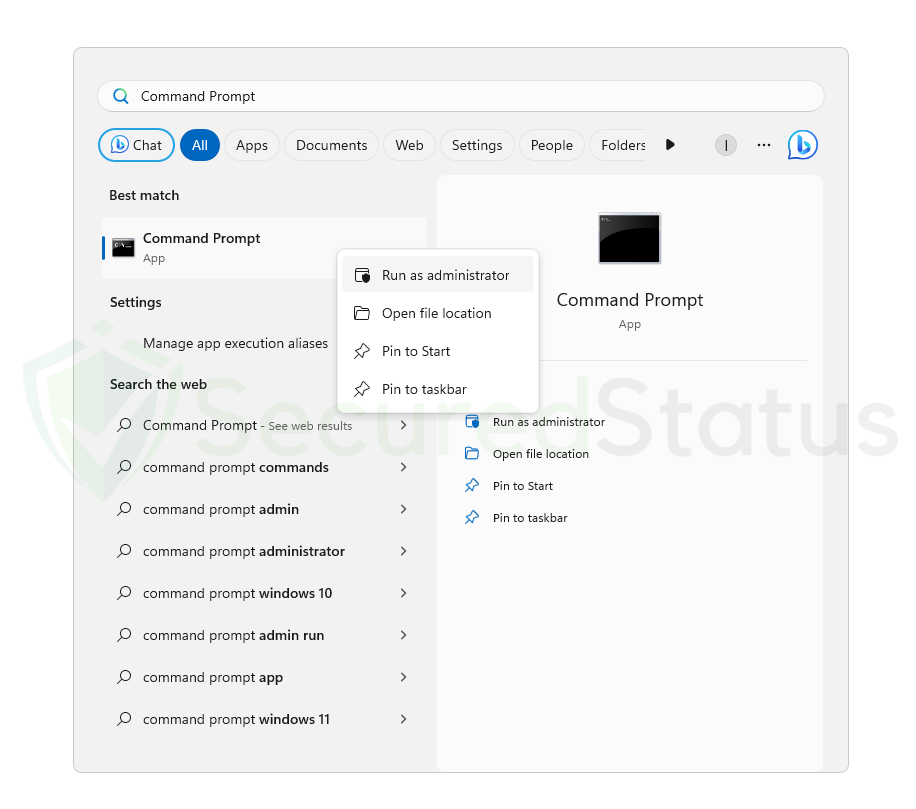
2. Right-click the application and select Run as administrator to grant it complete access to the computer when the Command Prompt appears from the computer search results. To ensure that the command we type will be acknowledged as coming from the highest authority, it is crucial to make sure it is run as an administrator.
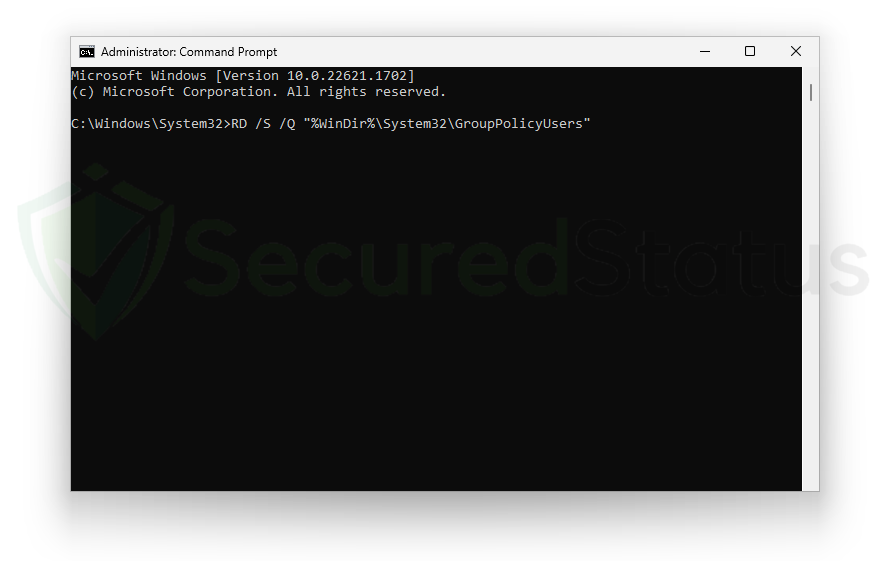
3. Once the Command Prompt has opened on the computer, enter the following command and hit enter:
RD /S /Q "%WinDir%\System32\GroupPolicyUsers"
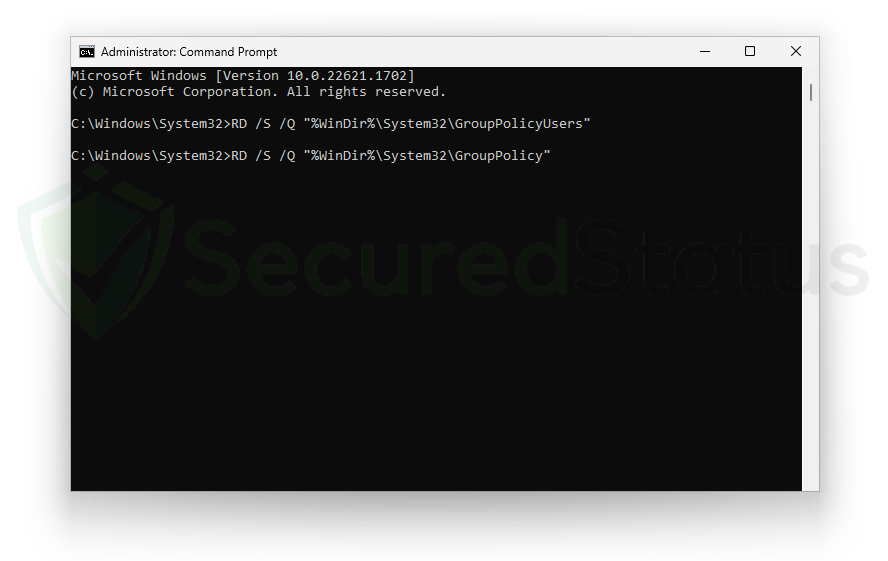
4. After entering the previous command, type in the following command next to reset the group policy and remove the malicious “Managed by Your Organization” policy set by malware.
RD /S /Q "%WinDir%\System32\GroupPolicy"
5. After that, you will need to force-update the Group Policy on the computer. To complete the removal of the malicious browser policies, run the last command shown below.
gpupdate /force
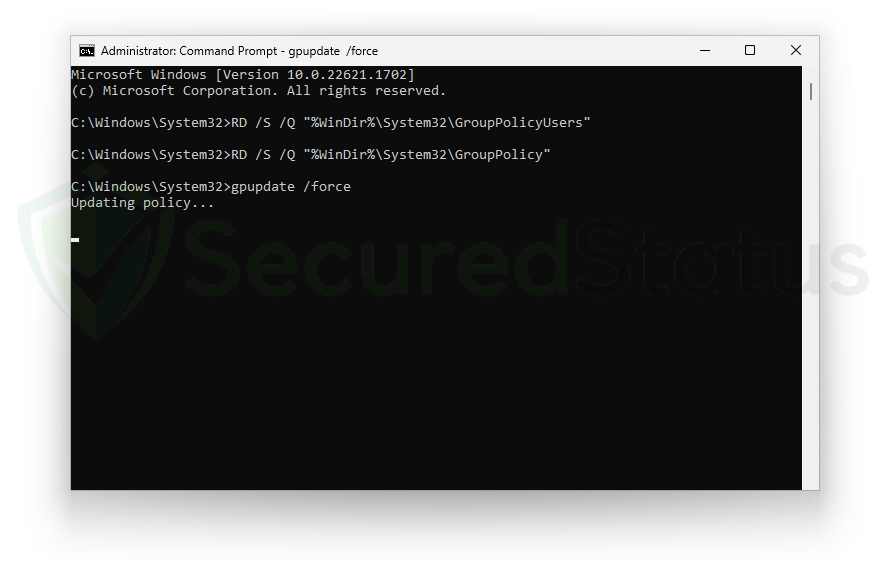
As a result, the “Managed by Your Organization” policy should be removed from the computer now that we’ve performed the commands to ensure its removal with the highest level of authority needed to remove such threats.
Step 2: Remove malware with powerful removal software
After removing the virus-imposed browser settings, we should also delete the malware from the system as well. In addition, having an effective malware scanner will ensure that the changes made by the malware will be undone.
For these malware threats, we recommend running a full system malware scan with Malwarebytes Anti-Malware. This program is widely known and recognized by security experts when it comes to removing viruses from the system.
Remove “Managed by Your Organization” policy with Malwarebytes Anti-Malware
We have also been using this software on our systems ever since, and it has always been successful in detecting viruses. It has blocked the most common browser threats as shown from our tests with the software, and we assure you that it can remove the malicious policy that cybercriminals impose on the browser.
 Not to mention, it is free to use and does not come at any cost to remove the viruses it finds on your computer.
To use Malwarebytes and remove malicious threats from the computer, follow the steps below:
1. Download Malwarebytes by clicking the button below, as we have made an additional and in-depth tutorial on how to use it. Otherwise, you may go to their official website via Malwarebytes.com (Avoid misspelling as it may lead to scams).
Download Malwarebytes Anti-Malware
2. Visit their download section and start a Free Download to begin installing the software on the computer. 3. Once the Malwarebytes setup file (MBsetup.exe) has finished downloading, open the executable file in File Explorer, then right-click the setup and select run as administrator to give the highest system authority and make sure Malwarebytes is installed correctly.
 4. Make sure to carefully follow the installation setup wizard’s instructions and provide the relevant information about your computer. You will be prompted with questions such as Personal or Business Use, Email Address, and others.
 5. From the application’s home screen, go to the scan tab and begin running a system scan. This will scan the whole computer, including memory, startup items, the registry, and the file system. This is done so that not only the malware that imposed the policy but also other trojan viruses hiding in the system can be detected.
 6. Since it can take a while, you should either relax and wait for it to finish or find something else to do. The length of the scan depends on the size of the files you have and the hardware capabilities of your computer. Here are some ways to make scanning faster.
7. Once the scan is finished, Malwarebytes will show the malicious viruses and threats it found on your PC. The malware that caused the policy to be added will also show up on the detection results, and it may also be in a different name or threat name such as Generic.Trojan.Injector.DDS, and many more. 8. Select all the detected files from the report and click the quarantine button to remove the malicious items from the computer into the protected safe quarantine zone of the anti-malware program so that they would not affect and do malicious actions to the PC again.
 9. After placing the virus files in the program’s quarantine, it may prompt you to restart the computer to finalize the full system scan procedure. Please do restart your computer if prompted, as it is essential. After the restart, Malwarebytes will open and display a message that the scan was complete.
Note: Don’t forget to delete the quarantined files afterwards.
Simply quarantining the malware files is not enough to make sure it is completely removed. This is actually a very common misconception: once you click the quarantine button, it is all good and gone.
But actually, while its effects and harmful activities are halted, the malware is still in the system, only placed in the anti-malware program’s quarantine folders. So to fully remove it, go to Detection History from the home screen, select all Quarantined items, and click Delete.

You have successfully removed the malware from the computer. Rest assured they would not resurface again since Malwarebytes offers a premium trial for 14 days, so you could take advantage of it for free and prevent malware from infecting your system.
While the detection and removal of malware is free for Malwarebytes, the premium versions include a real-time protection that ensures your computer is safe all the time. Although we encourage you to use the premium trial, you are free to purchase the full version if you find it useful.
The program is an anti-malware that removes harmful threats like trojan horses, worms, stealers, miner, keyloggers, and many other forms of malware and computer viruses.
We suggest Malwarebytes if you are looking for a removal tool and as a second opinion scanner, but if you want full-fledged antivirus software, we believe that the built-in Windows Defender or if you want something with a more sophisticated system and better protection: Kaspersky Free.
If you choose to uninstall Malwarebytes, you may suddenly see that Windows Defender Real Time Protection is turned off. This is a common issue that users may face when uninstalling the software. To fix this issue, you may refer to this article.
Alternative: Kaspersky Free Antivirus
Running an additional scan with a different program’s threat database will reassure you of hidden trojan viruses and rootkits that were not removed from the prior scan with Malwarebytes. Kaspersky is a widely known antivirus software that has been on the market for as long as the field of cybersecurity has existed. It is acclaimed by professionals in the field and is one of the most effective antivirus programs available. With its advanced internet security protection, it can also remove the malware threat.
 Based on our experience removing malware, when two different programs are used to scan, various threats are identified by one software but not by the other. Given that their threat databases differ from each other, it might be able to capture harmful viruses, rootkits, and trojans that Malwarebytes has missed.
Please be aware that if you decide to use Kaspersky, you should first uninstall Malwarebytes because having both security programs installed will cause a conflict. If you choose to do so, please remove Malwarebytes first, as it is essential to do so before we get started.
1. Click the button below to start downloading Kaspersky Antivirus from your computer. On the following page, we have provided clear details on how to install it on the computer. On the other hand, you may go to their official website by searching for the software on your web browser or typing Kaspersky.com (Beware of misspellings since cyber criminals typically use these as exploits to redirect users to malicious webpages).
2. Go to the download page for the Kaspersky Free Antivirus. Before clicking download, you will be prompted to choose your continent and where your country is located. This is very important, and you should not choose a different country because you will be met with a “Not supported in your region” message during installation. 3. Once you click download, a setup file (startup.exe) will be downloaded on the computer. After it has finished downloading, open its file location, right-click the executable file, then select Run as administrator. This will ensure that Kaspersky’s installation will be smooth and will not result in certain errors.
 4. The Kaspersky installation wizard will launch, and you can then proceed to install Kaspersky Free by following the setup instructions. If a UAC prompt appears, simply accept it to proceed with the installation.
 5. Please be patient while Kaspersky is being installed on your computer. The speed and length of the installation process will depend on your computer’s specifications. Kaspersky also mentioned that sluggishness or dark displays during the installation of their program are normal and should not be worried about.
6. In order to use the antivirus program, you must first create an account on the sign-in page that appears after the antivirus application has been successfully installed on the computer. If you’re looking for the sign-up button, simply enter your email exactly as it appears; if you don’t already have an account, one will be created for you. 7. Kaspersky will ask you to decide which plan to use. It will be either the Standard version or Kaspersky Plus. In this case, the standard version is all you need for now. If you want to try the premium version of Kaspersky, you may opt for Kaspersky Plus to try the features for free. You do not have to add a payment method to get started, and after the trial ends, you will be downgraded to the Standard version unless you pay for it.
 8. You will be asked if you want to install additional applications, namely Kaspersky Password Manager and a VPN. Feel free to opt for a program you might want to use; otherwise, install both, or choose not to if you do not need them.
 9. Kaspersky will ask you if you want to scan for viruses in the background. Simply choose not to do so because we will be doing a full system scan later; on the other hand, doing a scan now will only initiate a quick scan. However, if you want to be safe, you can run the background scan now and proceed with a full system scan after.
 10. Finish the installation, and once the antivirus application has opened, go to the security tab and click the choose a scan button. You will be presented with a number of different scans; go for the full system scan to ensure full computer security. Always remember to update the database because this will ensure that Kaspersky can detect newly discovered threats and exploits.
 11. A full system scan will take a long time to finish since it will look into all the files on the computer, including the registry, memory, startup applications, and many more. The scanning time will depend on how many files there are on the computer and how big the files are. Additionally, the computer’s hardware and specs will also play into how long the scan will take.
12. After the full system scan is finished, it will detect the malware hiding in the computer, showing its location along with a detection name (Trojan.Win32.Generic, Exploit.Win32.Generic, etc.) given to it. Go ahead and proceed to disinfect and restart the computer. 13. The Advanced Disinfection process will then start, and depending on the amount of RAM the computer has, it could take some time. It will then request a computer restart to complete the operation.
 Your computer will now have finished the entire system scan after restarting. By doing this, you can be sure that the “Managed by Your Organization” policy that the malware has imposed has been totally wiped from your computer.
Step 3: Uninstall unwanted programs from the computer
The “Managed by Your Organization” policy may also be caused by malware programs; if this is the case, you should locate and uninstall any apps you no longer use because they may be the root of the malicious policy.
How will I know what to uninstall?
Giving the exact name of the malicious program may be complicated, but there are ways to make it easier to detect it. One of which is to simply remove all unknown programs you do not recognize or think you do not install. You may have applications that you don’t even know the use for; that is a sign that they can be malware.
Unless it is a system process, which you can clearly see by checking the developer of the application, some trojan viruses also use recognized and legitimate names to obfuscate their programs. If the publisher name or source of the program is unknown to you, it is best to uninstall it.
Another thing to do is to look at the version number; the majority of adware and dangerous programs will have versions 1.0 because they don’t need to be updated and are merely running as background applications.
To remove malicious programs from your computer, we have provided two ways to do so: one is through normal uninstallation, and if that does not work, we also provide an advanced uninstall method to make sure it will be removed without issues.
Remove Software via Control Panel
The most common way to remove adware from your computer is to uninstall the program through the Control Panel. You may view all of your installed apps as well as the developer’s name in the list of applications.
1. From the Windows search bar at the bottom of your screen, search for Control Panel and click the result that matches the same application.

2. You will see different options, such as System and Security, as well as User Accounts. But what you want to click is the Uninstall a program under the Programs section. Depending on your Windows version, hovering over the uninstall section will be relatively the same.
 3. Now that you are on the Programs and Features page, it will show you all the installed programs. There will be filters you may want to use, such as viewing them in lists with details such as the publisher, version number, and when they were installed.
 4. Right-click the suspected virus program and click Uninstall to get rid of it (We will be using Adaware as an example). It will then proceed to remove the application, or you will be presented with an uninstaller that will guide you to remove it; either way, it will be removed.
 There is a chance that the program may not be uninstalled successfully, and when that happens, it is important to use the power of an uninstaller program such as Revo Uninstaller.
It is widely known to be enough to remove malicious programs that are evading uninstallation. If you encounter such an issue when proceeding to uninstall the app, you may utilize the uninstaller to do the job for you.
Remove Malicious Program via Revo Uninstaller
For computer users who are not sure of what to do. You may resort to using Revo Uninstaller since it is much more effective and easy to use. Revo Uninstaller is a very useful tool for Windows users.
This uninstaller not only removes programs from the computer but also deletes their changes from the Windows Registry, Host File, etc. Following the steps below will guide you on how to install and use Revo Uninstaller to get rid of the source of the “Managed by Your Organization” policy.
1. Click the button below to proceed with installing Revo Uninstaller on your computer since we have made an in-depth guide on how to use it on the following page. On the other hand, you can also head over to Revouninstaller.com and download it from there.
2. After the setup file (revosetup.exe) has finished downloading, run the installation wizard, read the license agreement, and click agree to proceed to the next step of the installation. Follow the procedure and wait until the installation of the software is complete.
 3. Once the software has launched, find the unwanted application that needs to be removed and double-click the program to uninstall it.

4. Click on the Continue button and follow the procedure to start uninstalling the program. It is also advised to make sure that a System Restore Point is made before the uninstallation, just in case.

5. You will be prompted to choose a scanning mode. From the three options, click the Advanced mode, then select Scan. 6. A window will pop up and show all of the leftovers and changes made by the program that was uninstalled. Click the Select All button and hit Delete to remove the leftovers found in the Windows Registry.

Once the window closes, you have successfully removed the malware threat from your system. And we believe with absolute certainty that once the virus has been removed, the “Managed by Your Organization” browser policy will be undone as well.
Step 4: Reset the browser to default settings
In order to ease your mind that the policy is gone, you can try and reset the browser to its default configuration to make sure that any remnants within the browser are removed after clearing every speck of malware, trojan, and virus from the computer.
Resetting the browser includes complete reversal and wiping out history, homepage settings, default search engines, and browser permissions. In addition to that, the browser reset does not include the favorites tabs, bookmarks, or saved passwords in some cases.
To reset your browser to its default settings, please follow the steps below for the browser you are using.

Google Chrome

1. Open the Google Chrome browser and click the three dots in the upper-right corner of your screen to access the drop-down menu.
2. From the menu presented, select the Settings button, then click the Advanced menu on the left side of the screen from the settings.
3. On the drop-down menu presented on the screen, select Reset and Clean up.
4. Click on the Restore settings to their original defaults.
5. Then a small confirmation window will appear; click the Reset Settings.

Mozilla Firefox

1. Launch the Mozilla Firefox browser, then open the menu by clicking on the three horizontal lines located in the upper right corner.
2. Navigate down and click Help, then select More Troubleshooting Information from the options given.
3. Select the Refresh Firefox button. Then click Refresh Firefox on the confirmation window that appears.
![]()
Microsoft Edge

1. Run Microsoft Edge on the computer and click the three-dot icon in the upper-right corner.
2. Click on the Settings button from the drop-down menu.
3. Find and click the Reset Settings from the left sidebar. Then click on the option Restore settings to their default values.
4. A warning window will appear that you are about to reset the browser. Click Reset, and the browser should return to its default settings.
The configurations added by adware and browser hijackers have all been removed, and your browser has now been entirely reset to the settings it had when you initially installed it.
For a better and safer web browsing experience, we’ve provided a few security measures and advice below that will safeguard your browser and computer from harmful threats like worms, malware, trojans, keyloggers, stealers, and other kinds of computer viruses that will harm user data.
Protective measures for better overall security
Cybercriminals are always stepping up their game to make sure they infect users and extract data and money from them.
We encourage you to take the actions listed below to ensure complete security before leaving this page because we strongly promote web security and having a secure online presence.
Safeguard your privacy and data by using a VPN application
VPNs, also known as virtual private networks, guarantee your safety and complete anonymity while you browse the internet.
This ensures that your data won’t be leaked because the program hides it. Be aware that visiting infected websites may cause your IP address and location to be disclosed; however, if you use a VPN, this will prevent your true IP address from being revealed to malware actors.
Mullvad VPN

Since user privacy is the main focus of a virtual private network program, Mullvad VPN excels at putting users’ privacy first. You do not need to enter your email address while registering to download their application because they maintain anonymous accounts.
If you wanted to hide or didn’t want your credit card information to be disclosed, they also accept bitcoin payments. According to their website, they support a free internet that is devoid of surveillance and censorship.
They have also been announcing new server locations in order to guarantee users a fast connection anytime they want to connect to various areas throughout the world.
AirVPN

AirVPN seeks to provide customers with access to the real internet, in contrast to Mullvad, which promises to offer users a free internet. Along with masking your IP, they also don’t monitor or log any user data, which is good.
You can use it for a long time without worrying about being disconnected because they don’t impose a traffic or time limit when connecting to their sites. In addition, there are infinite, cost-free server changes with physically fast servers in many different nations.
Additionally, when registering for their program, you are not required to enter your email address. They also offer strong encryption and Perfect Forward Secrecy to ensure that it is difficult to determine the user’s connection.
Utilize a firewall to prevent cyber attacks
A security firewall is required for every internet connection that is made. It is an essential tool that enhances security and stops online attacks.
Through a security mechanism, it controls incoming and outgoing network connections on your system and network and filters the undesirable ones. Consider it a further barrier against malicious assaults and zero-day exploits.
Comodo Personal Firewall

Comodo Firewall is a well-known software program for securing your network and computer. It is a sophisticated tool with a wide range of features.
It is simple to use and doesn’t require complicated configuration to set up. It also functions by being aware of your computer usage habits to avoid interfering with your work.
It claims to offer the highest levels of protection provided by Comodo Firewall against both inbound and outbound threats.
Additionally, it secures the ports on your computer from hackers and prevents rogue software from sending your sensitive data over the internet.
ZoneAlarm Free Firewall

You can also opt for ZoneAlarm Free Firewall as your first line of defense between your device and the internet. The program safeguards your network and blocks any dangers, and you can use the free version of it without paying anything.
It provides a robust two-way protection solution that guards against spyware from disclosing your data online while also hiding your PC from nefarious hackers.
With its cutting-edge anti-bot protection, it also protects your computer from automated cyberattacks in real time.
Additionally, it protects your computer against spam and dubious websites. Lastly, it provides real-time defense against automated cyberattacks with its cutting-edge anti-bot security.
This also protects your computer against spam and shady websites that can potentially install malware on the computer.
Bottom Line
While this may appear to be a typical advice, we recommend users to not visit illegal streaming or torrenting websites or, more importantly, download anything from them because doing so may result in the installation of malware and viruses.
Due to the fact that these websites are illegal, they are unable to make a profit from legitimate advertising. As a result, they host questionable advertisements from unidentified marketers that want to publicize their contents, which are most likely dangerous codes being propagated by cybercriminals.
Always make sure that your device is protected against sneaky exploits and stealthy cyberattacks. While taking precautions and avoiding dubious websites are crucial, having a solid line of defense is essential to ensuring the security of your network and data.
If you have other virus-related computer problems, please visit our website to find a malware removal solution for your issue or get in touch with us, and SecuredStatus would be happy to assist you once again.