Many MSI computer users are currently facing a troubling issue. Their computer’s drives have been overload with unfamiliar executable files (.exe), characterized by peculiar names. The number of these files is growing steadily, causing a host of problems for users.
The rapid influx of these unfamiliar application files is wreaking havoc on system performance. Users have reported a noticeable decline in their computer’s speed and responsiveness.

Furthermore, the growing number of these files is consuming valuable storage space, exacerbating the problem.
Extensive analysis has revealed that the source of this problem lies in the presence of numerous scattered .exe files. These files have made their way into the C: drive and Windows\System32 folder, compounding the storage space issue.
Each of these .exe files weighs approximately 1,074KB, further confirming the presence of malicious activity. It is imperative to address this situation promptly to safeguard system integrity.
Exe Virus Files Removal Instructions
This comprehensive guide combines insights from various sources to help you combat this malicious attack. By following these instructions, you will remove the thousands executable files from your MSI computer.
Step 1: Stop the Malware with Rkill Software
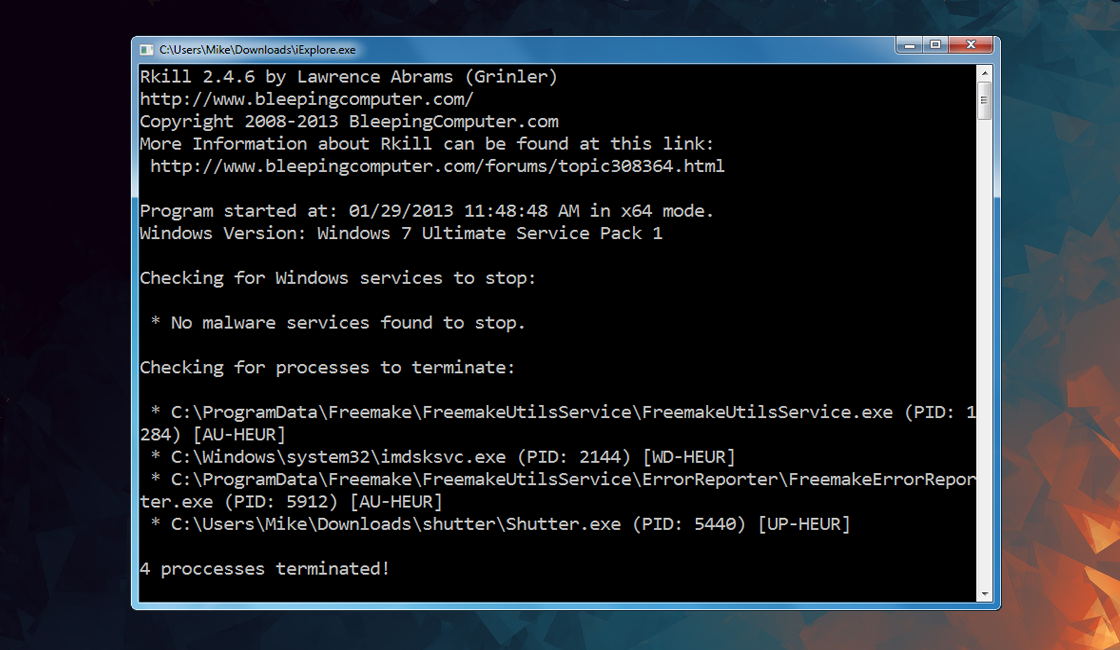
To stop the malware from causing further harm, run Rkill, a powerful tool designed to terminate malicious processes.

This action will immediately halt the virus’s activities and provide a foundation for the subsequent steps.
- Open a web browser and navigate to the official Rkill download page or click here.
- On the Rkill download page, look for the latest version of Rkill available for download. Click on the download link associated with that version to initiate the download process.
- After it has finished downloading, double-click on the Rkill file to run it. Depending on your system settings, you may need to confirm that you want to run the program or provide administrator privileges.
- Rkill will start scanning your computer for malicious processes. It will attempt to terminate any identified malicious processes that are currently running.
- During the scan, you may see a black command prompt window appearing and disappearing. This is normal behavior, as Rkill terminates processes and provides a report on the processes it encountered.
- After completing its scan, Rkill will generate a log file detailing the processes it terminated. You can review this log file for further information.
Step 2: Identifying and Removing Specific Malware Components
It has been determined that the OmApSvcBroker.exe file, part of the MSI NBFoundation Service component, is infected and the main cause of the growing thousands of .exe files.
- Launch the File Explorer application on your computer.
- In the File Explorer window, navigate to the Program Files (x86) directory. This directory is typically located on your system drive (usually C:).
- Within the Program Files (x86) directory, locate and open the MSI folder.
- Inside the MSI folder, locate and open the MSI NBFoundation Service folder.
- Look for the file named OmApSvcBroker.exe.
- Right-click on the OmApSvcBroker.exe file and select Delete from the context menu.
Step 3: Mass Delete the Thousands of Exe Virus Files
Users have reported that deleting a large number of .exe files can be challenging using Windows File Explorer. To make the process easier and more efficient, it is recommended to use dedicated software designed for handling such tasks.
- Download and install Directory Opus (click here).
- Launch Directory Opus and navigate to the target folder.
- Go to Preferences in Directory Opus.
- Navigate to “Settings > Preferences > File Operation > Deleting Files.”
- Disable the “Delete to Recycle Bin” option.
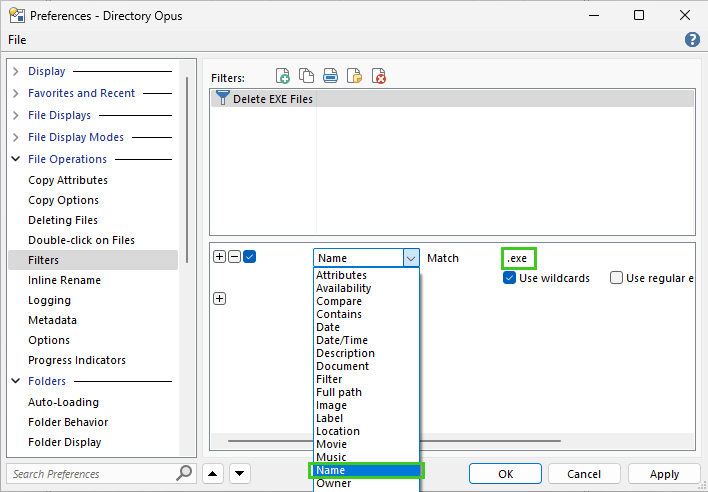
- Then now go to Filters in Directory Opus. (Also under File Operations)
- In the Filter Editor window, click on the New Filter button or use the keyboard shortcut Ctrl + N to create a new filter.
- Give the filter a descriptive name, such as “Delete EXE Files”.
- Select the Name attribute from the dropdown menu.
- Create and set the condition to “Match” and enter “*.exe” in the text field. This will filter files with the .exe extension. (Due to the technical nature of the explanation, a visual representation is provided below for clarity.)

- Save the Filter: Click on the Save button to save the filter configuration.
- Apply the filter to ensure only program files with the .exe extension are affected by deletion.
Step 4: Enhancing System Security
To enhance the security of your system, it is important to enable Core Isolation or Local Security Authority (LSA) protection if they are currently disabled. Follow these steps to enable these security features:
1. Right-click on the Windows Start button and select “Windows PowerShell (Admin)” from the context menu. This will launch PowerShell with elevated privileges.
2. In the PowerShell window, type or copy and paste the following command and press Enter:
reg add HKLM\SYSTEM\CurrentControlSet\Control\Lsa /v RunAsPPL /t REG_DWORD /d 2 /f
This command adds a registry entry to enable Core Isolation or LSA protection.
3. In the same PowerShell window, enter the following command and press Enter:
reg add HKLM\SYSTEM\CurrentControlSet\Control\Lsa /v RunAsPPLBoot /t REG_DWORD /d 2 /f
This command adds another registry entry to enable the protection during system boot.
4. Restart your computer: To apply the changes effectively, restart your computer. You can do this by clicking on the Start button, selecting the power icon, and choosing Restart from the options.
Conclusion
By following this comprehensive tutorial, you have successfully removed the thousands of exe virus files from your computer.
Remember to maintain strong security measures and stay vigilant against potential threats.
Safeguarding your system against malware is an ongoing process, and with the knowledge gained from this guide, you can enjoy a secure and optimized computing experience.
