What is Malware and Viruses
Malware, often known as malicious software, is a general word for programs or applications that are intended to harm or infect every electronic device such as computers and mobile phones.
Your device could be held hostage, have sensitive and private information stolen from it, or have malicious software installed that watches your internet activity.
Cybercriminals utilize malware, which is intended to harm a computer, server, or computer network, to steal data and take advantage of the infected system to make money
Users who have malware on their devices are most likely to face the following problems.
- Sudden issues with internet connection and applications
- Freezing or slowdowns in computer performance
- Difficulties opening documents or accessing files.
- Pop-ups appear online or when browsing.
- Overheat and high CPU usage.
How does a device become infected with malware & viruses?
There are various ways to get adware installed on a particular device, including through the download and installation of other programs. Here are a few other ways it can be suddenly installed:
Pop-up advertisements
Cybercriminals utilize pop-up advertising to install adware on the computer that may have clicked on the malicious ads. Adware developers also use pop-up advertisements to lure in users, but they can also be used by hackers to install their malicious programs.
Email Phishing
Hackers exploit email to trick users by pretending to be legitimate companies. When users click the attachment link in the phony emails they receive about fake work documents and files, malware is downloaded, leading to the installation of adware and other dangerous programs.
Drive-by Download
Drive-by downloads, which happen most typically on websites that appear fraudulent, are a common way for malware to be immediately downloaded onto a computer even without having to click a certain download button.

This commonly happens on compromised websites or websites that are under the control of cybercriminals.
Social Media Platforms
In this day and age, hackers use social media to spread malware. By creating false profiles, they distribute links that lead to downloading threats like adware. The most common places for individuals to find this kind of hack are on well-known social media platforms like Facebook, Pinterest, and Instagram.
Outdated Software
Due to the lack of updates and patches for advanced malware, criminals have a significant edge over users who run older or obsolete software, making their systems more susceptible to malware and cyberattacks. These are also known as zero-day exploits because they can be used to sneakily install unwanted software.
For other operating systems, select your operating system from the options below to automatically scroll down to the platform’s step-by-step tutorial.
 Remove Malware From Windows
The methods provided below will assist you in removing potential malware, trojans, rootkits, and viruses from the computer.
Removing malware from the system should be thorough and carefully executed; therefore, please follow every step provided.
We made the instructions below easy to understand so non-tech-savvy users can still remove potential malware without needing help from tech support or a computer technician.
Step 1: Remove the Malware threat from the browser
The web browser is used by hundreds and millions of people worldwide and it is no exception that it has played a wide role on the internet.
Internet browsing is still one of the most popular ways for people to engage and get information, even though social networking applications may appear to have captured a large portion of web users.
While that is the case, the internet is also home to most of the malware that has infected users over the years. Browsing on suspicious and illegal websites is what leads to getting malware installed on the computer.
For a more in-depth procedure on how to remove malware from the browser, you may follow this article.
Remove malicious pop-up permissions
You may have had a malicious pop-up advertisement configured on your browser’s permission if you notice pop-ups, unwelcome messages that your browser is infected, and other unusual pop-ups that seem out of the ordinary.
As a result, whenever you use your computer, you will constantly be exposed to advertisements. As can be seen from the image below, they use the browser’s notification to display the ads in the bottom-right corner of the screen.
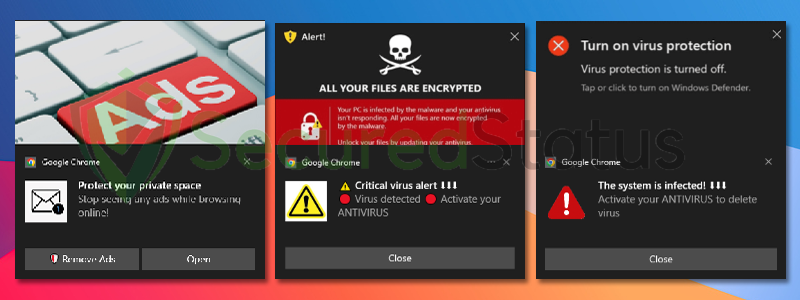
These pop-ups are considered to be unsafe in comparison to the ones promoted by legitimate advertisement platforms since the ones being shown in this case are harmful pop-ups that can cause damage to the user’s computer and data.
They would show a webpage stating “Click allow to watch the video” or “Click allow if you are not a robot,” to trick users into allowing them to show notifications.
Although these pop-ups can just appear to be annoying at first glance, they can lead to the installation of malware on the computer.
This is often known as Malvertising, which is when advertisements are made to promote harmful malware on the computer.
When such pop-ups are clicked, you will be redirected to an unwanted website that can either be a betting website, or a shopping platform, and while there are many more, visiting a drive-by download website that will initiate a malware installation is not uncommon.
The way this works is that cybercriminals do not own the pop-ups they are showing but instead, they act as a platform or a middleman between the malicious content advertisers to the users.
They get users to allow permission for their maliciously utilized website and in return, they will be paid by the advertisers to display the contents they want directly to the user.
They may show warnings such as Critical Virus Alert and that your Antivirus Subscription has expired. By using these alerts, users will be triggered into a state of panic thinking that their device is infected, and will be tricked into clicking the ads.
| Recently Found Pop-up Ad Domains |
|---|
Users should use caution when visiting the internet to avoid dangerous threats since new malicious pop-up domains are popping up every day.
These spam advertisements have no limit as to how many times they will appear on the computer, once you click close on one ad, it will eventually open up a new one as fast as you close the other. There is no end to these pop-ups unless you remove them from the browser permission.
How do I remove these pop-ups?
All you have to do is revoke the permission you granted to the aforementioned website to use the browser notifications to show ads.

Remove Pop-ups from Google Chrome
1. Open the Google Chrome application, then proceed by going to the upper-right corner of the browser window and clicking the three-dot menu button. Once the drop-down opens, select Settings.

2. After the Settings page of the browser has opened, go to the left-side panel and click Privacy and Security from the options available.

3. Once you are on the privacy page, scroll down to the section titled Privacy and Security, then click Site Settings.

4. Scroll down and find the Permissions section of the page. Click on Notifications to see all websites that have notification access in the browser

5. It will then provide a list of sites that are permitted to display notifications under Allowed to send notifications. To remove the site, click the three dots next to the link and then select remove.
 After doing the necessary steps, the pop-ups will now stop showing pop-ups from the Google Chrome browser.

Remove Pop-ups from Mozilla Firefox
1. Launch the Mozilla Firefox browser, then open the menu by clicking on the three horizontal lines located in the upper-right corner. When the drop-down menu appears, select Settings.

2. After the Settings page has opened in the new tab, hover over Privacy and Security via the left-side panel.

3. Scroll down until you find the Permission section, and click Settings beside Notifications.

4. A window will open alongside websites with permission to show notifications. Remove the pop-ups by selecting the suspicious URL and clicking the Remove Website button.

5. There will be an option called Block new requests asking to allow notifications. If you do not wish to allow sites to further ask for notifications, then you may tick the box.
 After making the modifications, click Save Changes. By now, the necessary changes would have been made, and the pop-ups would no longer appear on the browser.

Remove Pop-ups from Microsoft Edge
1. Start by launching Microsoft Edge on the computer and clicking the three-dot icon in the upper-right corner. After the drop-down menu has opened, click Settings.
 2. Once the Microsoft Edge settings page has opened in a new tab, select Cookies and Site permissions from the left sidebar.
 3. Scroll down on the Cookies and Data Settings page and select Notifications below the site permission section, as shown.

4. Locate suspicious domains in the Allow area of the Notifications page, then select the three horizontal dots and click Remove.
 After making the necessary changes to the notification permission, pop-ups shouldn’t appear on the browser any longer.
Remove suspicious browser extensions
Browser extensions are additions to the browser that make it easier for the user to use the internet, such as by providing coupons while making online purchases or by editing and paraphrasing their grammar.
however, there are what you may refer to as dangerous browser extensions that are made to do the exact opposite: they display irritating advertisements, steal user information, and engage in other harmful actions that will hurt users.
Cybercriminals also tend to hide their malicious extensions by using the names of legitimate browser plugins so that users will not know what extension is causing the malicious behaviors on the computer.
They may use the names Google Translate and Google Docs for their malicious browser-hijacking extensions so that users would not know which extensions to remove.
These extensions have different adverse effects on the browser and the computer and are known to cause more harm than good. Many of these extensions cover a wide variety of behaviors. The most prevalent types of malicious extensions are shown below:
Change the default homepage of the browser
When a web browser employs a hijacker, the malware’s search engine becomes the default one. This is done so that the search engine they provide will be utilized to search the web.
By doing this, they can collect users’ search information while also forcing them to see forced search results that may contain inaccurate information or unwanted advertisements.
Track keystrokes on the keyboard
An extension with monitoring permission may be able to track the keystrokes that the user types in the browser, much like keylogger malware.
This is extremely risky because if someone enters their email address and password for a specific account, the malicious extension that is logging and collecting keystroke data would send that information to hackers.
When a malicious extension is present when entering sensitive data, such as bank accounts and credit card numbers, it can lead to financial losses and possible data breaches. Therefore, you should check for malware first before entering important data online.
Monitor your online browsing activity
It is an invasion of privacy and may put the user at risk if a third party is watching your online web sessions. When such browser extensions are installed, the browser can read and record your online activities, including the websites you visit and the buttons you click.
Once they have enough information to know the crucial login details, fraudsters can exploit this data to extort money from individuals or enter their accounts.
Cybercriminals may use this data for their purposes, but they may also sell it to companies that run advertisements so that they can use it to determine which ads to show to users.
Clipboard Hijacking
Cybercriminals can access the clipboard, which controls the data you copy and paste, by using the dangerous capability of rogue browser extensions known as “clipboard hijacking“.
In retrospect, it might not seem like a major concern, but in this case, malware operators primarily target cryptocurrency traders and people who own cryptocurrencies and frequently access them on their computers.
They can send the cryptocurrency to themselves instead of the user’s address by hijacking the clipboard, which allows them to replace the recipient’s crypto address’s pasted address with their address.
This is a sophisticated piece of malware that, to avoid detection, will only run when it recognizes that the online user has copied a crypto address and not any other text, into the clipboard.
How to remove malicious browser extensions from Windows PC
Please follow the steps below to remove malicious browser extensions from your web browser and stop the suspicious and harmful behaviors that may endanger the user’s data and privacy.
If you have a dozen or more plugins installed, it could be challenging to figure out which one is malicious, but there are certain ways and approaches to figure it out.
Malware actors frequently exploit the names of utility programs to mask their dangerous plugins; examples include Volume Booster, YouTube Downloader, Text Reader, and similar names.
More hidden browser spyware will impersonate widely used and reliable plugins like Google Drive. Users won’t suspect the extension because of this trojan-like trait unless they investigate thoroughly and see if it genuinely comes from the same developer.
To know more about which extension should be deleted, we have made a guide stating ways how to find the browser culprit.
The browser may be controlled by an organization, making it impossible to remove the browser extension when you try to do so. It indicates that the virus has set up a specific configuration to prevent removal. If that’s the case, please use the steps in this article to fix the problem.
Note: The extension used in this step is not malicious and is simply being used as a demonstration of how to get rid of browser extensions.

Google Chrome
1. Open the browser and click on the three horizontal lines at the upper-right corner of the window screen. Once the drop-down menu opens, hover over Extensions and select Manage Extensions on the submenu. On the other hand, you may also type chrome://extensions on the URL bar to directly access the browser extension page. 2. The extensions page will then open in a new tab, showing all installed plugins on the browser. Find the malicious extension, and deactivate the browser extension by toggling the blue switch below its name and description (We will be using AdBlock as an example). After which, you may now click the remove button to get rid of the extension virus from the Chrome browser.
 3. If the switch is disabled, then you will need to remove it directly from the extensions folder of the browser. To do this, first, you have to select the plugin and look at its ID as shown in the URL bar. (See the image below for an example.)
 4. Open File Explorer and go to the folder where Chrome stores the browser extension. The default location will be at:
C:\Users\YOUR NAME\AppData\Local\Google\Chrome\User Data\Default\Extensions
 5. You will see a list of folders, each with different hashes. Find the folder matching the ID of the malicious extension, then right-click and delete it. Make sure the browser is closed before proceeding to delete the folder.
 The next time you open the Google Chrome browser, you will see that the extension has been removed.

Mozilla Firefox
1. Launch the Firefox browser and open the menu by clicking the three horizontal lines, which can be located in the upper-right corner of the program. Once the drop-down menu opens, click on Add-ons and Themes. On the other hand, you may also type about:addons on the browser URL bar to enter the Add-ons Manager. 2. From the left-side menu, go to the Extensions page and view all of your browser extensions installed on Firefox. Toggle the blue switch near the extension to deactivate the plugin, then click the three horizontal dots beside the toggle and select Remove to get rid of it from the browser (We will be using Adblock Plus as an example).
 3. If the toggle is locked or unable to be removed, then you will have to manually remove the extension from the browser’s extension file directory. Open File Explorer and go to the following directory where Mozilla Firefox keeps its browser extensions; this can be located via:
C:\Users\Your Username\AppData\Roaming\Mozilla\Firefox\Profiles
 4. You will be seeing Mozilla Firefox profiles, and depending on how many browser profiles you have, go to the default ones you have, such as default-release in some cases, and click on the extensions folder inside the profile.
 5. It will be difficult to determine the extensions of the folders you see because they have generated IDs. To make things simple, you should delete every .xpi extension file and make sure the Microsoft Edge browser is closed when doing so.
 When you open the browser, every extension you have will have been removed. After the extension virus has been wiped out, install the extensions that you frequently use again.

Microsoft Edge
1. Open Microsoft Edge and enter the following URL to enter the extensions manager page of the browser: edge://extensions on the other hand, you may click the horizontal three-dot menu and click Extensions from the multiple options shown. Then a small window of extensions will show; click on the Manage extensions to enter the same page. 2. The page will then show all of your installed extensions within the Microsoft Edge browser. Find the malicious extension and disable it by toggling the blue switch (We will be using the AdBlock extension as an example). Then proceed to uninstall it by clicking the remove button right next to Details.
 3. If you were unable to remove the malware plugin, then you will have to head over to the browser’s extension files via File Explorer to remove it manually. To do so, please head over to the extensions tab first, and now click the details next to the remove option.
 4. Open File Explorer and head over to the following directory where all browser plugins within Microsoft Edge are stored:
C:\Users\Your Username\AppData\Local\Microsoft\Edge\User Data\Default\Extensions
 5. Now find the folder with the same extension ID as the malicious plugin. It indicates that the following folder contains the files for the particular virus extension: Right-click it and delete it.
 When you open the browser again, the malicious extension has now been completely removed.
If browser hijackers persist, reset the browser
Resetting the browser includes complete reversal and wiping out history, homepage settings, default search engines, and browser permissions, which may be used by cybercriminals to hijack the browser.
In addition, the browser reset does not include the favorites tabs, bookmarks, or saved passwords in some cases. To reset your browser to its default settings, please follow the steps below for the browser you are using.
Doing so will remove all known malware including browser hijackers which is very persistent and will only be removed with a complete wipe.
What are browser hijackers?
Browser hijackers change your default search engine to a different one to track and collect information about you.
This type of browser malware can record your keystrokes and everything you input on text fields, including personal information, passwords, banking information, and other vital information.
It can alter the new tab page and home page of the web browser. Furthermore, it can expose users to potentially dangerous websites that might harm their devices and eventually result in the installation of malware.
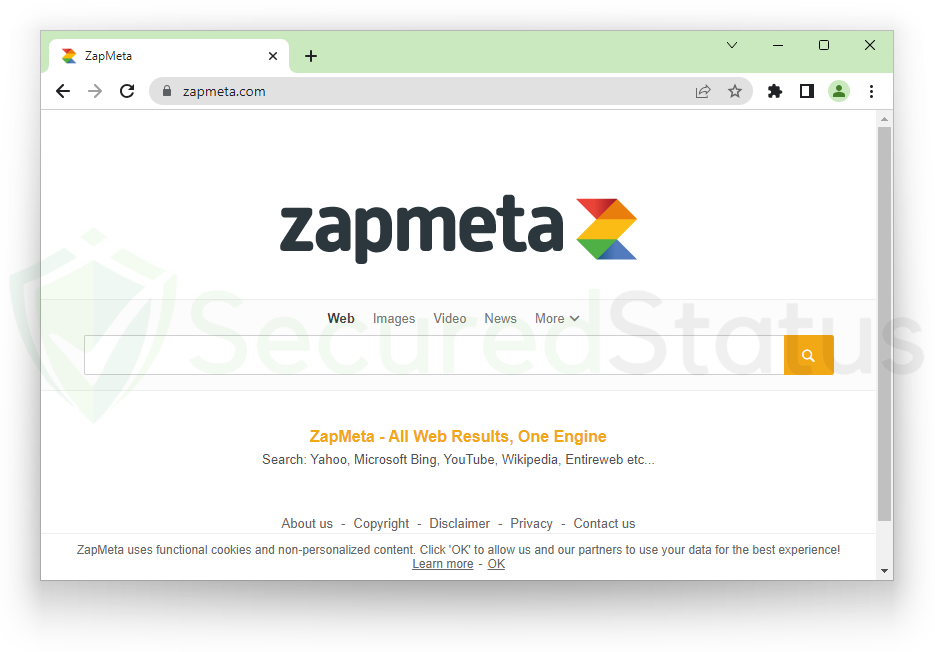
The browser hijacker can also change the search results provided by trustworthy search engines like Google. They will alter the search results to display unwanted websites at the top of the search queries rather than the organic search information that will benefit the users.
In addition to that, browser hijackers can also modify the browser to ensure that the malware can not be removed. It is a very troublesome issue given that it makes it more difficult to get rid of the malware especially if the user is not tech savvy.
Moreover, browser hijackers alter a lot of browser configurations, which slows down the loading of web pages due to the process it does of monitoring the web activity.
| Recently Found Browser Hijacker Threats |
|---|
Examples of browser hijackers
Even though Bing and Yahoo are two trustworthy search engines, hackers are using them since they offer reward points to users that use their search engines.
Cybercriminals employ a variety of techniques to forcefully install them onto a user’s device. Once it’s installed, your search engine will now be changed to either Bing or Yahoo.

Once the search engine is now different, users can now earn reward points for every search they carry out. However, this is not the case, hackers configured it so that every point that the user generates will be automatically directed to the hacker.
In addition to Bing and Yahoo, there may be other legitimate search engines that are being misused. That is why users ought to exercise caution when browsing the internet.
Meanwhile, there are also things called browser hijacker search groups, they are primarily responsible for the creation of malware of this kind.
This type of malware may have many different variants with the same design and is only created by one developer.

The browser hijackers Oltly.com, Shofast, and Searchel are an example of that; they were created by the same developer. Since they were made by the same programmer, it is possible that they were all distributed through the same method.
Hackers participate in these illegal activities, such as altering your search engine or rerouting your browser to a different website, all for financial gain.
Here is how to reset the browser and remove the hijacker threat:

Remove browser hijacker from Google Chrome
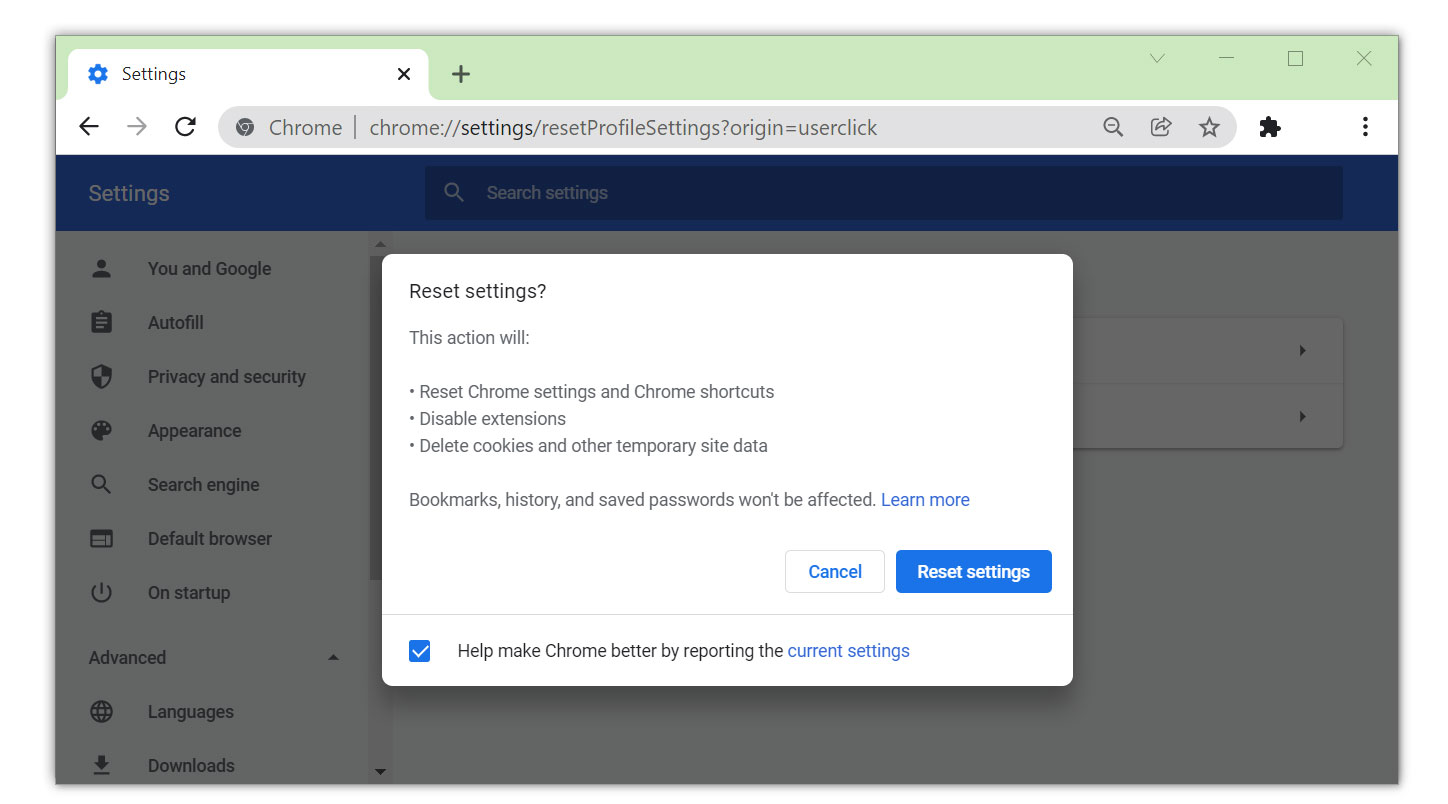
1. Open the Google Chrome browser and click the three dots in the upper-right corner of your screen to access the drop-down menu.
2. From the menu presented, select the Settings button, then click the Advanced menu on the left side of the screen from the settings.
3. On the drop-down menu presented on the screen, select Reset and Clean up.
4. Click on the Restore settings to their original defaults.
5. Then a small confirmation window will appear; click the Reset Settings.

Remove browser hijacker from Mozilla Firefox
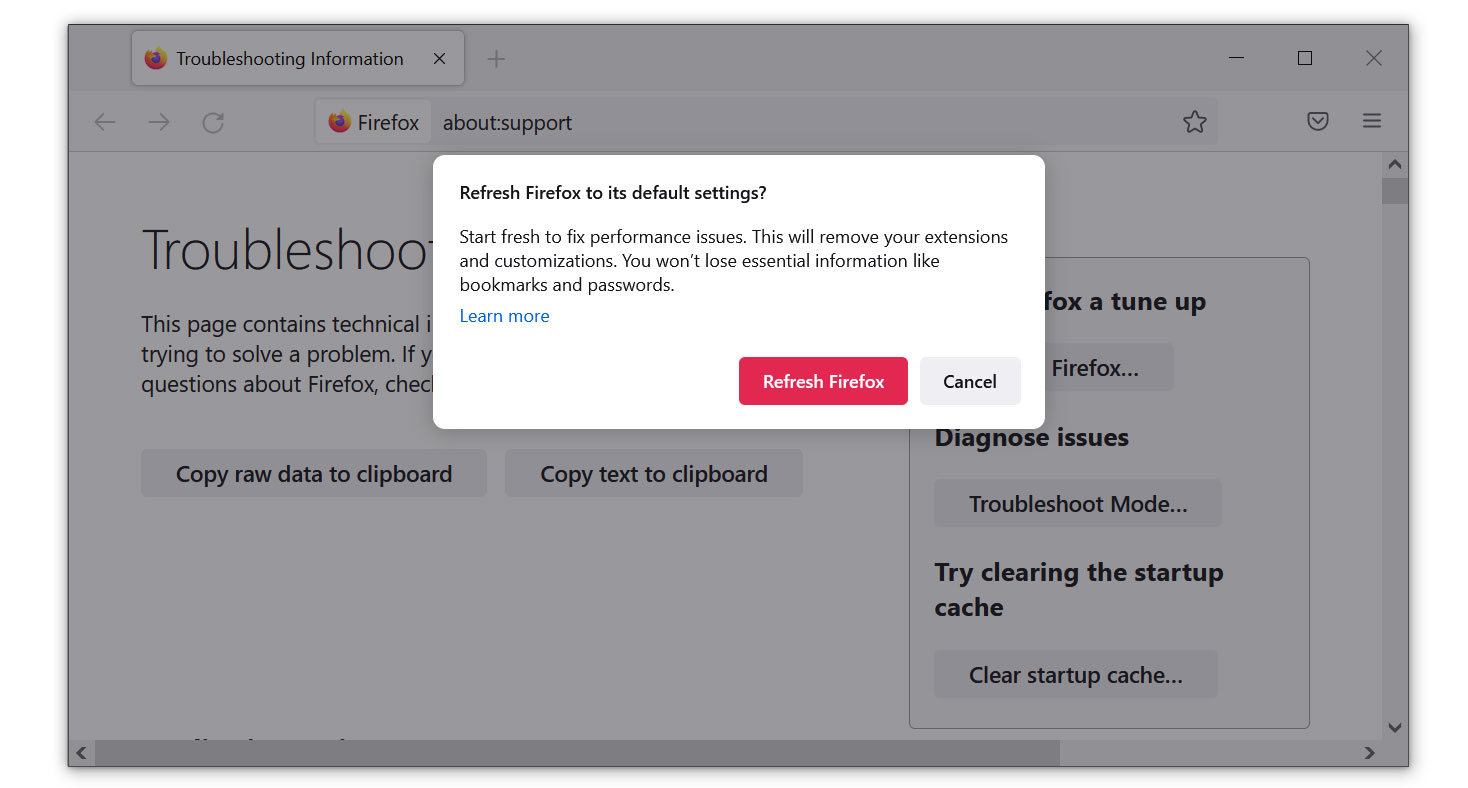
1. Launch the Mozilla Firefox browser, then open the menu by clicking on the three horizontal lines located in the upper-right corner.
2. Navigate down and click Help, then select More Troubleshooting Information from the options given.
3. Select the Refresh Firefox button. Then click Refresh Firefox on the confirmation window that appears.

Remove the browser hijacker from Microsoft Edge
1. Run Microsoft Edge on the computer and click the three-dot icon in the upper-right corner.
2. Click on the Settings button from the drop-down menu.
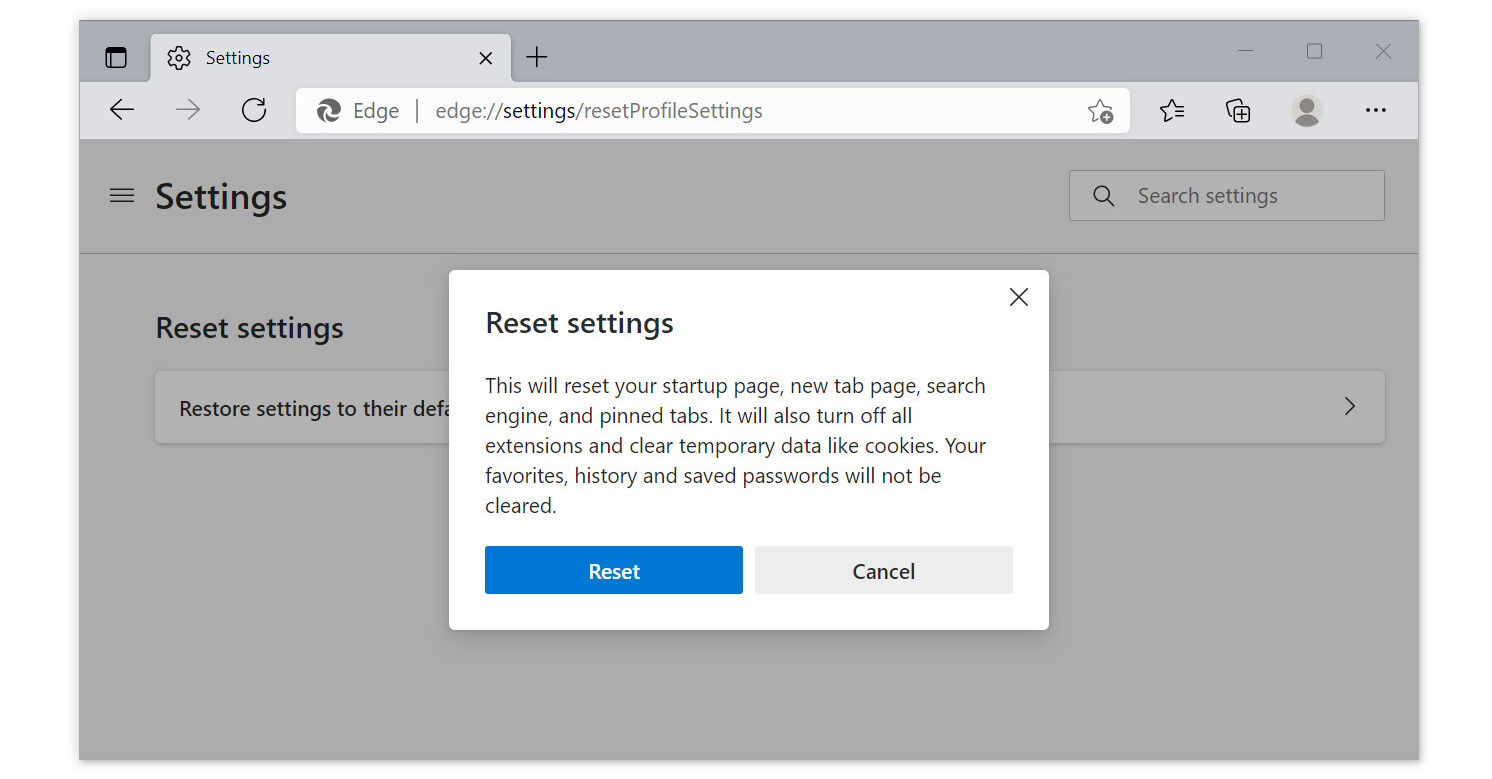
3. Find and click Reset Settings from the left sidebar. Then click on the option Restore settings to their default values.
4. A warning window will appear, telling you that you are about to reset the browser. Click Reset, and the browser should return to its default settings.
The configurations added by the browser hijacker have all been removed, and your browser has now been entirely reset to the settings it had when you initially installed it. You can use your browser with complete security now. Rest assured that the redirections won’t resurface again.
Step 2: Remove the Malware from the computer system
Malware represents a very high risk to the computer and, depending on the payload and type of malware they inject, it may cause great damage to every file present in the system.
Not to mention how the infection affects your financial and personal accounts. It can look for crucial information that can then be provided to cyber criminals.
They can have access to all of your accounts if you have previously entered or logged them in your browser because they can steal the cache and access it from there.
Another case is where it can track your keystrokes while hiding in the background without the user noticing it.
We have created an in-depth guide on how to remove malware, particularly from the operating system, should you wish to do so, you may follow this article. On the other hand, please proceed to the procedure below.
Commonly installed computer malware:
Miner virus is a malicious program that is used to mine digital currency such as Bitcoin, Ethereum, and Monero. It can lead to several problems including overheating and slowing down of your computer.
Since mining from your device is very resource-consuming, the hardware is to their advantage by using it to mine crypto for them.

This type of software can usually be downloaded through software bundling, where it is included alongside a free application.
Miner malware forces the GPU and CPU to operate at their highest capacity due to mining activity, and doing so may result in graphical issues and overheating of the computer.
| Recently Found Miner Malware |
|---|
That is the reason why cybercriminals are persistent in developing crypto-jacking software that can maliciously mine cryptocurrency using the power of their victims’ devices. They can generate even more income by using this method, the more computers infected, the higher the crypto mined.
Ransomware is a harmful malware infection that encrypts the files of the infected user and renders them inaccessible. Threat actors created it to take advantage of flaws in victims’ computers and request ransom money in exchange for the recovery and decryption of the data they encrypt.
Since so many people have essential documents and files on their devices, those infected with ransomware are compelled to pay the ransom requested by cybercriminals in exchange for their data.
Adware, also known as advertisement-supported software is used by cybercriminals to show advertisements to user’s computers.
It will display unwanted content and can also function as spyware, gathering user information that will eventually be sold. Since it displays intrusive advertisements and slows down your device, it may be annoying for users.
When a user browses the internet or uses their computer, adware displays users suspicious and harmful advertisements. Once an individual downloads third-party programs and does not uncheck the installer option for additional programs, adware gets installed.
By displaying unwanted adverts, adware generates revenue for its developers. In addition, the data that was monitored and stolen from the user is often sold to third-party advertising companies.
| Newly Discovered Adware |
|---|
 Urban VPN
Discovered in August 3, 2022 by Millan Nava Urban VPN
Discovered in August 3, 2022 by Millan Nava
|
 Courage Browser
Discovered in July 3, 2022 by Millan Nava Courage Browser
Discovered in July 3, 2022 by Millan Nava
|
- 1
- 2
Remove unwanted programs from the computer
To remove adware, trojans, and other form of malware from your computer, we have provided two ways to do so: one is through normal uninstallation, and if that does not work, we also provide an advanced uninstall method to make sure it will be removed without issues.
How will I know what to uninstall?
Giving the exact name of the malicious program may be complicated, but there are ways to make it easier to detect it. One of which is to simply remove all unknown programs you do not recognize or think you have not installed. You may have applications that you don’t even know the use for; that is a sign that they can be malware.
Unless it is a system process, which you can see by checking the developer of the application, some trojan viruses also use recognized and legitimate names to obfuscate their programs. If the publisher name or source of the program is unknown to you, it is best to uninstall it.
As we have previously mentioned, another thing is to look at the version number; the majority of adware and dangerous programs will have version 1.0 because they don’t need to be updated and are merely running as background applications.
To remove malicious programs from your computer, we have provided two ways to do so: one is through normal uninstallation, and if that does not work, we also provide an advanced uninstall method to make sure it will be removed without issues.
Remove software via Control Panel
The most common way to remove malware from your computer is to uninstall the program through the Control Panel. You may view all of your installed apps as well as the developer’s name in the list of applications.
1. From the Windows search bar at the bottom of your screen, search for Control Panel and click the result that matches the same application.

2. You will see different options, such as System and Security, as well as User Accounts. But what you want to click is the Uninstall a program under the Programs section. Depending on your Windows version, hovering over the uninstall section will be relatively the same.
 3. Now that you are on the Programs and Features page, it will show you all the installed programs. There will be filters you may want to use, such as viewing them in lists with details such as the publisher, version number, and when they were installed.
 4. Right-click suspicious programs you did not install and click Uninstall to get rid of them (We will be using Adaware as an example). It will then proceed to remove the application, or you will be presented with an uninstaller that will guide you to remove it; either way, it will be removed.
 There is a chance that the program may not be uninstalled successfully, and when that happens, it is important to use the power of an uninstaller program such as Revo Uninstaller.
It is widely known to be enough to remove malicious programs that are evading uninstallation. If you encounter such an issue when proceeding to uninstall the app, you may utilize the uninstaller to do the job for you.
Remove unwanted programs via Revo Uninstaller
For computer users who are not sure of what to do. You may resort to using Revo Uninstaller since it is much more effective and easy to use. Revo Uninstaller is a handy tool for Windows users.
This uninstaller not only removes programs from the computer but also deletes their changes from the Windows Registry, Host File, etc. Following the steps below will guide you on how to install and use Revo Uninstaller to get rid of the malicious software.
1. Click the button below to proceed with installing Revo Uninstaller on your computer since we have made an in-depth guide on how to use it on the following page. On the other hand, you can also head over to Revouninstaller.com and download it from there.
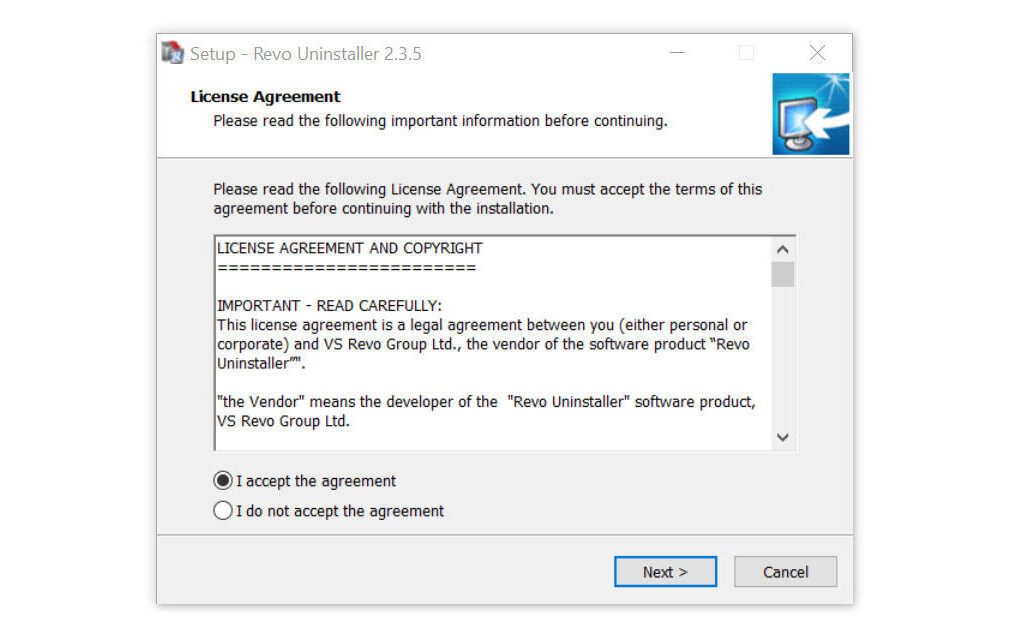
2. After the setup file (revosetup.exe) has finished downloading, run the installation wizard, read the license agreement, and click agree to proceed to the next step of the installation. Follow the procedure and wait until the installation of the software is complete.
 3. Once the software has launched, find the suspicious application and double-click the program to uninstall it.
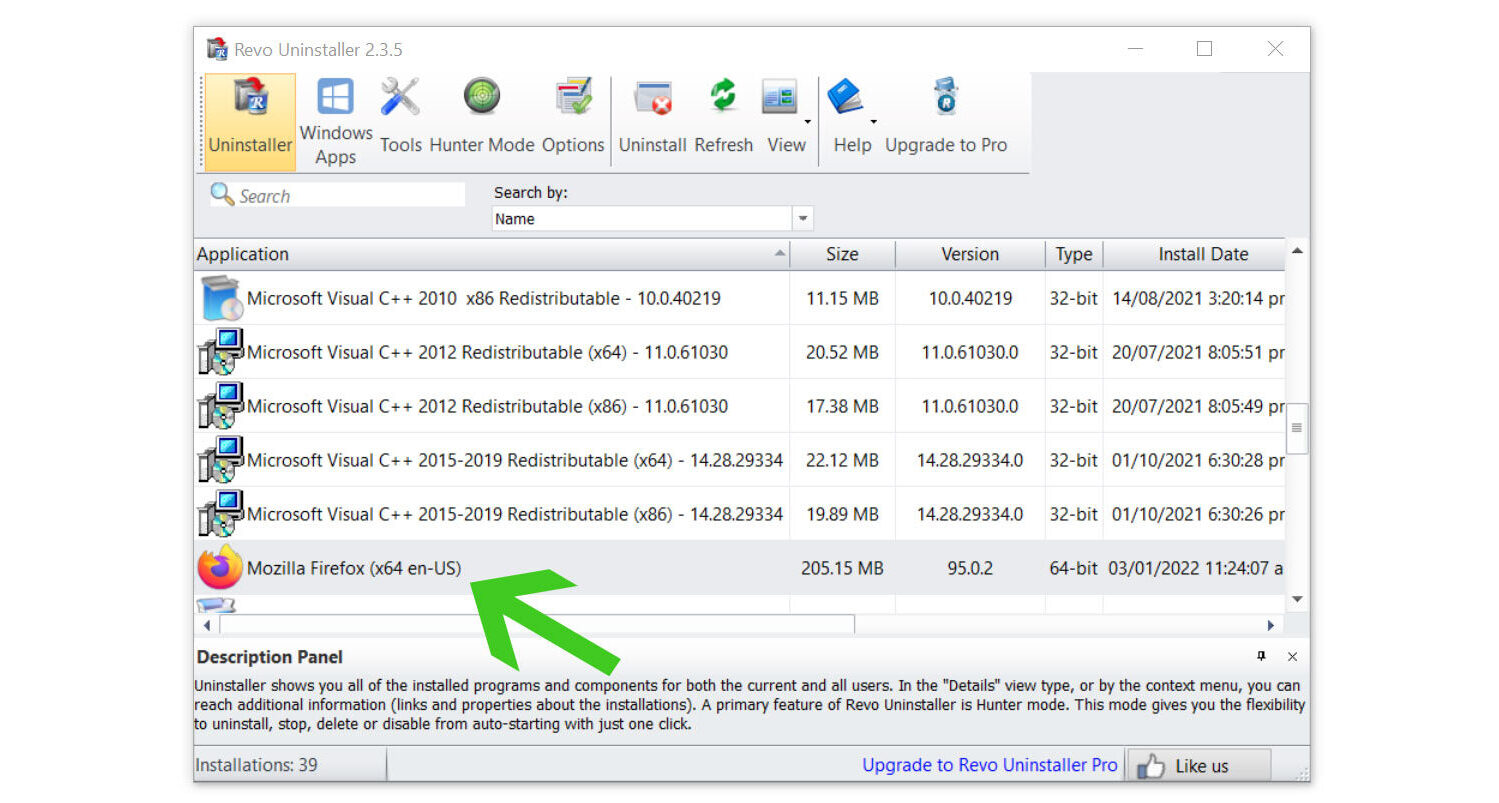
4. Click on the Continue button and follow the procedure to start uninstalling the suspicious program. It is also advised to make sure that a System Restore Point is made before the uninstallation, just in case. (We will be using Firefox as a demonstration.)
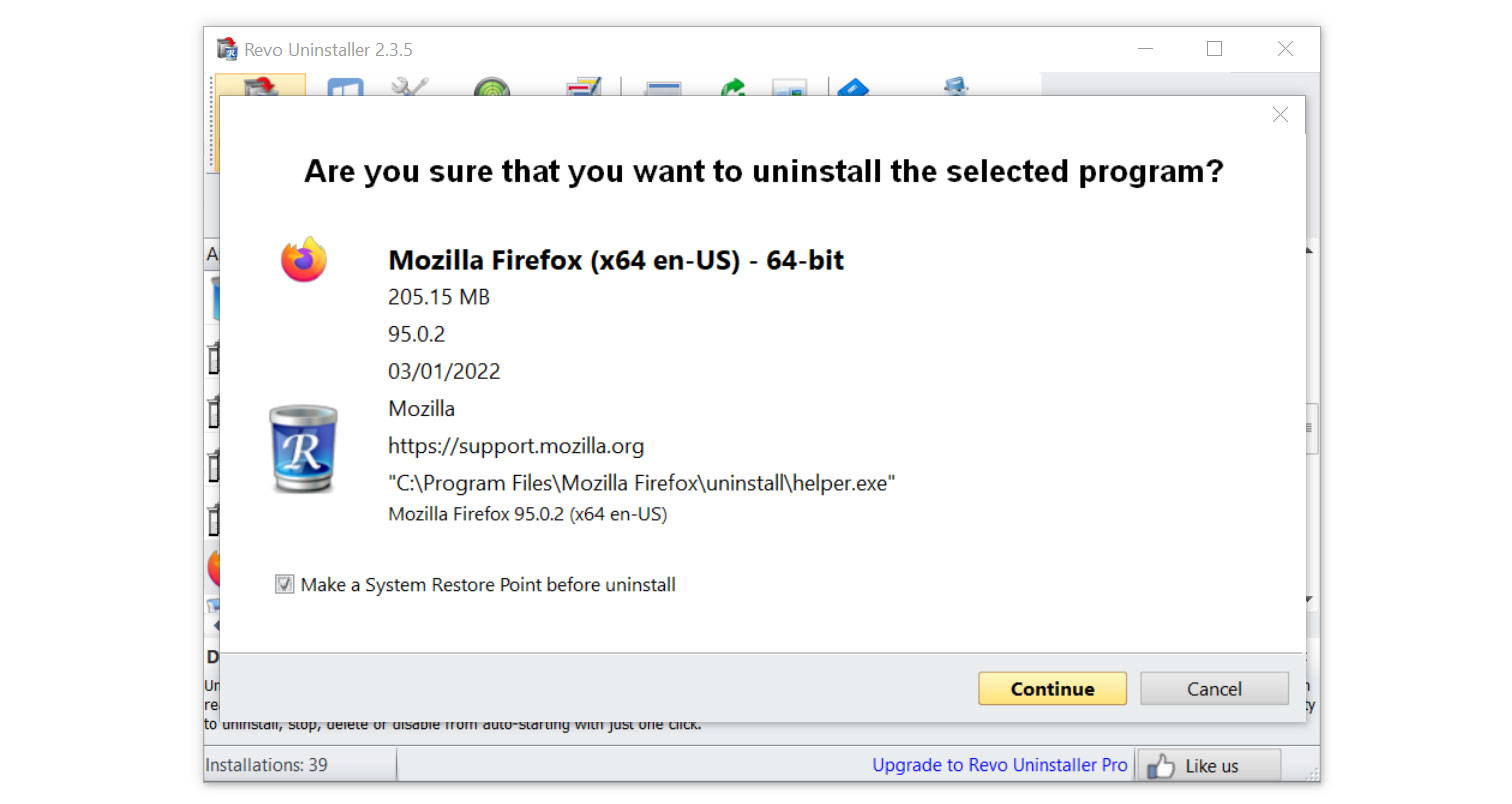
5. You will be prompted to choose a scanning mode. From the three options available, select Advanced mode, then click Scan. 6. A window will pop up and show all of the leftovers and changes made by the uninstalled program. Click the Select All button and hit Delete to remove the leftovers found in the Windows Registry.
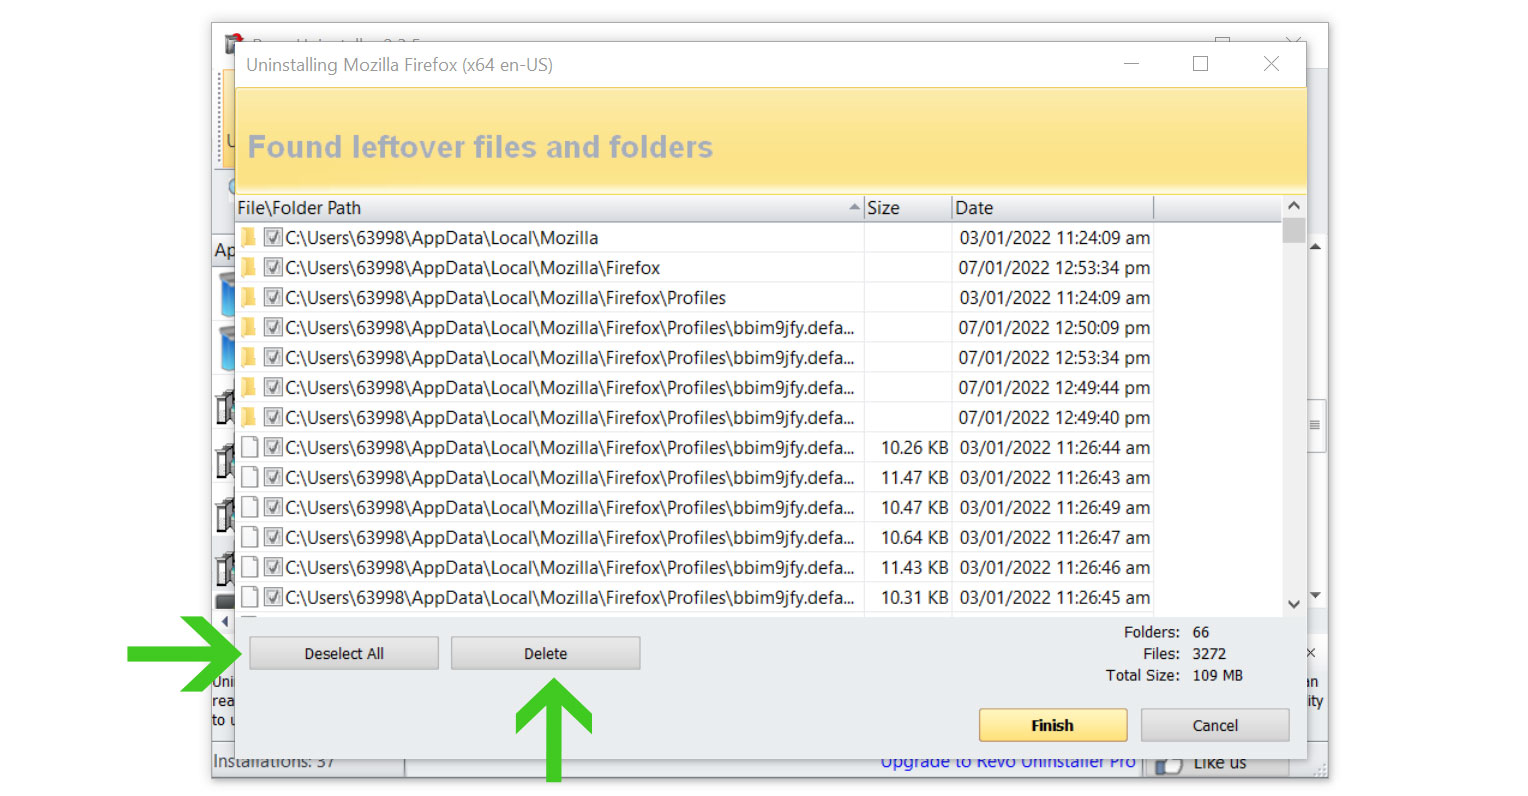
Once the window closes, you have successfully removed malware from your system.
Delete malicious files manually
There is a chance that the virus may not be an installed Windows program but rather a single executable file that is hiding in the computer. If this is the case, then you can remove it by locating the source of the file and deleting it from there.
Please follow the instructions below to find and delete the malware manually from the computer.
1. When the trojan virus is causing your computer to overheat, launch task manager by simultaneously pressing the Ctrl, shift, and Esc buttons. Another option is via the Run program by pressing the Windows key and R, then typing taskmgr. 2. Check the processes that are running on your computer right now to discover how much hardware they are using once Task Manager has opened. Once you have located it, right-click on it and select Open file location.

3. Make that the file location does not originate from a Windows system directory, such as the C:Windows\System32, after the File Explorer has opened up while highlighting the suspected file, since you may risk unintentionally deleting a system file. If the software is not from a crucial directory, delete it by selecting it with the right-click menu.

If the file refuses to be deleted because the process is running as well as if certain programs are preventing it from being uninstalled, simply enter Windows Safe Mode and delete it from there.
Before doing so, please remember the directory where the virus is located because Safe Mode prevents non-essential files from running on the computer.
To boot into Safe Mode, first, open the system configuration by pressing Windows Key + R button then type “msconfig.exe“.

Once the System Configuration window appears, click Boot next to General then check the Safe Boot from Boot options. Below that, tick the Network option to allow internet within the Safe Mode then click Apply, once everything is done and the computer should be restarted into safe mode.

After booting into the said mode, go to the directory where the suspected virus is located and delete it. It should be able to be deleted now that the configurations preventing it from being removed are blocked in Safe Mode.
Step 3: Scan with a powerful malware removal software
Certain viruses such as ransomware may be hard to delete and for users who are not knowledgeable about their technology, it is best to utilize a program dedicated to removing such threats from the computer.
Here are some of the most well-known ransomware organizations that have been infecting users ever since and still do today.
Phobos Ransomware
Phobos ransomware was first identified in December 2018 and it was widely known to have been targetting small businesses.

Consequently, the typical ransom demand for a Phobos attack is $18,755 since the ones they target do not have much capital to pay a big amount of money.
Some of the ransomware extensions that were used by Phobos are .steel and .fopra, which people and businesses alike are still getting infected today.
MedusaLocker Ransomware
In September 2019, the MedusaLocker ransomware was discovered for the first time. Since then, MedusaLocker has infected and encrypted systems in a variety of industries, primarily the healthcare industry.

Users as well as organizations have been affected by the aforementioned ransomware, which they may have downloaded from unscrupulous and dubious sources.
One of the known variants of the MedusaLocker we have covered on our website appends the .allock extension to the infected computer.
For these types of malware threats, we recommend running a full system malware scan with Malwarebytes Anti-Malware. This program is widely known and recognized by security experts when it comes to removing viruses from the system.
Remove malware with Malwarebytes Anti-Malware
We have also been using this software on our systems ever since, and it has always been successful in detecting viruses. It has blocked many known computer threats as shown from our tests with the software, and we assure you that it can remove every malware hiding on your computer.
 Not to mention, it is free to use and does not come at any cost to remove the viruses it finds on your computer.
To use Malwarebytes and remove malicious threats from the computer, follow the steps below:
1. Download Malwarebytes by clicking the button below, as we have made an additional and in-depth tutorial on how to use it. Otherwise, you may go to their official website via Malwarebytes.com (Avoid misspelling as it may lead to scams).
Download Malwarebytes Anti-Malware
2. Visit their download section and start a Free Download to begin installing the software on your computer. 3. Once the Malwarebytes setup file (MBsetup.exe) has finished downloading, open the executable file in File Explorer, then right-click the setup and select run as administrator to give the highest system authority and make sure Malwarebytes is installed correctly.
 4. Make sure to carefully follow the installation setup wizard’s instructions and provide the relevant information it requires. You will be prompted with questions such as Personal or Business Use, Email Address, and others.
 5. From the application’s home screen, go to the scan tab and begin running a system scan. This will scan the whole computer, including memory, startup items, the registry, and the file system.
 6. Since it can take a while, you should either relax and wait for it to finish or find something else to do. The length of the scan depends on the size of the files you have and the hardware capabilities of your computer. Here are some ways to make scanning faster.
7. Once the scan is finished, Malwarebytes will show the malicious viruses and threats it found on your PC. Every malware will show up on the detection results, and it will show up in a threat name such as PUP.Optional.OpenCandy, and many more. 8. Select all the detected files from the report and click the quarantine button to remove the malicious items from the computer into the protected safe quarantine zone of the anti-malware program so that they would not affect and do malicious actions to the PC again.
 9. After placing the virus files in the program’s quarantine, it may prompt you to restart the computer to finalize the full system scan procedure. Please restart your computer if prompted, as it is essential. After the restart, Malwarebytes will open and display a message that the scan was complete.
Note: Don’t forget to delete the quarantined files afterward.
Simply quarantining the malware files is not enough to make sure they are completely removed. This is a very common misconception: once you click the quarantine button, it is all good and gone.
But, while its effects and harmful activities are halted, the malware is still in the system, only placed in the anti-malware program’s quarantine folders. To completely remove it from the computer, go to Detection History from the home screen, select all Quarantined items, and click Delete.

You have successfully removed malware from your computer. Rest assured they would not resurface again since Malwarebytes offers a premium trial for 14 days, so you could take advantage of it for free and prevent malware from infecting your system.
While the detection and removal of malware is free for Malwarebytes, the premium versions include real-time protection that ensures your computer is safe all the time. Although we encourage you to use the premium trial, you are free to purchase the full version if you find it useful.
The program is an anti-malware that removes harmful threats like trojan horses, worms, stealers, miners, keyloggers, and many other forms of malware and computer viruses.
We suggest Malwarebytes if you are looking for a removal tool and as a second opinion scanner, but if you want full-fledged antivirus software, we believe that the built-in Windows Defender is sufficient for computer security, or if you want something with a more sophisticated system and better protection: Kaspersky Free.
If you choose to uninstall Malwarebytes, you may suddenly see that Windows Defender Real-Time Protection is turned off. This is a common issue that users may face when uninstalling the software. To fix this issue, you may refer to this article.
Alternative: Kaspersky Free Antivirus
After removing malware from your system, you may want to install antivirus software to protect your system against malware.
More importantly, running an additional scan with a different program’s threat database will alert you to hidden Trojan viruses and rootkits that were not removed from the prior scan with Malwarebytes. Kaspersky is a widely known antivirus software that has been on the market for as long as the field of cybersecurity has existed. It is acclaimed by professionals in the field and is one of the most effective antivirus programs available. With its advanced internet security protection, it can also remove additional malware from the computer.
What is the difference between anti-malware and antivirus? Anti-Malware software is designed to specifically remove malware and its variants. In addition, it employs heuristic-based detection by picking up harmful code from files.
On the other hand, an antivirus uses signature-based detection, which examines data for attacks to protect users from dangerous viruses, including keyloggers, loaders, worms, trojans, and others.
Malwarebytes and Kaspersky are identical, but Kaspersky is a better overall program since Malwarebytes’ main purpose is to remove malware, but Kaspersky has been known for comprehensive computer security protection ever since.
 Based on our experience removing malware, when two different programs are used to scan, various threats are identified by one software but not by the other. Given that their threat databases differ from each other, it might be able to capture harmful viruses, rootkits, and trojans that Malwarebytes has missed.
Please be aware that if you decide to use Kaspersky, you should first uninstall Malwarebytes because having both security programs installed will cause a conflict. If you choose to do so, please remove Malwarebytes first, as it is essential to do so before we get started.
1. Click the button below to start downloading Kaspersky Antivirus on your computer. On the following page, we have provided clear details on how to install it on the computer. On the other hand, you may go to their official website by searching for the software on your web browser or typing Kaspersky.com (Beware of misspellings since cybercriminals typically use these as exploits to redirect users to malicious webpages).
2. Go to the download page for Kaspersky Free Antivirus. Before clicking download, you will be prompted to choose your continent and where your country is located. This is very important, and you should not choose a different country because you will be met with a “Not supported in your region” message during installation. 3. Once you click download, a setup file (startup.exe) will be downloaded on the computer. After it has finished downloading, open its file location, right-click the executable file, and then select Run as administrator. This will ensure that Kaspersky’s installation will be smooth and will not result in certain errors.
 4. The Kaspersky installation wizard will launch, and you can then proceed to install Kaspersky Free by following the setup instructions. If a UAC prompt appears, simply accept it and proceed with the installation.
 5. Please be patient while Kaspersky is being installed on your computer. The speed and length of the installation process will depend on your computer’s specifications. Kaspersky also mentioned that sluggishness or dark displays during the installation of their program are normal and should not be worried about.
6. To use the antivirus program, you must first create an account on the sign-in page that appears after the antivirus application has been successfully installed on the computer. If you’re looking for the sign-up button, simply enter your email exactly as it appears; if you don’t already have an account, one will be created for you. 7. Kaspersky will ask you to decide which plan to use. It will be either the Standard version or Kaspersky Plus. In this case, the standard version is all you need for now. If you want to try the premium version of Kaspersky, you may opt for Kaspersky Plus to try the features for free. You do not have to add a payment method to get started, and after the trial ends, you will be downgraded to the Standard version unless you pay for it.
 8. You will be asked if you want to install additional applications, namely Kaspersky Password Manager and a VPN. Feel free to opt for a program you might want to use; otherwise, install both, or choose not to if you do not need them.
 9. Kaspersky will ask you to scan for viruses in the background. Simply choose not to do so because we will be doing a full system scan later; on the other hand, doing a scan now will only initiate a quick scan. However, if you want to be safe, you can run the background scan now and proceed with a full system scan after.
 10. Once the antivirus application has opened, go to the security tab and click the choose a scan button. You will be presented with several different scans; go for the full system scan to ensure full computer security. Always remember to update the database because this will ensure that Kaspersky can detect newly discovered threats and exploits.
 11. A full system scan will take a long time to finish since it will look into all the files on the computer, including the registry, memory, startup applications, and many more. The scanning time will depend on how many files there are on the computer and how big the files are. Additionally, the computer’s hardware and specs will also play into how long the scan will take.
12. After the full system scan is finished, it may detect remnants of the malware as well as other viruses hiding in the computer, showing its location along with a detection name (Trojan.Win32.Generic, Exploit.Win32.Generic, etc.) given to it. Go ahead and proceed to disinfect and restart the computer. 13. The Advanced Disinfection process will then start, and depending on the amount of RAM the computer has, it could take some time. It will then request a computer restart to complete the operation.
 Your computer will now have finished the entire system scan after restarting. By doing this, you can be sure that all forms of malware and viruses have been wiped from your computer.
You shouldn’t be concerned if the scan turned up no instances of malware or viruses, which indicates that there isn’t any malware on your computer. If two independent programs declare your computer safe, then that’s probably the case.
 Remove Malware From Mac OS
The methods provided below will assist you in removing potential malware, trojans, adware, and viruses from the Mac computer OS.
Removing malware from the Mac system should be thorough and carefully executed; therefore, please follow every step provided.
We made the instructions below easy to understand so non-tech-savvy users can still remove potential malware without needing help from tech support or a technician.
Step 1: Remove malicious applications from the system
If you experience unusual activity from your Mac, such as pop-up advertisements and website redirections, your device might have been infected with malware.
Despite having excellent safety features, Macs are nevertheless vulnerable to malware and virus attacks. It can take several different forms and harm your device in various ways.
Adware, also known as advertisement-supported software is used by cybercriminals to show advertisements to user’s computers.
These types of applications have the icon of a magnifying glass which makes them easier to identify. It can be very annoying for users since they’ll be bombarded with advertisements every time they open the browser.
It will display unwanted content such as advertisements and can also function as spyware, gathering information from the infected user that will eventually be sold to advertisement companies.
| Recently Found Mac Adware |
|---|
Whenever a user opens their browser, adware shows them one or more suspicious and potentially harmful adverts.
Adware commonly gets installed on a user’s device when they download from third-party programs and do not uncheck the installation option for additional programs.
Remove Malware from Applications
1 Open the Finder application from the Dock.

2 Select Applications from the left sidebar.

3 Find the suspicious malware then right-click its icon then select Move to trash. (We will be using the MacKeeper application as an example.)

Remove Files Associated with Malware
1 Click the Go from the Finder toolbar and select Go to the folder from the expanded menu.

2 Search the following paths for files associated with the malware. These files will have the .plist extension and will look similar to com.alphaconsole.plist. (Note: Do not delete files that come from legit applications)

~/Library/LaunchAgents
~/Library/Application
/Library/LaunchAgents
/Library/LaunchDaemons
3 Once you have found them, right-click and select Move to Trash to get rid of those files.

Empty the Trash Bin
1 From the Dock, right-click the Trash application and select Empty Trash to delete the files permanently.

2 A confirmation window may appear asking if you want to delete the files on the Trash, go ahead and proceed to delete them.

Now, the suspicious application as well as files related to the malware threat are permanently deleted from the Mac system.
Step 2: Remove profiles created by malware
Browser hijackers and similar malware can prevent users from reverting to their default browser settings. As a result, when users attempted to alter their preferences back, they were either unable to do so or their preferences were turned back after a few minutes.
Removing the profiles added by the malware is required to ensure that configurations are not altered again once they have been reverted. (Note: If the device does not have any profiles related to the hijacker, you may proceed to the next step.)
1 Click the Apple logo on the upper left corner of the screen then select System Preferences from the drop-down menu.

2 On the System Preferences window, find and click Profiles. (If you cannot find Profiles, then it means you do not have profiles on your Mac. You may skip this procedure and head over to the next step.)

3 Find and remove profiles that may be associated with the adware. Click the minus button on the lower left part of the window to remove the profile.

Step 3: Reset the browser to remove hijacker configurations
Numerous browser hijackers target Mac users especially. This malware can gain access to the web browser causing it to perform unpredictable and odd actions.
After installation, it will modify the web application settings, search engine selections, and homepage tab. Furthermore, this kind of malware could redirect your browser to unwanted websites and interfere with search engine results.
The browser hijacker can also collect private information about the user, such as browsing habits, search queries, and browser history. Hackers sell the user data they have obtained to advertising companies.
| Recently Found Browser Hijacker Threats |
|---|
It may be installed through the websites you visit, search engines, or notifications. Furthermore, every time you browse the web, you can receive multiple redirects to unwanted websites.
Your browsing program is most likely tainted by the browser hijacker since this type of malware relies solely on the usage of internet content which is why resetting it will undo the changes done by the virus.
If you do not wish to reset your browser, you can undo the changes manually by removing the extension and changing the default homepage and search preferences back to normal. However, if you are not much of a techy person, resetting the browser will be the easier approach.
Here is how to reset the browser on the Mac OS, please follow the one for the program you use:
For Google Chrome:
1 Open Google Chrome and click the three dots in the upper right corner of your screen to access the Google Chrome menu.
2 Click the Settings button, then click the Advanced menu on the left side of the screen from the settings screen.
3 On the drop-down menu, select Reset settings.
4 Click on the Restore settings to their original defaults.
5 When a small window will appear and click the Reset Settings.
For Safari:
We will be using the utilization of the Terminal application to reset the Safari browser because, unlike Chrome or Firefox, it does not have an auto-reset feature for the browser.
1 To use the Terminal application, open Finder and navigate to the Applications/Utilities folder.

2 Copy and paste each code line separately in the Terminal. Some of the first codes will have a confirmation line, type y to continue. (Note: Make sure the Safari application is closed while proceeding with working with the codes.)

rm -Rf ~/Library/Cookies/*;
rm -Rf ~/Library/Cache/*;
rm -Rf ~/Library/Safari/*;
rm -Rf ~/Library/Caches/Apple\ -\ Safari\ -\ Safari\ Extensions\ Gallery;
rm -Rf ~/Library/Caches/Metadata/Safari;
rm -Rf ~/Library/Caches/com.apple.Safari;
rm -Rf ~/Library/Caches/com.apple.WebKit.PluginProcess;
rm -Rf ~/Library/Cookies/Cookies.binarycookies;
rm -Rf ~/Library/Preferences/Apple\ -\ Safari\ -\ Safari\ Extensions\ Gallery;
rm -Rf ~/Library/Preferences/com.apple.Safari.LSSharedFileList.plist;
rm -Rf ~/Library/Preferences/com.apple.Safari.RSS.plist;
rm -Rf ~/Library/Preferences/com.apple.Safari.plist;
rm -Rf ~/Library/Preferences/com.apple.WebFoundation.plist;
rm -Rf ~/Library/Preferences/com.apple.WebKit.PluginHost.plist;
rm -Rf ~/Library/Preferences/com.apple.WebKit.PluginProcess.plist;
rm -Rf ~/Library/PubSub/Database;
rm -Rf ~/Library/Saved\ Application\ State/com.apple.Safari.savedState;
After running all the codes to the Terminal application, the Safari browser should look good as new.
For Mozilla Firefox:
1 Launch Mozilla Firefox browser then open the menu by clicking on the three horizontal lines located in the upper right corner.
2 Navigate down and click Help then select More Troubleshooting Information from the options given.
3 Select the Refresh Firefox button.
4 A confirmation window will appear, click Refresh Firefox.
Step 4: Scan the Mac OS with a powerful anti-malware program
Malwarebytes Anti-Malware is one of the most powerful anti-malware programs available for the Mac OS. They have some of the most advanced threat detection tools, ensuring that any harmful virus on your computer is eliminated.
1. To begin, click the button below to go to the Malwarebytes official website and download the malware removal tool for the Mac OS. Additionally, you can directly access their website, Malwarebytes.com via Safari or your default web browser. (Please avoid misspellings since online criminals occasionally use them to direct customers to dangerous websites.)
2. Click the Download button for the Malwarebytes anti-malware program after choosing your preferred plan. A Thank You for Downloading notice should appear after that, and the application setup file (Malwarebytes-Mac.x.xxx.x.pkg) will then be downloaded.
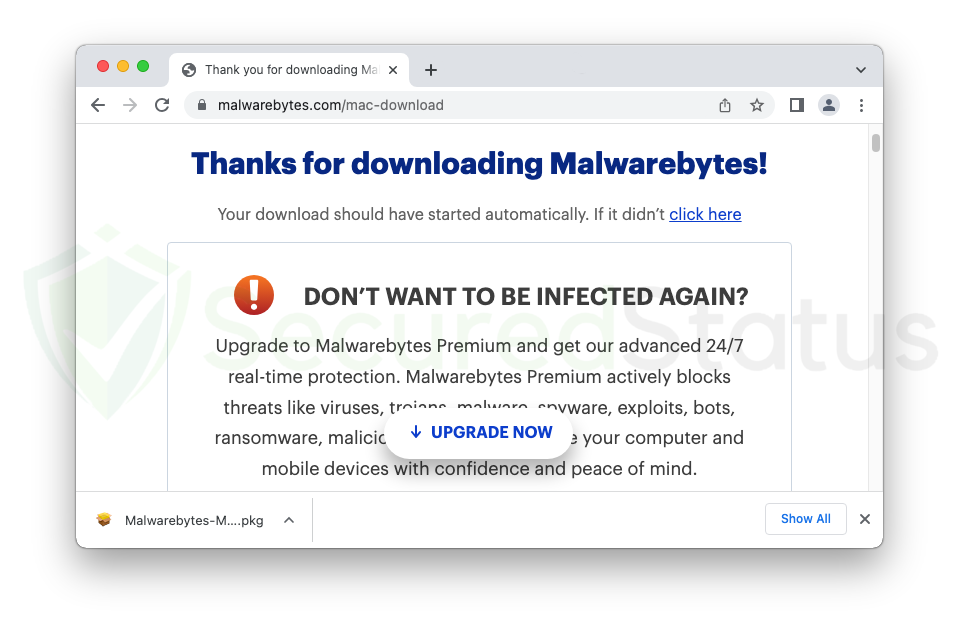
3. Run the setup package file after the application has finished downloading, and it should direct you to install Malwarebytes for Mac. There are numerous steps in the setup wizard, the first of which states that all Macs are susceptible to malware. To proceed, click the Continue button in the application’s lower right corner.
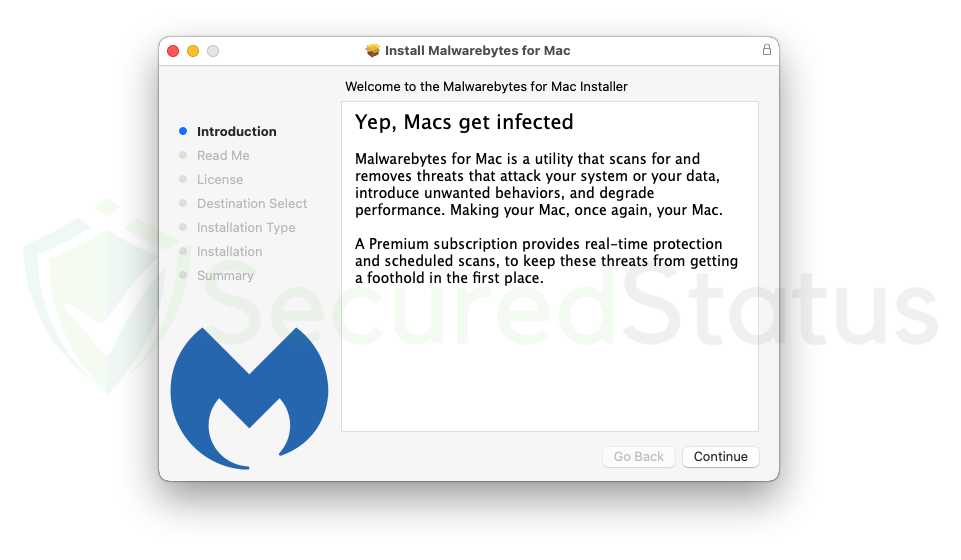
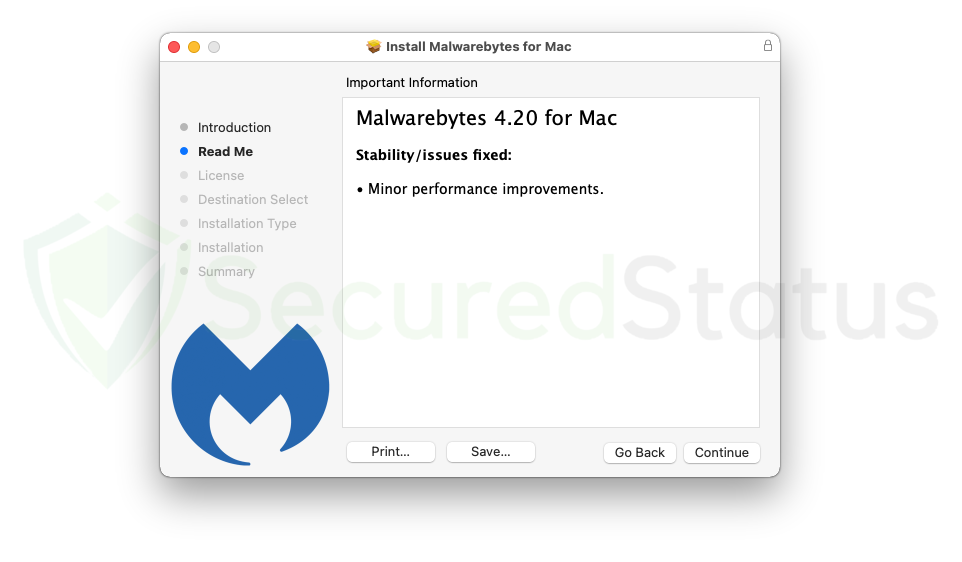
4. A read-me containing the key details of the application would appear in the next step. Depending on the version you’re downloading, it might display new features that come with it, or it might just be stability and bug fixes for minor improvements. To move on to the next step, click Continue yet again.
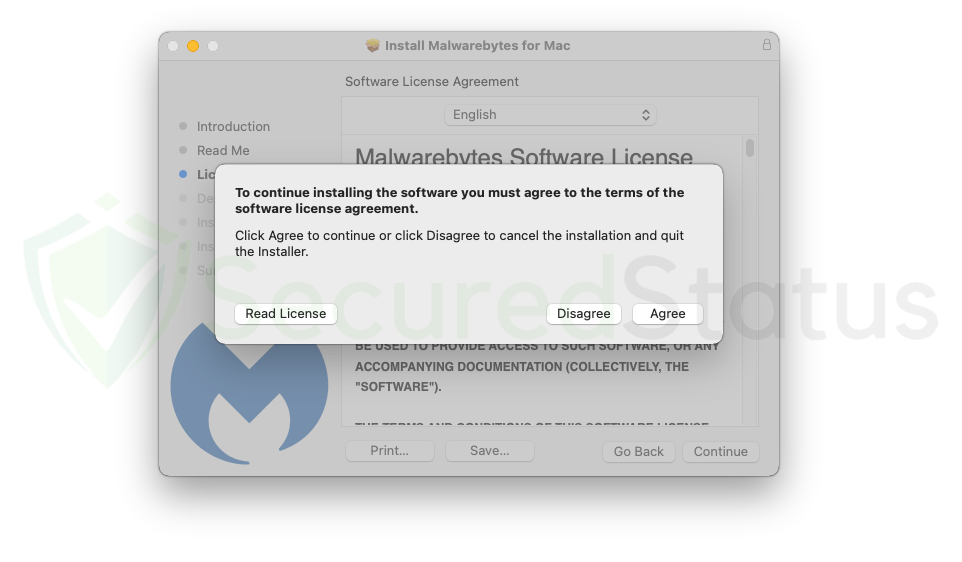
5. By continuing to install Malwarebytes, you agree to the terms of the software licensing agreement, as seen in the image below. Users are entitled to read this document because every application has one, and users must accept it before using the application. To move on to the next stage, select Agree.
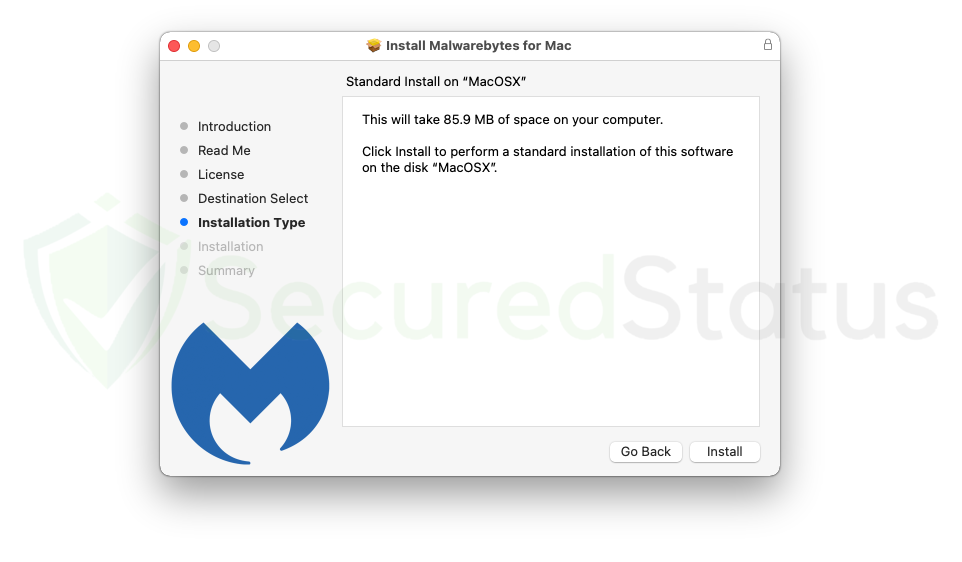
6. You will be informed onscreen before starting the installation process that the application will use a small amount of storage space on your Mac. To ensure a trouble-free installation of Malwarebytes, make sure you have sufficient available space. If you think you have enough storage, click Install to start the program’s installation.
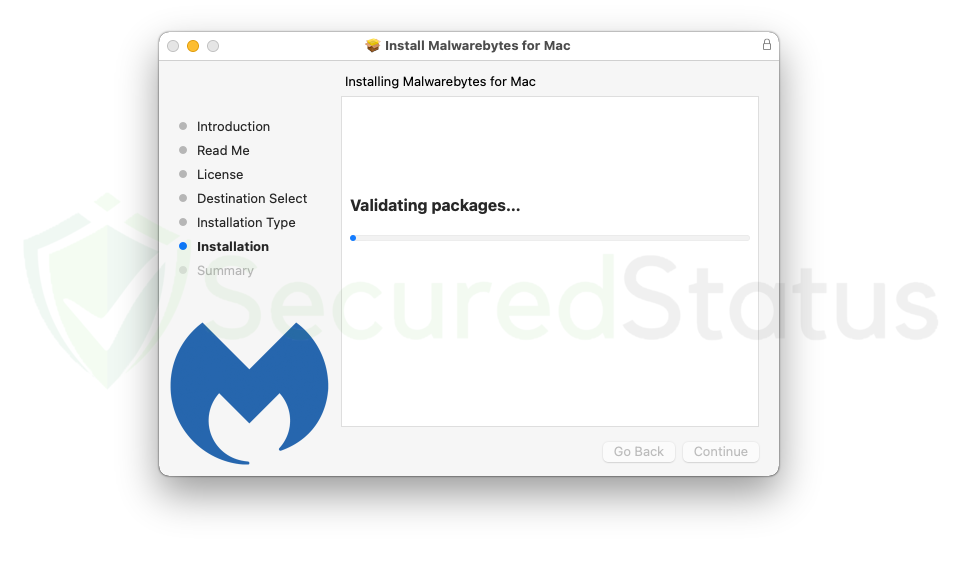
7. The computer will then start to install Malwarebytes. Depending on the available space and how fast your machine is, this could take some time. Installing Mac OS on older Mac computers may take longer than on newer versions and flagship models. In any case, please wait while the application installs.
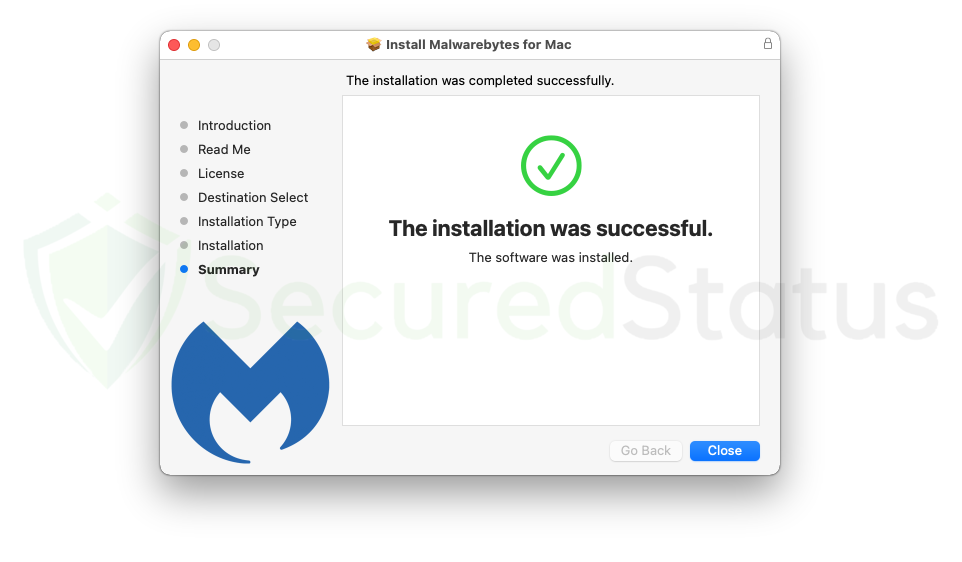
8. When the Mac system’s installation of the application is complete. The summary tab will then appear, stating that Malwarebytes was set up successfully and that the installation process was successful. To launch Malwarebytes and begin scanning your computer for infection, click the Close button.
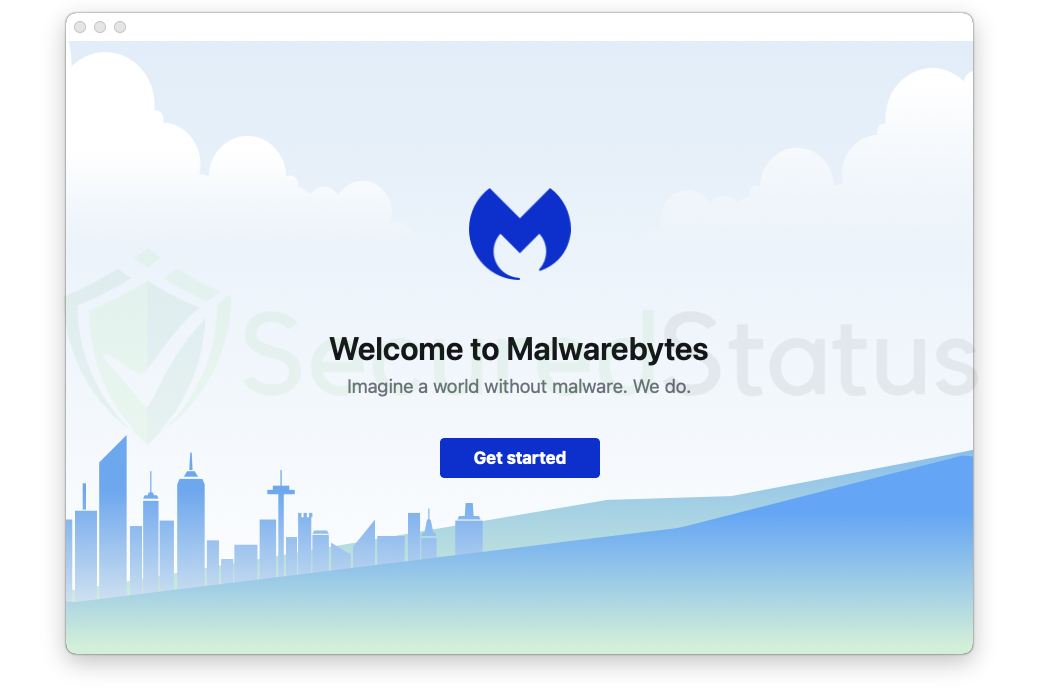
9. After the setup process has been closed, Malwarebytes will launch on the computer. When the setup wizard is finished, you can select to delete it since it is no longer needed. Click Get Started on the main Malwarebytes program to start the preparations for utilizing the program. Only when you download the application for the first time will this appear.
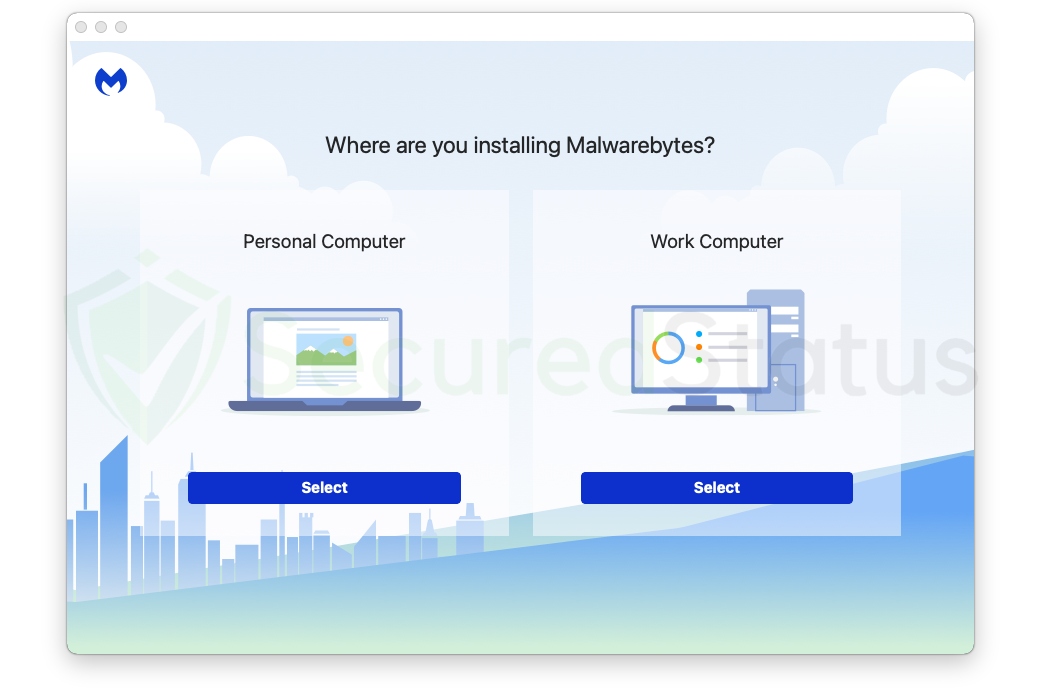
10. You will be directed to a screen where you can choose which computer you want to install Malwarebytes on. This is between Work Computer for office usage, which may download a different version of Malwarebytes anti-malware created exclusively for businesses, and Personal Computer, such as for devices owned by you and your family. However, because you probably came to this page to remove spyware and protect your computer, simply choose that you are installing it for your Personal Computer.
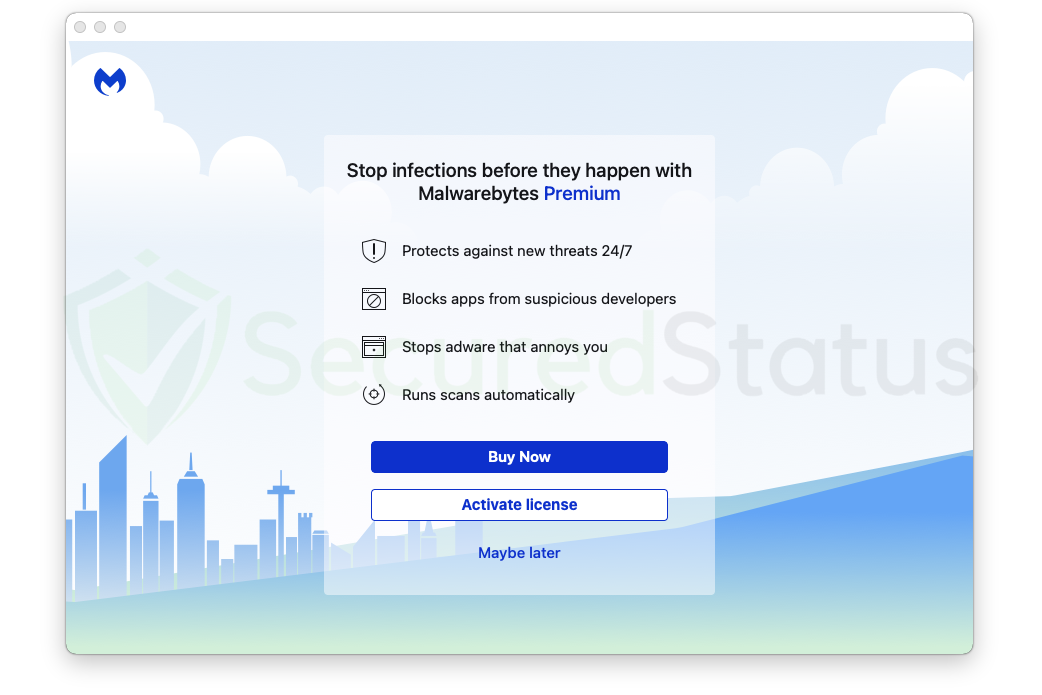
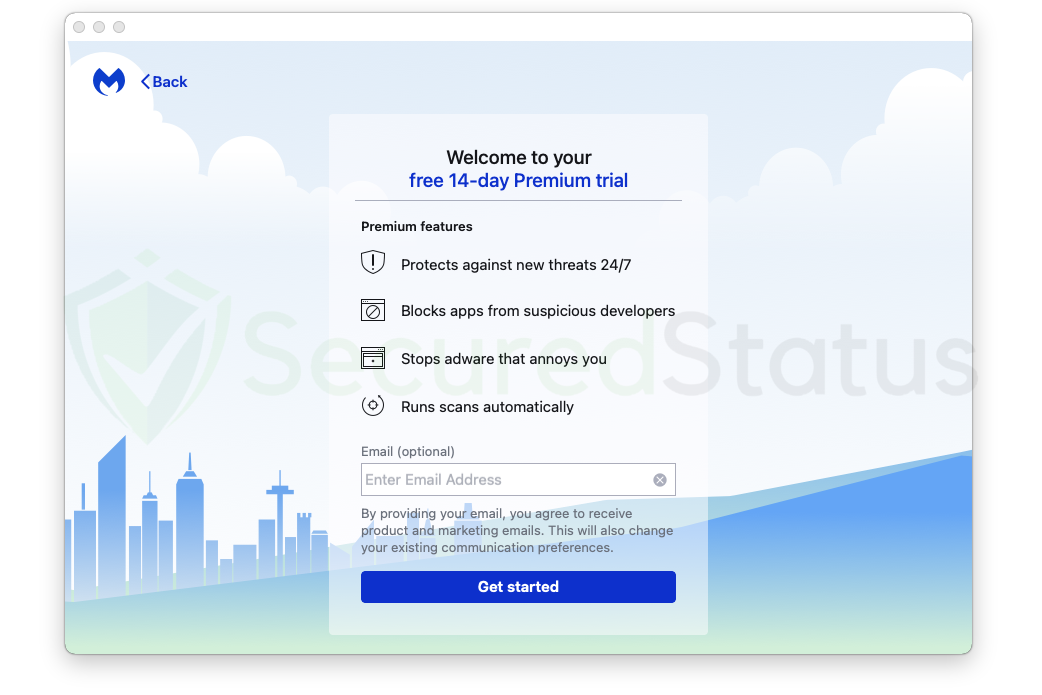
11. The features of Malwarebytes Premium will be shown on the following screen, and if this is your first time downloading the program, a 14-day free trial will be given. On the other hand, if you purchased the paid version, click on Activate subscription to begin entering the license code that was provided. Click Maybe later to continue without a subscription.
12. If you selected the free version, you will then get a notice offering a 14-day Premium trial. Enter your email address in the space provided if you want to receive marketing emails and promotions from Malwarebytes. Click Get Started when you’re ready to finish the welcome messages and begin scanning and protecting your device.
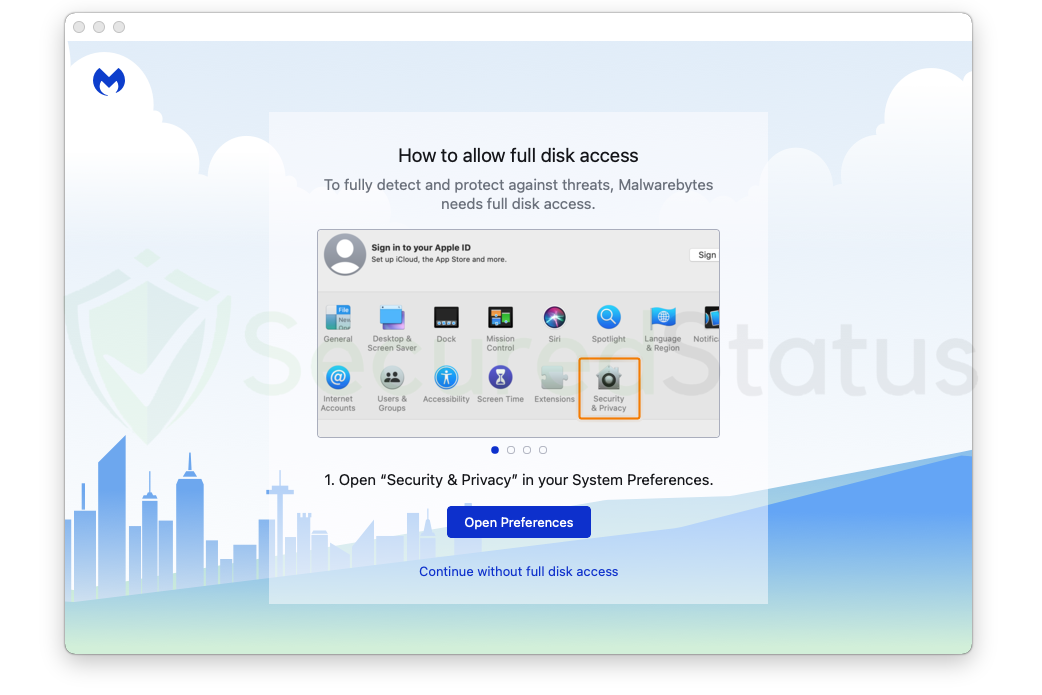
13. You will then be prompted to grant Malwarebytes full disk access. This is crucial since Mac OS is strict about granting apps access to the computer. The anti-malware program requires this permission to scan all of the system’s contents. To do this, click the Open Preferences button, which will launch the settings immediately.
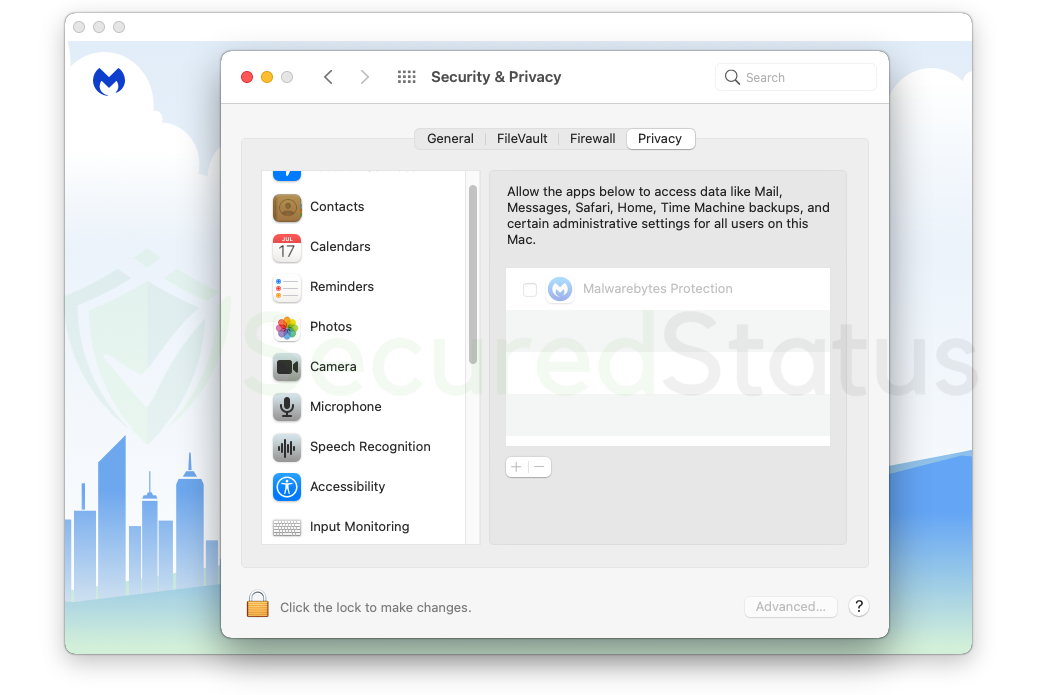
14. When the Security & Privacy window opens, it will immediately direct you to the Privacy tab, where you may make the necessary changes. To alter the authorization of Malwarebytes, click the lock at the bottom left of the window, unlock it, and begin making changes.
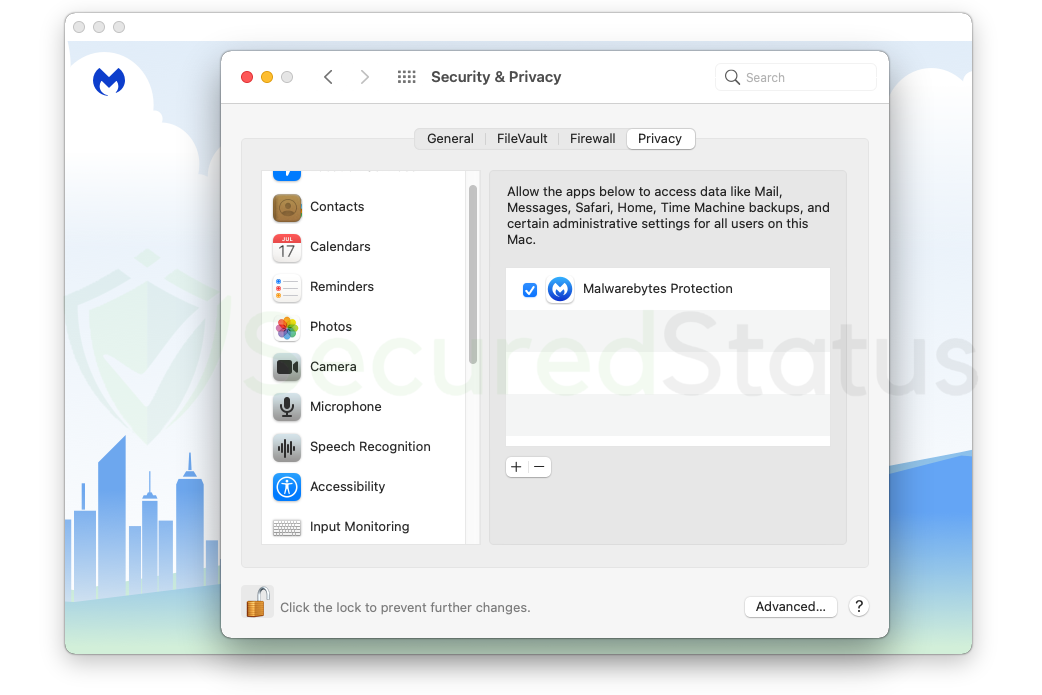
15. You will see that the checkmark in the box near the application has been unlocked. Simply check the box to give Malwarebytes permission to access the disk and perform a deeper scan for malware. After reviewing the program, click the lock once more to save the changes and prevent further alterations.
16. The main program of Malwarebytes will appear after completing the aforementioned procedures. When you initially use the main software, you will see three boxes due to its distinctive and simple user interface. A Scanner for initiating the computer’s scan, Real-Time Protection for enabling and disabling overall security features, and Detection History for erasing quarantined files after scanning, which is an important step that shouldn’t be overlooked.
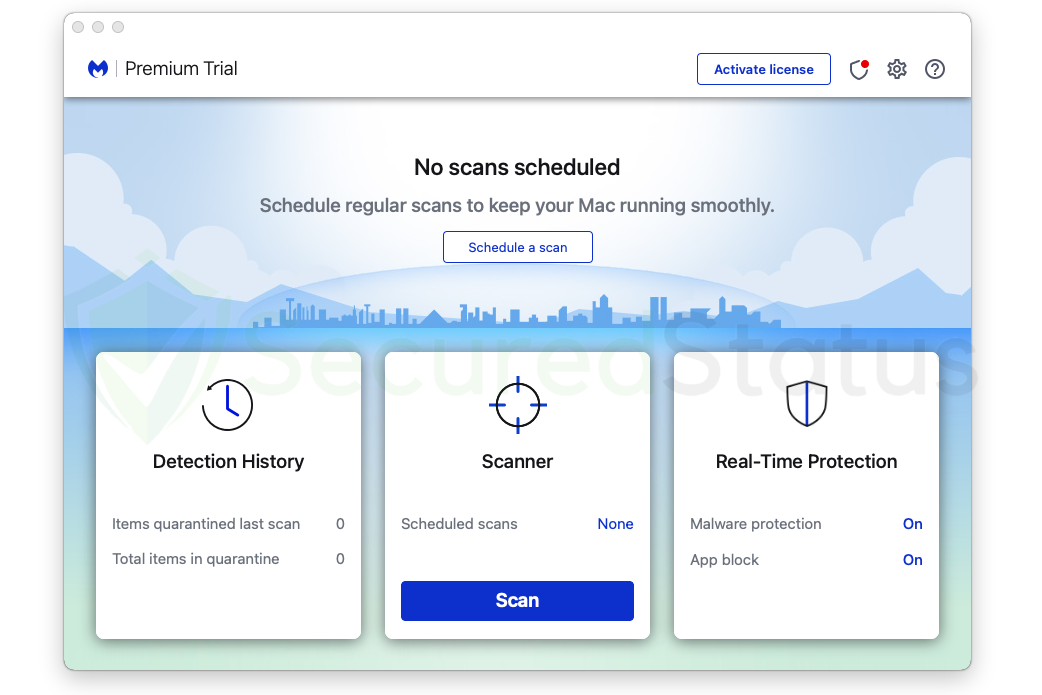
17. From the home screen, select the Scan button to launch a malware scan. Your computer should now begin to be scanned for infections by Malwarebytes. Along with other components, it will search all of your disk files if you permitted it to do so. Please be patient while the application scans; depending on how many files are on the computer, this process can take a long time to complete.
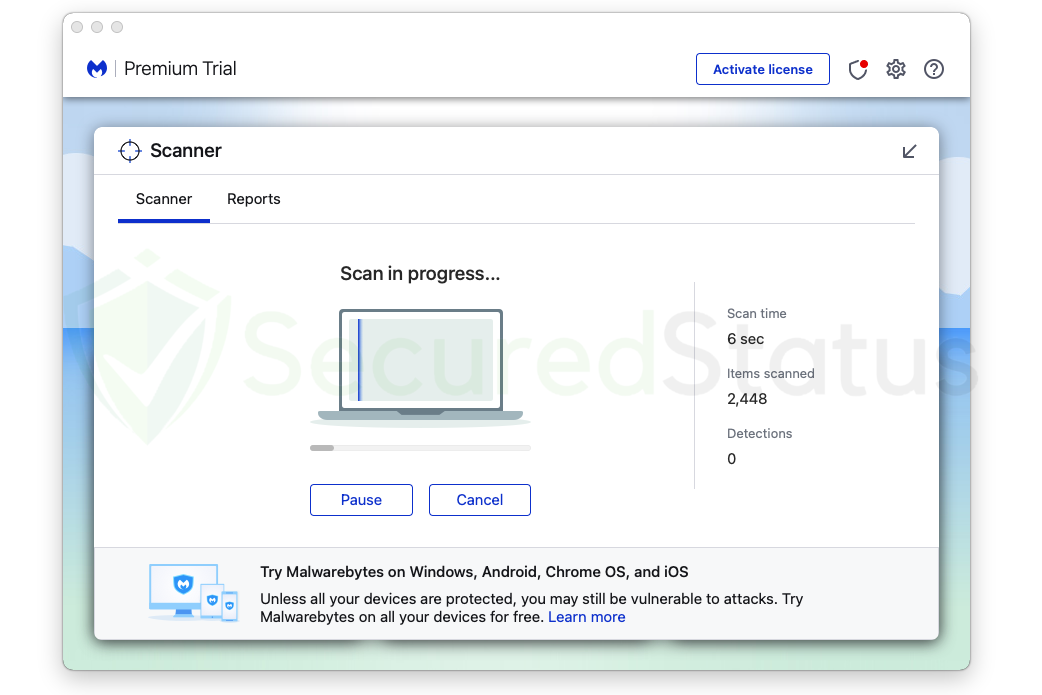
18. Malwarebytes will provide the results of the malicious threats it has found on the computer after the scan is complete. It will be shown along with its location and the detection name that Malwarebytes has assigned to it, such as PUP.Adware and other similar names.
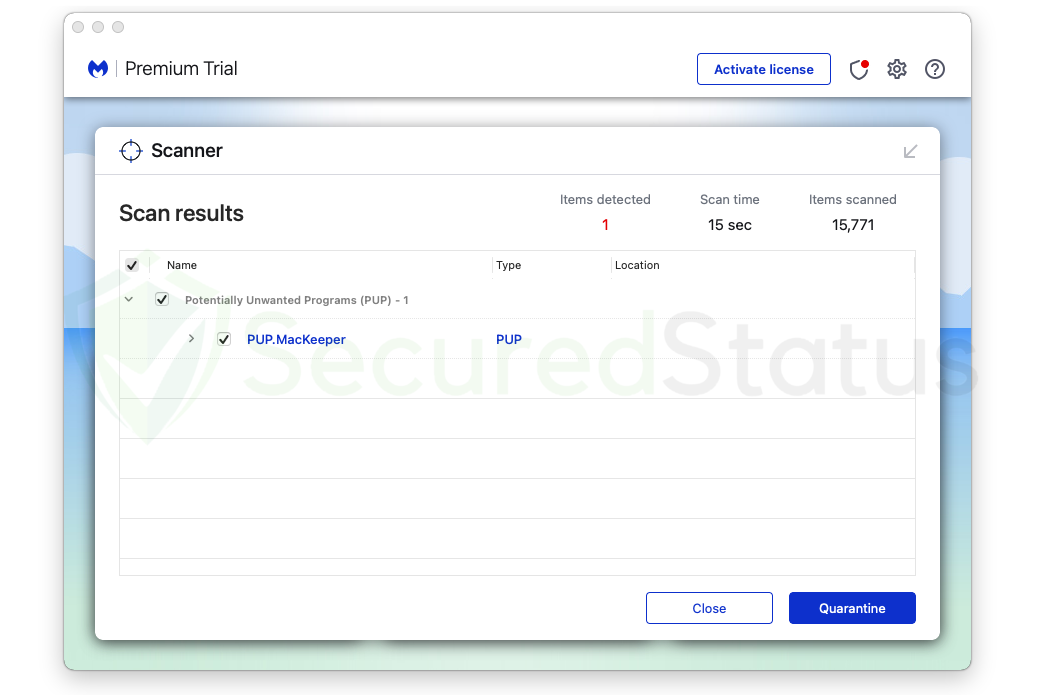
19. Select all the detected files from the report, then click the Quarantine button to remove harmful files from the computer system and put them in the anti-malware program’s secure quarantine area where they won’t affect or harm the Mac system again.
20. After you’ve quarantined the infected files, if the program asks you to restart the computer to finish the system scan, please do so because it is important. After the restart, the Malwarebytes program will run and send a message that the scan was successful.
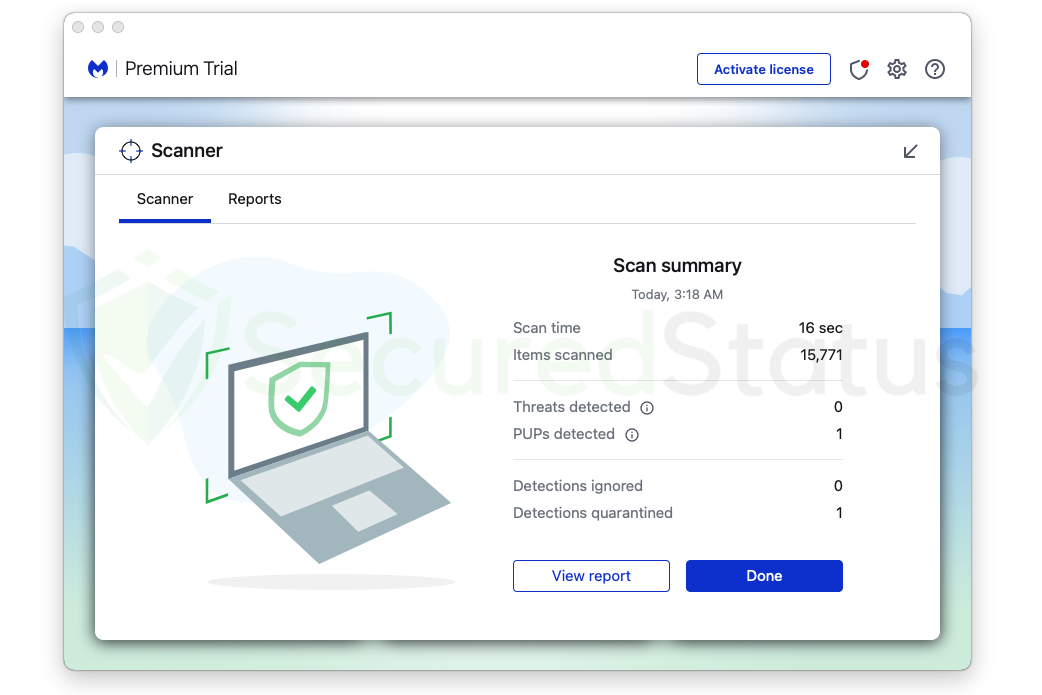
21. The Malwarebytes application’s quarantine area now contains the malware that was previously on the computer. To completely remove it from the system, go to the Detection History tab on the home screen, select all Quarantined items, and then click Delete.
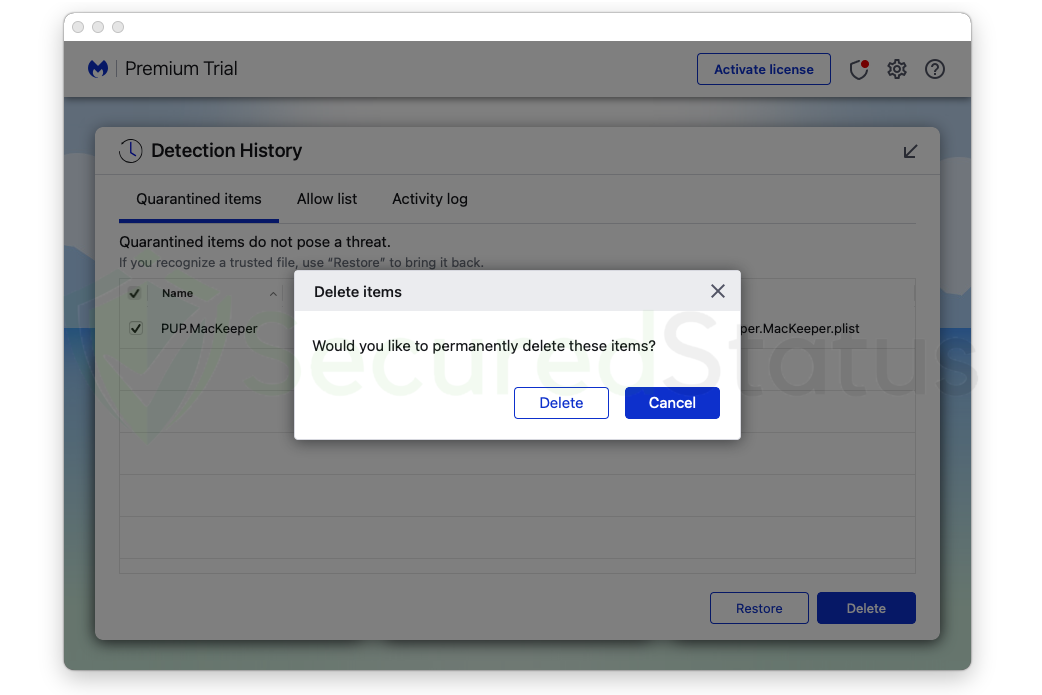
Every piece of malware and computer virus on your computer has been successfully eliminated. You may rest assured that they won’t reappear because Malwarebytes offers a free 14-day premium trial so you can use it to stop malware from infiltrating your machine.
 Remove Malware From Android
The methods provided below will assist you in removing potentially harmful Android viruses that may have infected your device.
Removing malware from the system should be thorough and carefully executed; therefore, please follow every step provided.
We made the instructions below easy to understand so non-tech-savvy users can still remove the Android threat without needing help from tech support or a technician.
For more in-depth detail on how to remove malware from Android, you may follow this article. On the other hand, please follow the steps below.
Step 1: Remove notification permission from the browser
Pop-up advertisements from unwanted sources are one of the main sources of getting your Android device infected.
These websites display advertisements to devices and redirect them to unwanted sites. You should avoid interacting with the contents the said website shows since it may bring harm.
One of the main things it will display is fake advertisements alerting you that your device is infected or that you have to download something to make your phone fast.
| Recently Found Android Pop-ups |
|---|
If you previously allowed websites to show notifications on your device, it could have been the primary reason you are getting ads from a malicious website.
To remove malicious pop-up notification permission from the browser, please follow the steps below:
You keep seeing pop-up ads because the malicious pop-up domain has interfered with your web browser settings. The problem will almost definitely be resolved by reverting the changes made in the browser preferences.

Google Chrome
1 First open Google Chrome then go to the upper right corner of the browser and click the three dots menu button.
2 From the shown menu, select Settings.
 3 Scroll down and click Site Settings under the advanced section.
4 Once the Site settings menu appears, click Notifications.  5 Find the suspicious website from the website’s list and remove its access by blocking it.
 6 To be safe just in case, go back to the Site settings menu and go to Pop-ups and redirects.
  7 Block Pop-ups and redirects from the browser.
  8 Go back to the Site settings again and go to Ads.
  9 Block Ads by toggling the switch off.

Mozilla Firefox
1 Launch Mozilla Firefox browser then click the three horizontal dots on the lower right corner to open the menu.

2 Click the Settings option.

3 Hover over to the Privacy and Security section and click Site permissions.

4 Click Notifications from the Site Permissions menu.

5 Set Notifications to Blocked.

Step 2: Remove the malicious application from the device
Malware isn’t just available for operating systems like Windows and Mac OS; it’s also common for the Android system to be infected with various forms of malware.
These harmful programs are used by cybercriminals to access sensitive information stored on your mobile phone as well as your login details.
Since we use our phones daily, such data would inevitably be saved on them; therefore, malware should be eliminated as soon as possible.
Android malware is a threat that will most likely take the form of an Android app. Find cracked or suspicious applications that you did not download.
1 Go to the Settings application and head over to the application menu. It is the menu wherein installed applications are seen. Since many Android devices are different, there are also different locations for this menu.  2 Scroll down the installed applications and find suspicious ones that you might not recognize or installed.
 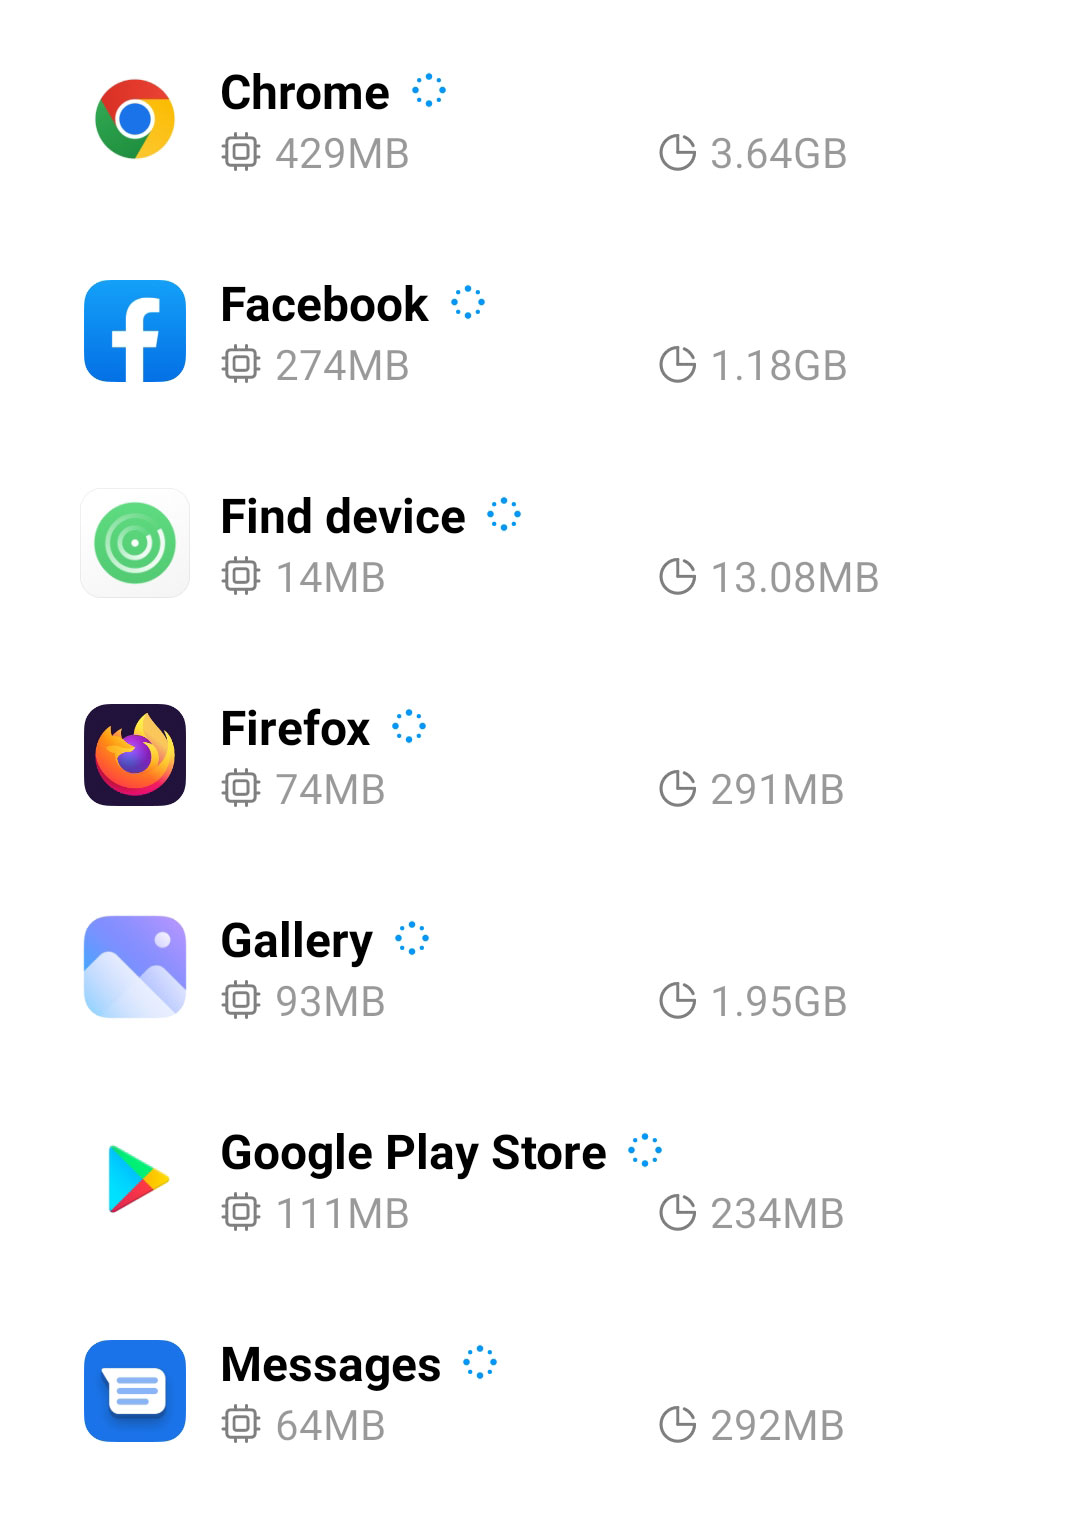 3 Once you find the suspicious application, click it and uninstall it. For this guide, we are using Smart Cleaner Ultra as an example.

Step 3: Scan the device with Malwarebytes Anti Malware
Malwarebytes is a renowned anti-malware tool and it has one of the best threat detection rates. Utilizing this anti-malware program will make removing the malware easily.
Every device should be scanned every once in a while. With this tool, every malware on the Android device will be removed.
1 First, go to the Google Play store and install Malwarebytes Anti Malware.  2 Once installed, it will ask you for permission to access files. Allow it access to manage the files on the device, it is needed to detect malicious threats

3 Click Run a full scan to detect potential threats on the whole device. Since this may take a while, you can simply close the application and let it run in the background. You can see the progress of the scan through the notifications.

4 After the scan is complete, the detected threats will be shown on the screen and all that is left to do is to eliminate them. Click the Remove Selected to get rid of the threats.

We advise you to run a routine scan of the device to ensure that it is continuously malware free. We also recommend using Malwarebytes Real-Time Protection, which will secure your machine and detect any threats as soon as they appear.
Additional protective measures for better security
Removing malware from the computer and the mobile device is one thing; keeping it secure for the future and a long period is a different thing and will require certain things to make sure you are secured, especially if you do not know most of the ins and outs of the device you are using.
Cybercriminals are always stepping up their game to make sure they infect users and extract data and money from them.
We encourage you to take the actions listed below to ensure complete security before leaving this page because we strongly promote web security and having a secure online presence.
Safeguard your data and privacy online by using a VPN application
VPNs, also known as virtual private networks, guarantee your safety and complete anonymity while you browse the internet.
In contrast to a firewall, which monitors and blocks potentially harmful connections in the network, A VPN hides the user’s connection via a tunnel so that it would appear to third parties as a different IP address and location.
This ensures that your data won’t be leaked because the program hides it. Be aware that visiting infected websites may cause your IP address and location to be disclosed; however, if you use a VPN, this will prevent your true IP address from being revealed to malware actors.
If you already had Kaspersky installed from the previous step, you had the choice to install its integrated Virtual Private Network, which is a good tool that we also advise.
However, if you decide against doing so and instead download a VPN-only program to cloak your web browsing activity, Mullvad, and AirVPN are excellent choices for fast connections and better privacy.
Mullvad VPN

Since user privacy is the main focus of a virtual private network program, Mullvad VPN excels at putting users’ privacy first. You do not need to enter your email address while registering to download their application because they maintain anonymous accounts.
If you wanted to hide or didn’t want your credit card information to be disclosed, they also accept Bitcoin payments. According to their website, they support a free internet that is devoid of surveillance and censorship.
They have also been announcing new server locations to guarantee users a fast connection anytime they want to connect to various areas throughout the world.
AirVPN
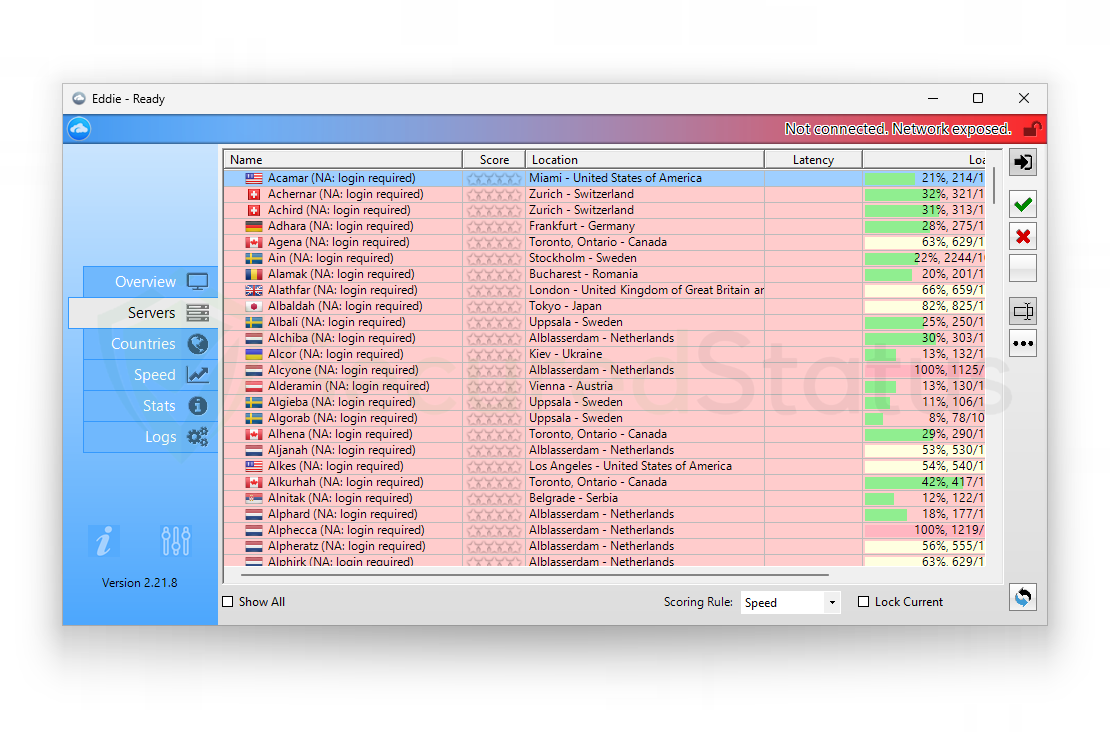
AirVPN seeks to provide customers with access to the real internet, in contrast to Mullvad, which promises to offer users a free internet. Along with masking your IP, they also don’t monitor or log any user data, which is good.
You can use it for a long time without worrying about being disconnected because they don’t impose a traffic or time limit when connecting to their network. In addition, there are infinite, cost-free server changes with physically fast servers in many different nations.
Additionally, when registering for their program, you are not required to enter your email address. They also offer strong encryption and Perfect Forward Secrecy to ensure that it is difficult to determine the user’s connection.
Utilize an adblocker when browsing the internet
Installing an adblocker on the browser is the best way to prevent malicious software.
Additionally, by blocking malicious websites before users can even access them, it is possible to prevent malware from being downloaded.
In this case, we recommend uBlock Origin, which is an open-source AdBlock extension that comes at no cost and is free forever. It is one of the most reliable plugins out there, ensuring that every advertisement on a webpage will be blocked.

For Google Chrome
1. Go to the Chrome Web Store and search for the browser extension, or click here to go directly to the extension page.
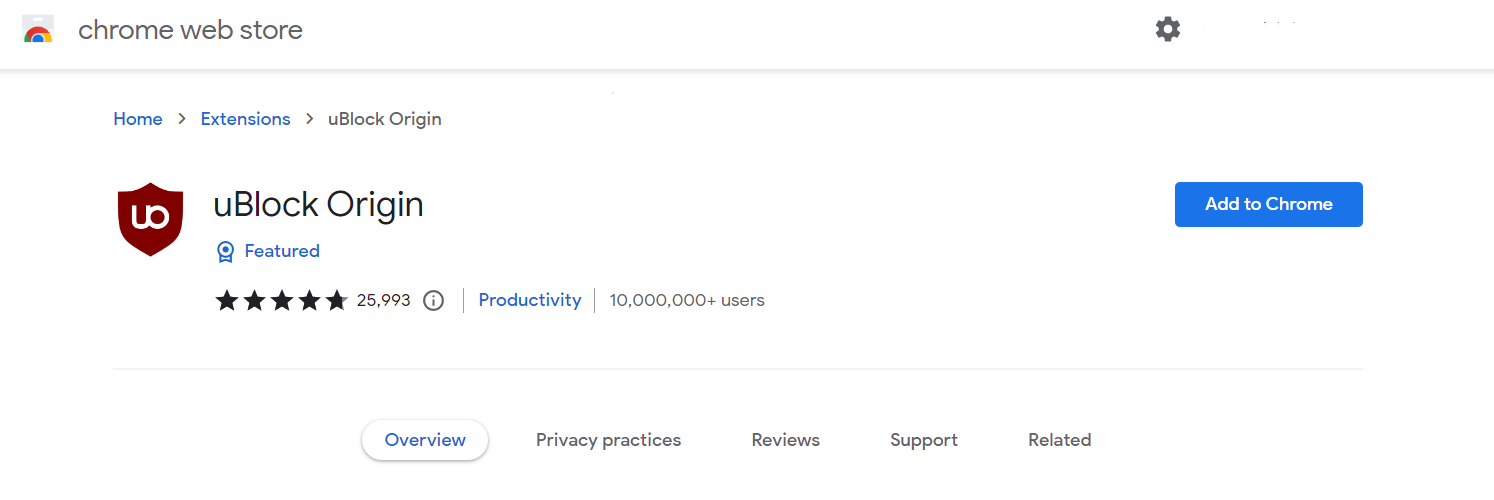
2. Click the Add to Chrome button. Then click Add extension when the confirmation window appears.

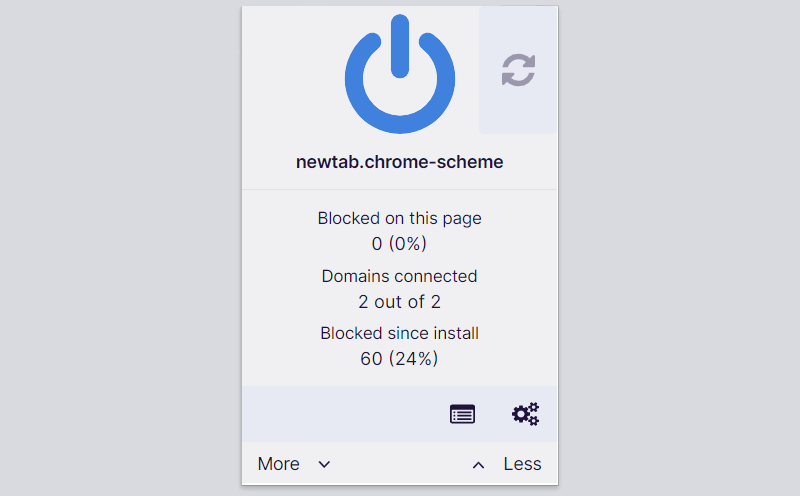
3. uBlock Origin is now installed in Google Chrome. The adblocker is turned on by default; you can click the power button if you wish to turn it off for a while. The menu can be found by clicking the puzzle icon in the upper-right corner next to the search bar.

For Mozilla Firefox
1. Visit the Firefox Add-ons Store and search for uBlock Origin, or click here to automatically go to the extension’s webpage.
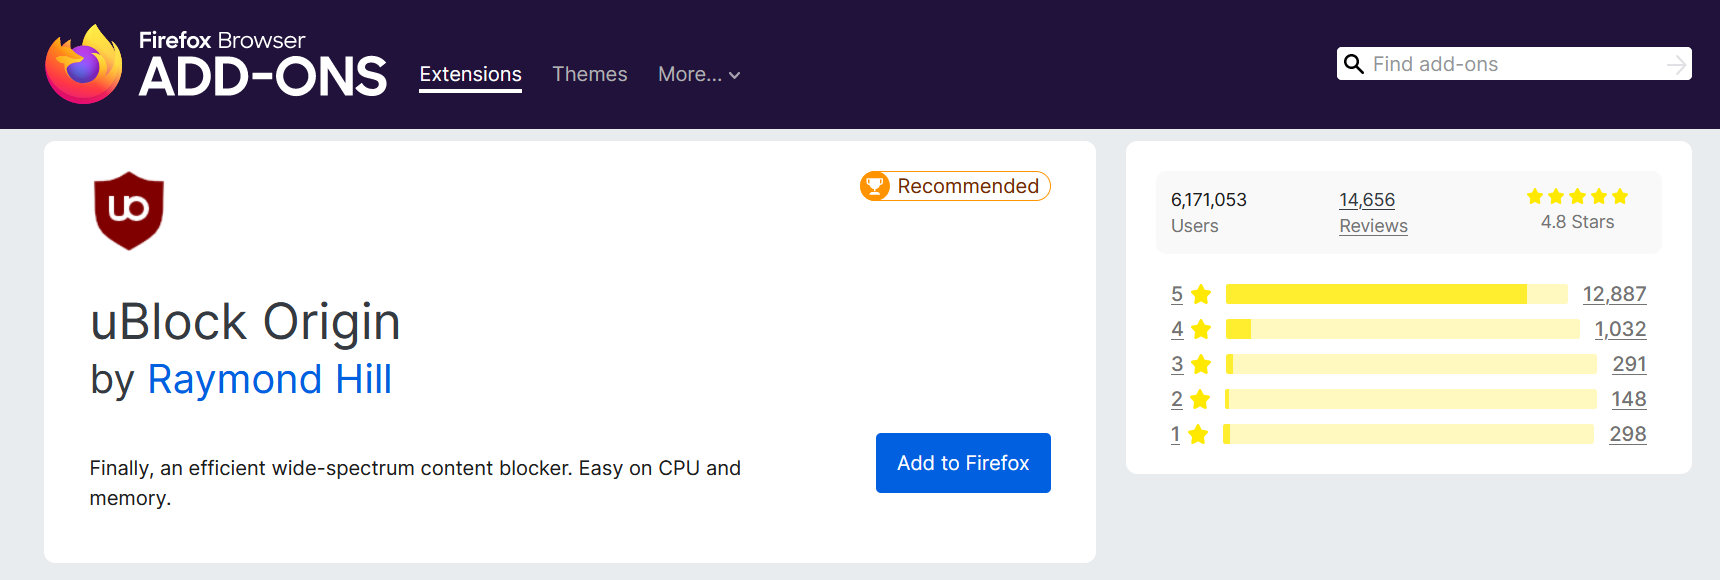
2. Click Add to Firefox, and after that, a confirmation window will appear stating the permissions it will grant the addon. Finally, to add it to the browser, click Add.

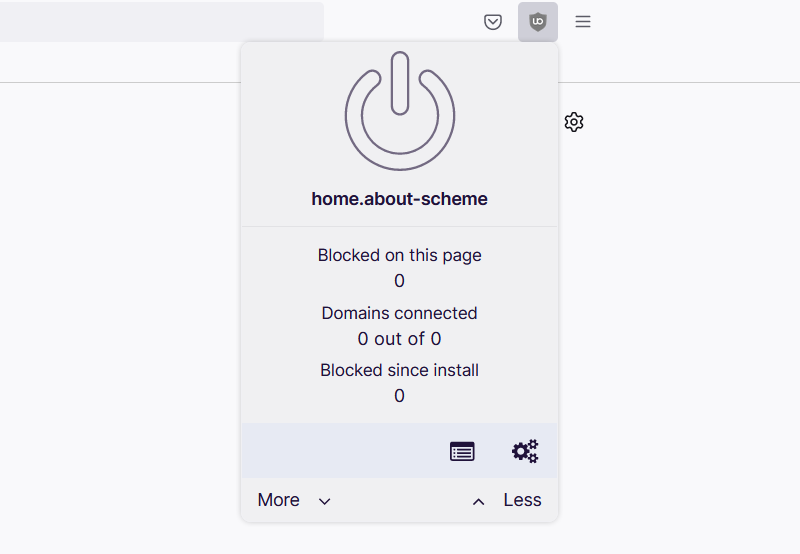
3. Mozilla Firefox now has uBlock Origin installed. The adblocker is activated by default; if you want to disable it for some reason, simply click the power button. The menu can be found in the upper-right corner of the web browser, next to the search bar.

For Microsoft Edge
1. Go to the Edge Addon Store and search for the said browser extension. You can also click here to go directly to the plugin page of the Adblocker.

2. Click the Get button, and a confirmation window will appear. Continue installing the extension by selecting Add extension.

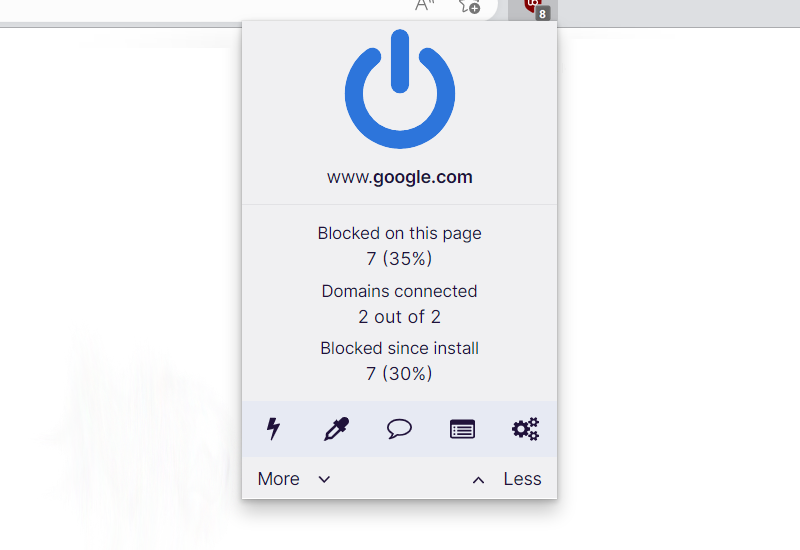
3. Now that uBlock Origin is installed on the browser, you can choose to disable the Adblocker by clicking the power button. The menu can be accessed by hovering over the extension’s icon next to the search bar.
The majority of pop-up advertisements, whether they include malware or not, will be filtered by the extension and no longer be displayed to you. Currently, uBlock Origin is not available for Mac or iOS users, but there are plenty of free options on the market, such as AdBlock for Safari.
Use a firewall to prevent cyber attacks
A security firewall is required for every internet connection that is made. It is an essential tool that enhances security and stops online attacks.
Through a security mechanism, it controls incoming and outgoing network connections on your system and network and filters the undesirable ones. Consider it a further barrier against malicious assaults and zero-day exploits.
You don’t need to do anything if you installed Kaspersky in the previous step because the program we installed earlier comes with a built-in firewall that is turned on by default.
On the other hand, if you prefer a standalone, fully functional firewall utility application that is exclusively focused on securing the network, we recommend these top two firewall solutions for personal computers: Comodo and ZoneAlarm.
Comodo Personal Firewall

Comodo Firewall is a well-known software program for securing your network and computer. It is a sophisticated tool with a wide range of features.
It is simple to use and doesn’t require complicated configuration to set up. It also functions by being aware of your computer usage habits to avoid interfering with your work.
Additionally, it claims to offer the highest levels of protection against both inbound and outbound threats. It secures the ports on your computer from hackers and prevents rogue software from sending your sensitive data over the internet.
ZoneAlarm Free Firewall
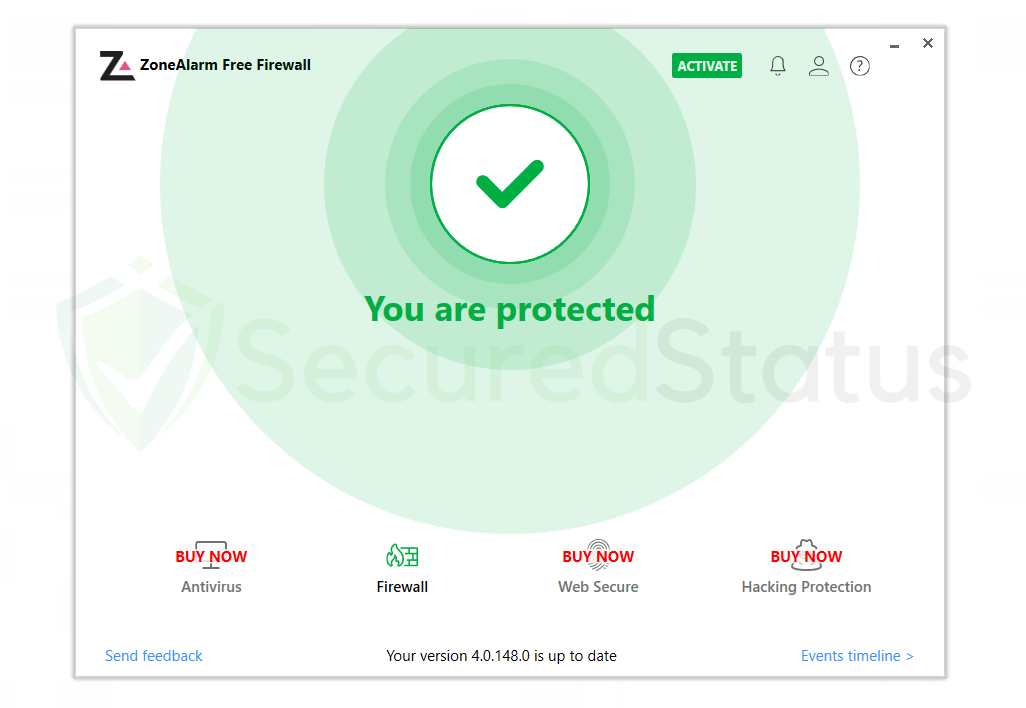
You can also opt for ZoneAlarm Free Firewall as your first line of defense between your device and the internet. The program safeguards your network and blocks any dangers, and you can use the free version of it without paying anything.
It provides a robust two-way protection solution that guards against spyware from disclosing your data online while also hiding your PC from nefarious hackers.
With its cutting-edge anti-bot protection, it also protects your computer from automated cyberattacks in real-time.
Additionally, it protects your computer against spam, dubious websites, and many others. Lastly, it provides real-time defense against automated cyberattacks with its cutting-edge anti-bot security.
Decryption tools if you were infected with a ransomware
Finding a working decryption tool for ransomware-infected data may be difficult, if not impossible. Because there may not be much information on a virus that appears to be new, it may take time to create a decryption.
However, you can check Emsisoft’s Ransomware Decryption Tools page on their official website to see if a decryption program for the ransomware in question is available. In addition, you can also try Avast’s Free Ransomware Decryption Tools to see if they offer one that works as well.
Note that these sites may not have one available at present, therefore you may also want to try the file recovery applications that are shown below.
File Recovery Programs to Try and Use:
Here are programs you may use to restore your files from a ransomware attack. Note that the tools mentioned below do not guarantee the decryption of ransomware-infected files.
Shadow Explorer
ShadowExplorer is a file recovery program that allows you to recover prior versions of files that have been altered or overwritten. The application accesses the location in which the documents or files are located and retrieves them from there.
For your information, Windows saves a copy of the files you updated with its restore points, but you won’t be able to access them until you have the feature turned on. Restoring your data with software like ShadowExplorer, on the other hand, can be a lifesaver especially when facing a ransomware virus.
In a matter of seconds, the application will display all of the recovered copies. Whatever sort of file you need to restore, ShadowExplorer will find the overwritten copies in any format. This application is extremely useful since it could simply pull up a backup copy of the infected data and get it back. It would be as if it wasn’t infected at all, as long as there is a shadow copy of the files it could do just that.
PhotoRec
Photo Rec is primarily a photo recovery program. It allows you to recover photographs from a variety of digital devices, including laptops, video cameras, mobile phones, external drives, and more.
The tool can also recover corrupted photos, making it suitable for occasions such as ransomware attacks.
Since corrupted photos can be lost or unrecoverable. PhotoRec comes in handy here. The application is a digital picture recovery utility that allows you to recover photographs and images from a variety of devices, even if they have been corrupted by system or file damage.
The program is open-source and free. It recovers missing files from a system using text-based data recovery algorithms. However, do note that this application cannot ensure that your infected photos will be completely decrypted.
Bottom Line
While this may appear to be typical advice, we recommend users not visit illegal streaming or torrenting websites and more importantly, download anything from them because doing so may result in the installation of malware and viruses.
Because these websites are illegal, they are unable to make a profit from legitimate advertising. As a result, they host questionable advertisements from unidentified marketers that want to publicize their contents, which are most likely dangerous codes being propagated by cyber criminals.
Always make sure that your device is protected against sneaky exploits and stealthy cyberattacks. While taking precautions and avoiding dubious websites are crucial, having a solid line of defense is essential to ensuring the security of your network and data.
If you experience another computer issue, please visit our website to find a solution for your problem or get in touch with us, and SecuredStatus will be happy to assist you once again.


