While browsing suspicious and unfamiliar websites like crack downloads and illegal streaming sites, it is important to be aware of a common tactic employed by cybercriminals.
Users may encounter sudden redirects to webpages displaying alarming messages claiming that their computers are infected.
It is crucial to understand that these pop-ups are deceptive and designed solely to induce panic, leading users to believe their systems are compromised.
These misleading pop-ups are created to resemble genuine Windows Defender warnings or legitimate antivirus notifications.
However, they are not authentic interfaces of such programs; rather, they are simply webpages displayed within the browser.
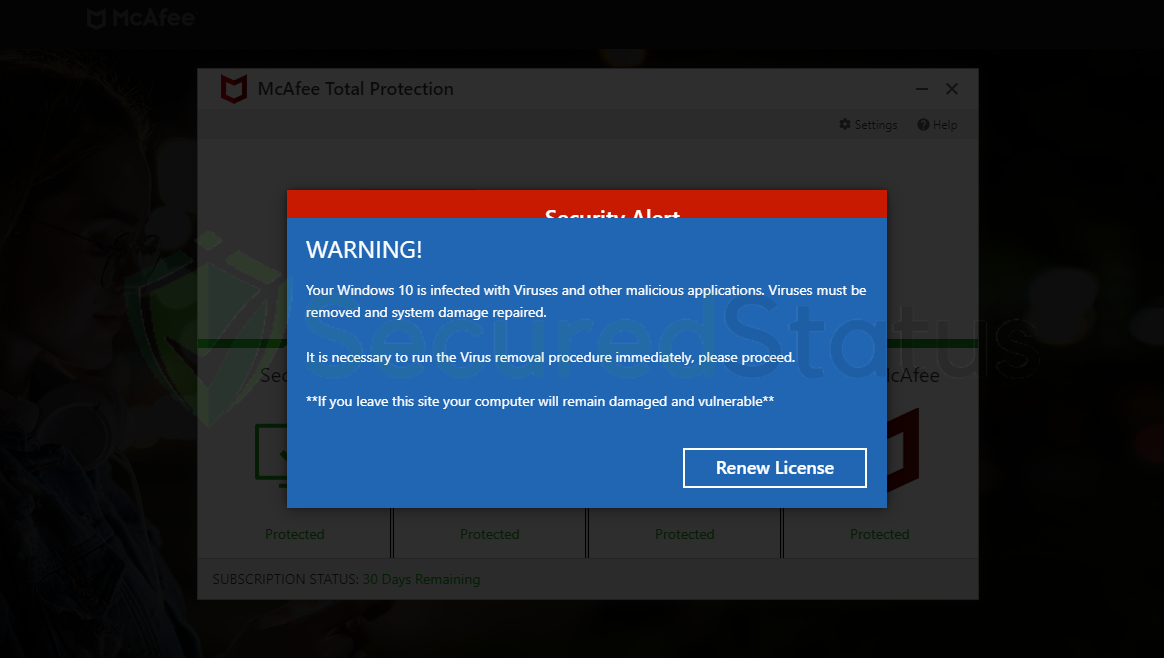
In these instances, users are typically prompted to click on a download link under the pretense of installing necessary software or security updates.
It is essential to exercise caution and refrain from interacting with these deceptive prompts. Clicking on the provided download link can result in the installation of unwanted programs that may introduce on the user’s computer.
These programs can pose severe risks, such as compromising personal information, hindering system performance, or granting unauthorized access to cybercriminals.
Following the procedure below will help you to get rid of the pop-ups stating that your computer is infected. It will also make sure that such pop-up messages will not show up again.
Procedure to Remove Pop-ups Stating Your Computer Is Infected
The steps provided in the guide below will assist you in getting rid of the pop-ups stating that your computer is infected. Furthermore, it will assist in ensuring that any other malware that may be hiding in the system is removed.
Each of the tools and methods indicated below has been tested and evaluated by our team to ensure that they are effective. As a result, we are confident that the browser threat on the device will be removed.
Step 1: Remove the malicious pop-ups automatically with Malwarebytes
The antivirus software has received widespread acclaim from cyber security professionals, and we believe it can help users get rid of malware from their devices.
Not to mention, it is free to use unless you would like to pay for the extra features.
Malwarebytes is an anti-malware which is excellent at finding and getting rid of unwanted threats on the system. Based on our tests, this tool has been able to successfully remove the majority of the malware that was being installed in a testing environment.

Malwarebytes also offers a free 14-day trial when you download it for the first time, so you might want to use the remaining time of the trial to test out the premium features.
1. Click the button above to download the latest version of Malwarebytes Anti-malware.

2. Open the installation file after the download and follow the procedure shown.
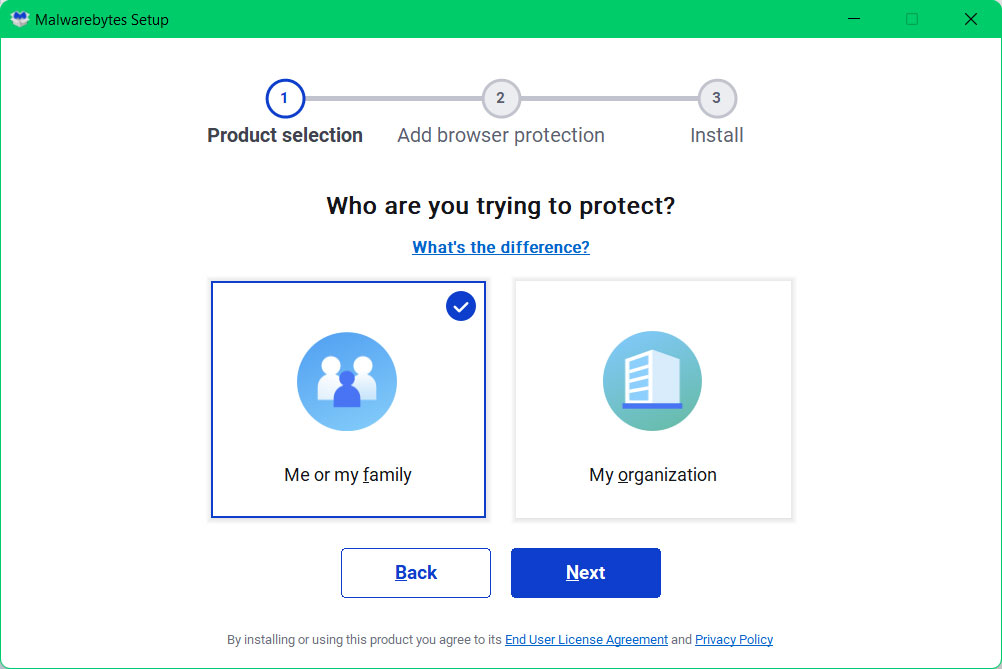
3. After following the software setup instructions, wait for the application to finish installing.

4. Once the application is installed, you may now run your first computer scan and wait for it to finish.
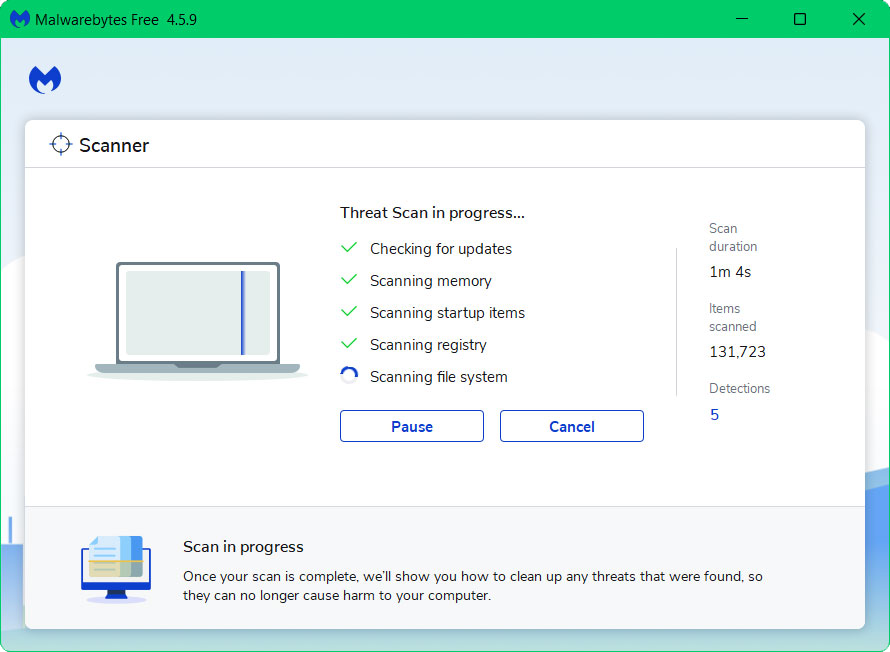
5. All discovered malware on the computer will be displayed on the screen, and you can eliminate them by pressing the “quarantine” button.
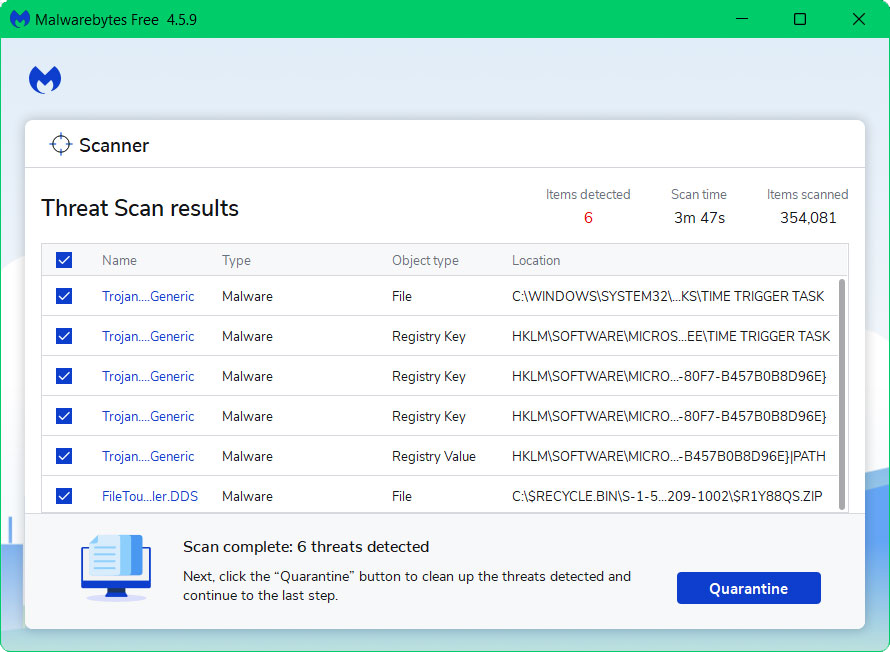
The browser threat as well as additional malware hiding on your system is now removed. As we mentioned above, the first time you download Malwarebytes, you will receive a premium trial. You can use this trial to determine whether you prefer the additional capabilities offered by the paid version.
You have the option to uninstall the application if you wish to do so after getting rid of the malware from the computer. While doing so will turn off Windows Defender Real Time Protection, you can use this guide to activate it after removing Malwarebytes.
Step 2: Remove the pop-ups browser permission
The majority of the time, all you have to do to stop the pop-ups from the browser is to get rid of the notification permission for a suspicious website.

For Google Chrome
1. Open the Chrome application then go to the upper right corner of the browser window and click the three dots menu button.
2. From the left panel menu, select Settings, then Privacy and Security.
3. Scroll down to Notifications under Site Settings.
4. It will then provide a list of sites that are permitted to display notifications. Find websites you do not recognize and delete the website.
5. To remove the site, click the three dots next to the link and then select remove.

For Mozilla Firefox
1. Launch Mozilla Firefox browser then open the menu by clicking on the three horizontal lines located in the upper right corner.
2. Click the Settings option then hover over to the Privacy and Security panel.
3. Scroll down until you find the “Permissions” section then click settings.
4. A window will open alongside websites with permission to show notifications.
5. Remove the website by selecting on the URL and clicking the Remove Website button.
6. There will be an option called “Block new requests asking to allow notifications” if you do not wish to allow sites to further ask for notifications then you may tick the box.
7. After making the modifications, click Save changes.

For Microsoft Edge
1. Run Microsoft Edge on the computer and click the three dots icon on the upper right corner.
2. Click on the Settings button.
3. Select the Cookies and site permissions on the left sidebar.
4. Find and click Notifications then under the allow section, find suspicious websites and remove it.
5. Toggle the three dots on the right end of the website link then click remove.
After removing the browser threat, you should run a full antivirus scan to make sure the system is malware-free. Please click here or scroll below to follow the procedure.

For Safari
1. Open the Safari browser then click on Safari on the Menu Bar on top.
2. Choose Preferences from the drop menu.
3. A window should appear, then click the Websites tab.
4. On the left side panel select Notifications.
5. Remove the website from Safari by selecting the URL and click the Remove button.
 For Android Devices
(Click here to access the instructions for iOS if you use an Apple device.)
Removing the notification permission on android devices is also as easy as removing it on computer. Please follow the step-by-step procedure below.

Remove permission on Google Chrome
1. First open Google Chrome then go to the upper right corner of the browser and click the three dots menu button.
2. From the shown menu, select Settings.
 3. Scroll down and click Site settings under the advance section.
4. Once Site settings menu appear, click Notifications.  5. Find suspicious domains from the websites list and remove its access by blocking it.
 6. To be safe just in case, go back to the Site settings menu and go to Pop-ups and redirects.
  7. Block Pop-ups and redirects from the browser.
  8. Go back to the Site settings again and go to Ads.
  9. Block Ads by toggling the switch off.

Remove permission on Mozilla Firefox
1. Launch Mozilla Firefox browser then click the three horizontal dots on the lower right corner to open the menu.

2. Click the Settings option from the drop down menu.

3. Hover over to the Privacy and Security section and click Site permissions.

4. Click Notifications from the Site permissions menu.

5. Toggle the Notifications to Blocked.

 For Apple Devices
Since there are no browser permissions on iOS devices, you may utilize the Content & Privacy Restriction feature to blacklist websites from the settings.
1. To start off, head over to the Settings application of your device, scroll down and click the Screen Time option with the hourglass icon.
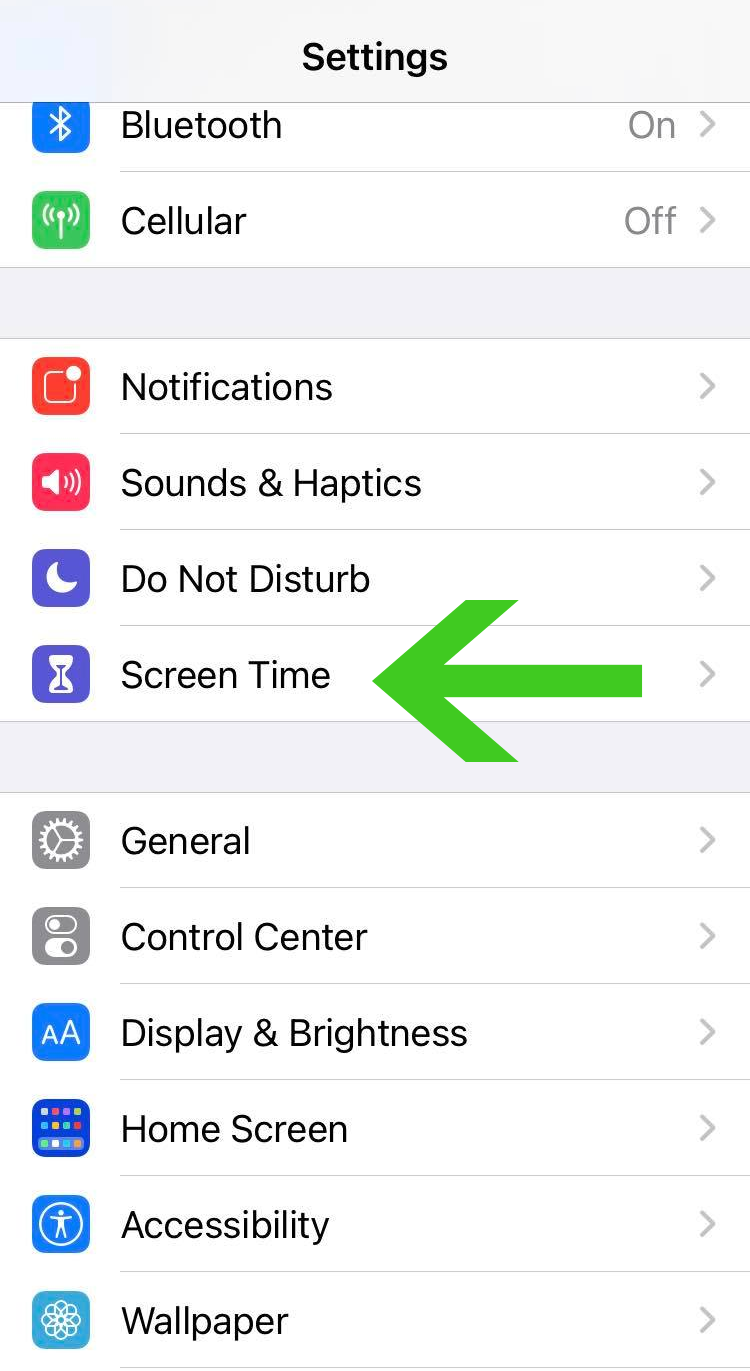
2. From the Screen Time settings, click on the Content & Privacy Restrictions option as seen from the image below.
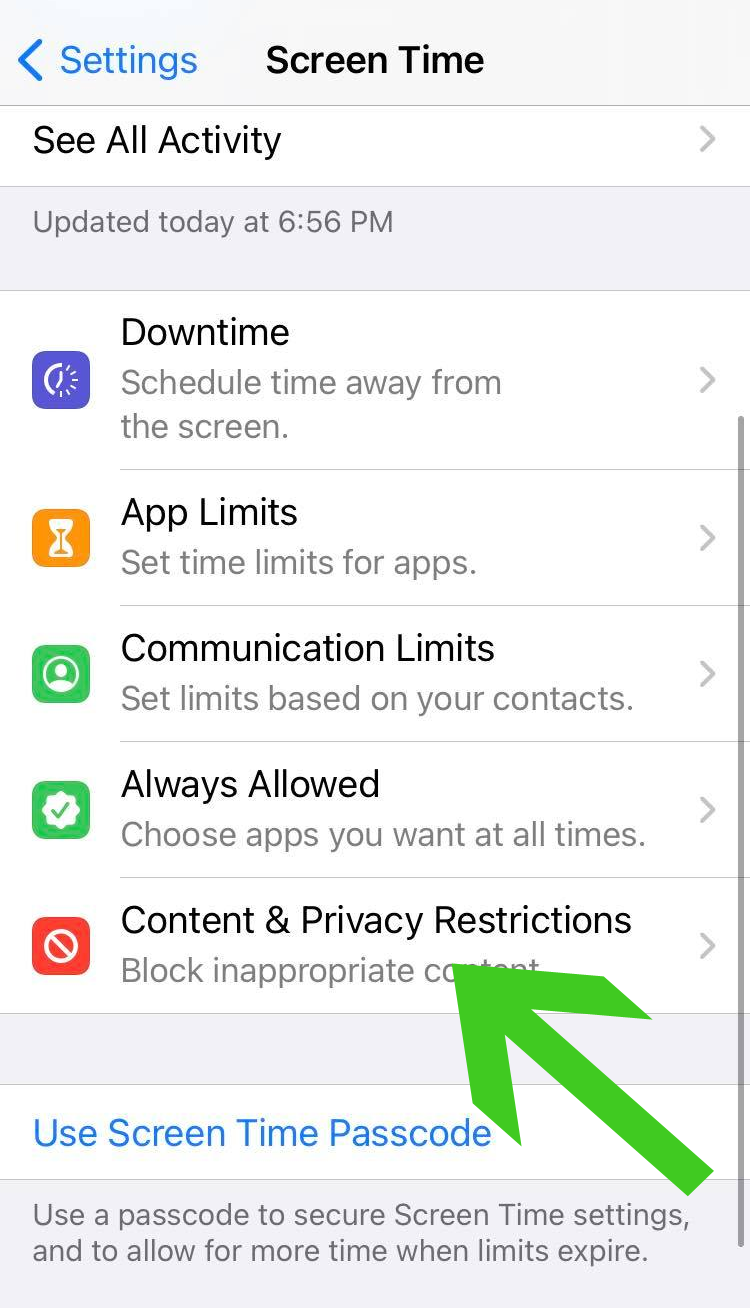
3. Once inside the Content & Privacy Restrictions settings, scroll down and click Web Content from the list of features and options it have.
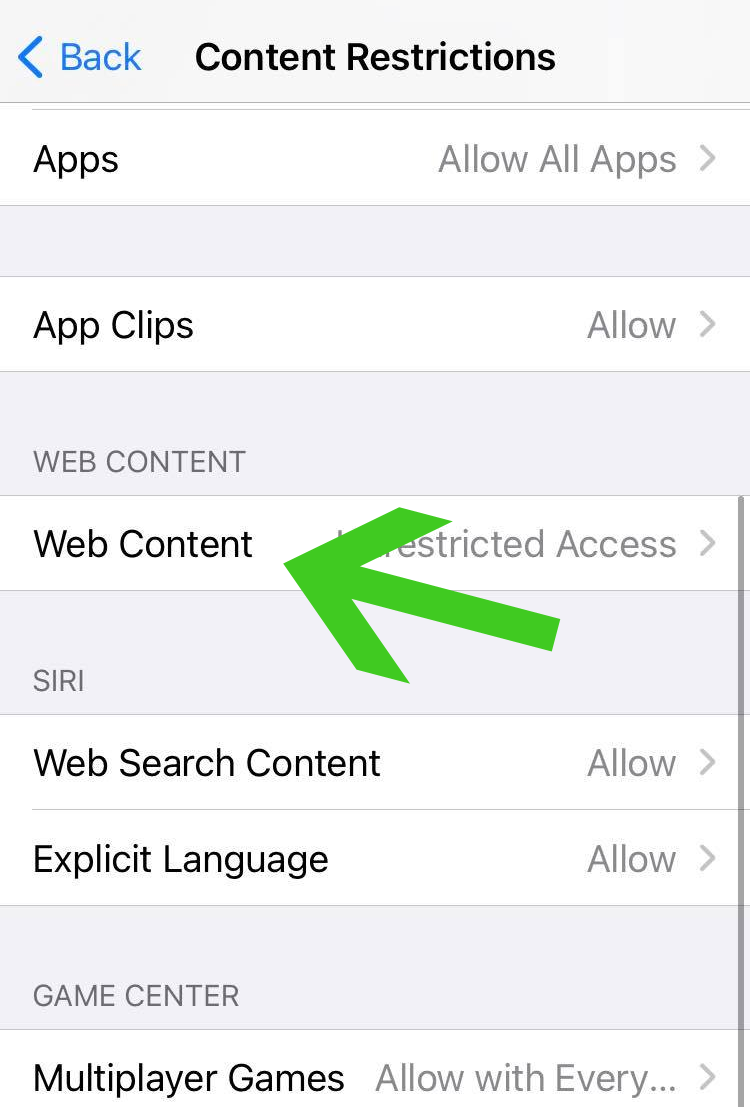
4. From here on you are presented with three options, unless you have never used this feature, it will be set to default with Unrestricted Access. Click on the Limit Adult Websites as we are going to use this option to block the malicious pop-ups and other unrecognizable websites from the browser.
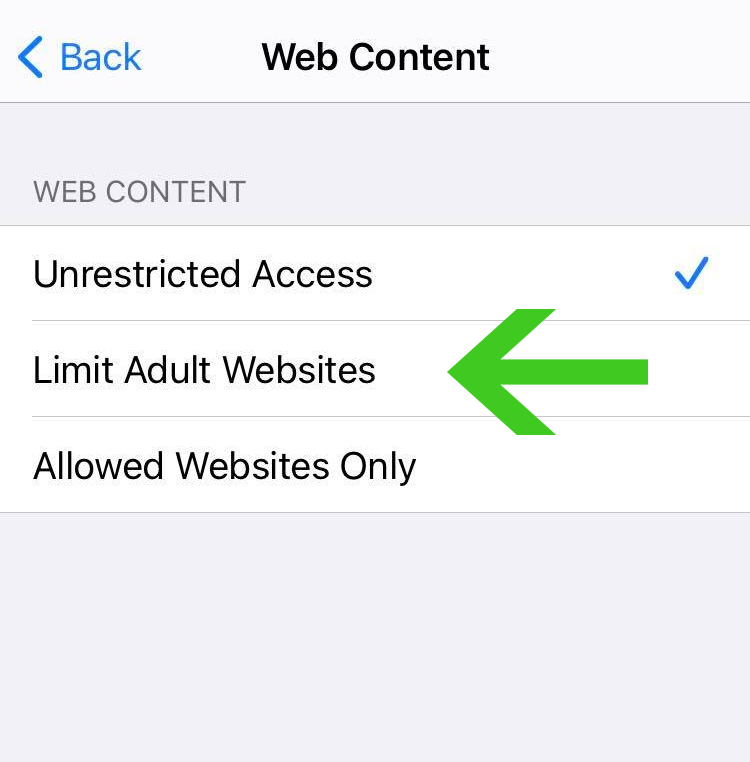
5. Two options should show up after clicking the Limit Adult Websites button. Click the “Add Website” button under the Never Allow section.
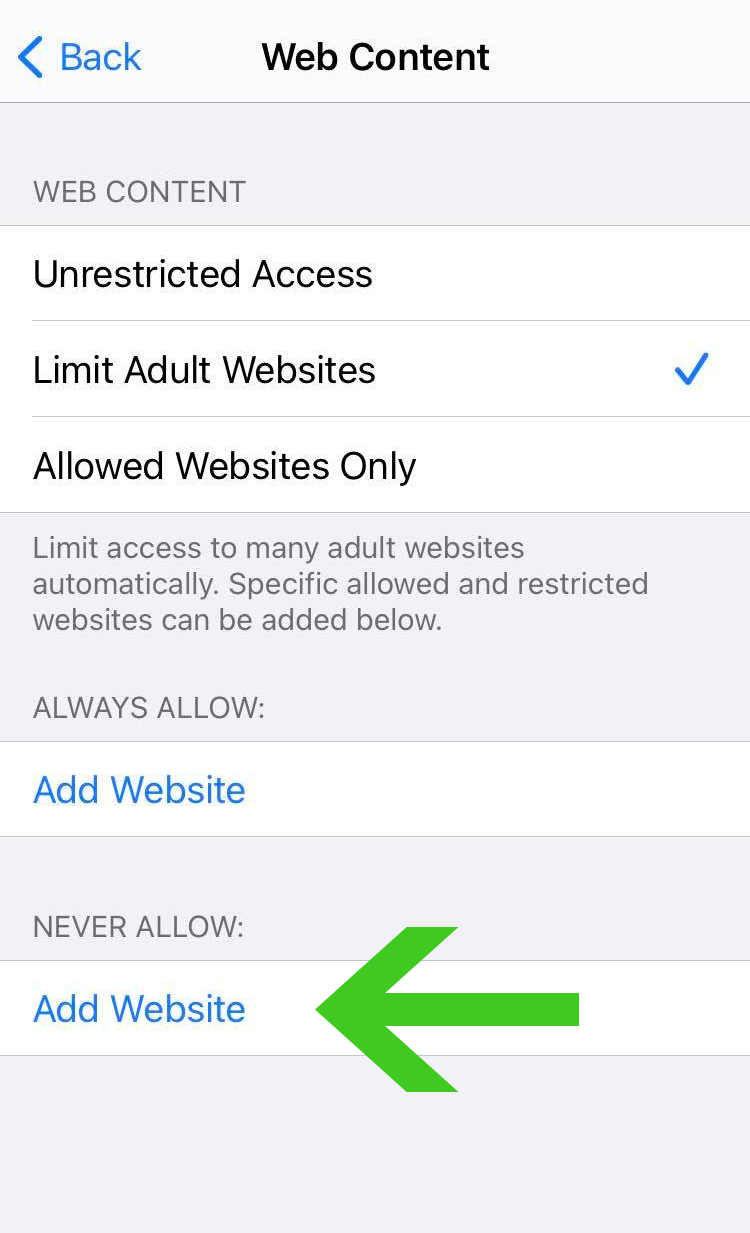
6. A URL bar should display after you click the Add Website button so you can insert the URL of the website you want to block. In the URL bar, enter the suspicious domain and press Done.
Now, the website that you blocked will never again appear in the browser. You can use this feature once again if you want a particular unwanted website to not show up. However, because the Block Pop-up function was enabled, it is unlikely that you will ever see these websites again.
Step 3: Remove suspicious browser extensions and programs
As we previously said, malicious hackers also employ pop-up ads and redirection to install their harmful software on users’ computers.
It is best to uninstall any doubtful and undesired apps that have been installed, if any, as a certain drive-by download may have taken place.
It is worth noting that locating the program can be tricky because many malicious programs disguise as legitimate programs or system files.
You may locate the program by utilizing the Task Manager and finding suspicious applications that are currently running when you are facing the browser hijacker symptoms.
Uninstall malicious programs via Control Panel

1 Search Control Panel in the Windows search bar then click it.
2 The Control Panel should open, from there click Programs then Programs and Features.
3 A list of installed software will show on the screen after a moment.
4 Scroll down and find malicious or any suspicious programs you did not download then right click the application and select Uninstall.
Remove malicious browser extensions
If the redirections still appear even after removing notifications permissions from suspicious sites, then the most likely cause is due to a malicious browser plugin installed.

Google Chrome:
Click the three dot buttons in the right hand corner of Chrome Browser. Find and click More Tools from the drop menu, then select Extensions.
A new tab will appear with all your installed extensions. Find which extension is suspicious and delete it. In order to deactivate the extension, toggle the blue switch to disable the program. Then click the remove button to fully uninstall it from Google Chrome.
If the switch is disabled: You have to remove the extension from within the extensions folder manually. Go to the Google Chrome extensions folder by using the following directory:
C:\Users\YOUR NAME\AppData\Local\Google\Chrome\User Data\Default\Extensions
You will see a list of folders with different hashes, to find what you need to delete, tick the Developer mode in the Google Chrome extensions tab to show the id of downloaded plugins.
Find the one matching the id of the extension you wish to remove to the one in the folder then delete it. Restart Google Chrome and the extension should be gone.

Mozilla Firefox:
Click the Menu button in the right corner of Firefox once it’s open. Then go to Add-ons and Themes then select Extensions.
Toggle the blue switch to disable the suspicious extension after finding it. Click Remove from the three dots icon on the right side of the extension you want to remove.

Microsoft Edge:
Open Microsoft Edge application then click on the three dots on the upper right. A drop down menu will show then click Extensions.
New tab will open and show all installed extensions on the browser. Find the suspicious extension that you might have not installed.
Slide the blue switch to disable the use of the extension. Click on the remove button just below the extension.

Safari:
Open the Safari browser then click on Safari on the Menu Bar on top. Choose Preferences from the drop menu. A window should appear, then click the Extensions tab.
Search for suspicious extensions you did not install. Click the unwanted extension then select the remove button.
Step 4: Run a second opinion scan with Kaspersky
If you visit numerous forums and websites, you will see most users agree that Kaspersky is one of the best antivirus tool available.
There is a chance that malware may still be present in the computer system. Not to mention, a second opinion scan will greatly reassure you that your device is free of harmful threats.

Since each antivirus application has its own threat database, Kaspersky’s detection technology may be able to find viruses that the prior program missed.
To ensure sure the malicious pop-ups and other viruses are totally removed from the system, we advise running a scan just in case. If you are downloading the application for the first time, you will also receive a 31-day premium trial.
1. Download the Kaspersky Security Cloud by clicking the button above.

2. Once the setup has finished downloaded, open the file and start the installation.

3. Wait until the wizard finds the latest version of the application or click Skip to install the current version stored.

4. Review the License Agreement. If you agree to its terms, click Continue.

5. Follow the installation instructions as shown then finally click install. (You may choose to uncheck the options shown if you do not want those features.)

6. Wait for the application to finish installing, then after the process is complete, click done.

7. Apply the recommended settings then start the application by clicking apply. Feel free to untick the options you do not desire.

8. You will be prompt to create an account and once you are finished, you will be redirected to the main screen. Select the Scan tab then click the run full scan and wait for it to complete. (Before scanning, we recommend you update the database to ensure any new malware variants are detected.)

9. After the scan has finished, the detected threats will be deleted from the computer.

The malicious pop-ups stating your computer is infected has now been completely removed from the browser along with any further malware it may have installed. Now that this process is complete, we can confidently assure that such threats won’t ever resurface on your device anymore.
If you currently do not have an active antivirus program, we recommend keeping Kaspersky as it is regarded as one of the best on the market.
Common Internet Safety Tips
- Websites with distinctive domain extensions should be avoided. Domain extensions other than .com, .org, .net, and .edu should be avoided because most infected websites have very distinct TLDs, always check the last section of a domain to make sure you’re on a safe site, unless it has been reputable for a long time.
- Never download software or programs from unknown sources. This is one of the most popular ways for adware and other malware to infiltrate your computer. Download only from recognized and legal sources. To be secure, avoid torrent downloads and cracked software download sites, as the files will almost always contain viruses.
- One of the most reliable ways to be safe online is to use a firewall. It protects users from potentially hazardous websites by acting as a first line of protection. It keeps intruders out of the user’s network and device. In today’s world, a firewall will protect a user from the risks that lurk on the huge internet.
- Anti-virus software must be kept up to date. These programs should always be updated on a computer since hundreds of new malware threats are produced every day that aim to infect the machine’s weaknesses. Antivirus updates contain the most recent files needed to combat new threats and protect your computer.
- Only visit websites with a secure connection. Since HTTP connections do not encrypt the data they receive, they are not considered secure. Entering personal information like email addresses, phone numbers, and passwords on a website that uses an HTTP connection is hazardous since your information could be stolen. Websites that use HTTPS connections, on the other hand, are more secure because data is encrypted and attackers are less likely to obtain access to information shared within the site.
Final Thoughts
If you’re still unsure about the pop-up threat, you can fully reset the browser by following these instructions. This will return all settings to their default settings, but it won’t delete your saved bookmarks or website passwords, so you don’t need to worry.
The appropriate removal tools and procedures makes removing malware a straightforward process. Nonetheless, it’s crucial to start safeguarding your device now to avoid the dangers posed by viruses, which are much more harmful than pop-ups and redirects.
We are proud of our expertise in this area and are pleased to have assisted you with your malware issue. If you happen to face another virus on your system, SecuredStatus will be readily available to offer support once again.
