What is the Fake McAfee Renewal Notice Pop-up?
McAfee Renewal Notice is a fake alert website that tricks users into downloading an unwanted application into their computer. This type of scam fools the user to pay for apps and get the device bloated with antivirus programs.
When visiting an unreliable site, users may be redirected to websites stating you are infected with McAfee Renewal Notice.
Please do note that websites like these are made to fool users into thinking they are compromised but in reality their device is perfectly fine. These scams only show websites with designs of malware threats that look very close to official McAfee warnings.
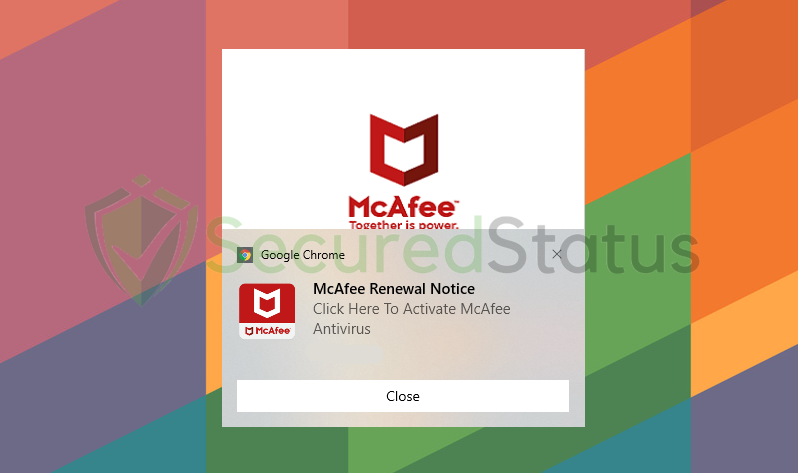
Even though these sites showing McAfee Renewal Notice alerts are fake, if you keep on redirecting to these sites every few minutes then you may have adware installed on your browser or computer. It is a type of malware that is frequently spread throughout the internet and has infected many people everyday.
It is an irritating piece of malware that shows unwanted advertisements and redirects you to a multitude of websites of it’s partners. The main purpose of these programs are to earn money by displaying ads on a user’s computer without their consent.
These pop-ups from McAfee Renewal Notice website are not malicious at all however they may provide greater risk if the user falls for it. That is why it is necessary to remove it from the browser and the system as soon as possible. The removal guide below should help you eliminate the malware threat from your computer.
Fake McAfee Renewal Notice Removal Procedure
The steps provided below will assist you in getting rid of the pop-up ads from Fake McAfee Renewal Notice as well as any potential malware, trojans, rootkits, and other viruses that may have come with them.
Removing malware from the system and the browser should be thorough and carefully executed; therefore, please follow every step provided. We have thoroughly inspected and updated the provided steps to ensure their current effectiveness.
We optimized the methods below so that less tech-savvy individuals can still remove the browser threat without the need to seek assistance from tech support or a computer expert.
Step 1: Remove Fake McAfee Renewal Notice from the browser
The majority of the time, the pop-up advertisements from Fake McAfee Renewal Notice are brought on by granting an unknown website access to display notifications to the browser.
All you have to do is revoke the permission you granted to the aforementioned website to use the browser notifications to show ads.

Remove Fake McAfee Renewal Notice from Google Chrome
1. Open the Google Chrome application, then proceed by going to the upper-right corner of the browser window and clicking the three-dot menu button. Once the drop-down opens, select Settings.
2. After the Settings page of the browser has opened, go to the left-side panel and click Privacy and Security from the options available.
3. Once you are on the privacy page, scroll down to the section titled Privacy and Security, then click Site Settings.
4. Scroll down and find the Permissions section of the page. Click on Notifications to see all websites that have notification access in the browser
5. It will then provide a list of sites that are permitted to display notifications under Allowed to send notifications. To remove the site, click the three dots next to the link and then select remove.
After doing the necessary steps, Fake McAfee Renewal Notice will now stop showing pop-ups from the Google Chrome browser.

Remove Fake McAfee Renewal Notice from Mozilla Firefox
1. Launch the Mozilla Firefox browser, then open the menu by clicking on the three horizontal lines located in the upper-right corner. When the drop-down menu appears, select Settings.
2. After the Settings page has opened in the new tab, hover over Privacy and Security via the left-side panel.
3. Scroll down until you find the Permission section, and click Settings beside Notifications.
4. A window will open alongside websites with permission to show notifications. Remove the Fake McAfee Renewal Notice pop-ups by selecting the URL and clicking the Remove Website button.
5. There will be an option called Block new requests asking to allow notifications. If you do not wish to allow sites to ask for notifications, then you may tick the box.
After making the modifications, click Save Changes. By now, the necessary changes would have been made, and the Fake McAfee Renewal Notice pop-ups would no longer appear on the browser.

Remove Fake McAfee Renewal Notice from Microsoft Edge
1. Start by launching Microsoft Edge on the computer and clicking the three-dot icon in the upper-right corner. After the drop-down menu has opened, click Settings.
2. Once the Microsoft Edge settings page has opened in a new tab, select Cookies and Site permissions from the left sidebar.
3. Scroll down on the Cookies and Data Settings page and select Notifications below the site permission section, as shown.
4. Locate Fake McAfee Renewal Notice in the Allow area of the Notifications page, then select the three horizontal dots and click Remove.
After making the necessary changes to the notification permission, pop-ups from Fake McAfee Renewal Notice shouldn't appear on the browser any longer.

Remove Fake McAfee Renewal Notice from Safari
1. Open the Safari browser, then click on Safari on the Top Menu Bar. Choose Preferences from the drop-down menu.
2. A window should appear; then click the Websites tab. Then, on the left-side panel, select Notifications.
3. Remove the website from Safari by selecting the URL/s you do not recognize and clicking the Remove button.
After that, pop-ups from Fake McAfee Renewal Notice should stop appearing in the browser and on the computer's notifications tab.
Step 2: Remove suspicious browser extensions
Now that the pop-ups have been removed, our attention will turn to removing any malware that may have been installed on the computer while the pop-ups were active.
Fake McAfee Renewal Notice pop-ups can also lead to the installation of malicious extensions in the browser. Cybercriminals tend to use these extensions to deploy malicious advertisements to unsuspecting users. It may also act as a sort of spyware through which web data can be tracked, such as history, cookies, and saved passwords.
So, to be short, it can lead to browser exploits and data leaks if not prevented and removed as soon as possible. This is why we'll be investigating the browser extensions that are currently installed on your computer.
If you have a dozen or more plugins installed, it could be challenging to figure out which ones are harmful, but there are certain ways and approaches to figure it out.
Malware actors frequently exploit the names of utility programs to mask their dangerous plugins; examples include Volume Booster, YouTube Downloader, Text Reader, and similar names.
More hidden browser spyware will impersonate widely used and reliable plugins like Google Drive. Users won't suspect the extension because of this trojan-like trait unless they investigate thoroughly and see if it genuinely comes from the same developer.
To know more about which extension should be deleted, we have made a guide stating ways to find the browser culprit.
Please follow the steps below to remove malicious browser extensions from your web browser and stop the Fake McAfee Renewal Notice pop-ups, redirects, and other suspicious behaviors that may endanger the user’s data and privacy.
The browser may be controlled by an organization, making it impossible to remove the browser extension when you try to do so. It indicates that the virus has set up a specific configuration to prevent removal. If that's the case, please use the steps in this article to fix the problem.
Note: The extension used in this step is not malicious and is simply being used as a demonstration of how to get rid of browser extensions.

Google Chrome
1. Open the browser and click on the three horizontal lines at the upper-right corner of the window screen. Once the drop-down menu opens, hover over Extensions and select Manage Extensions on the submenu. On the other hand, you may also type chrome://extensions on the URL bar to directly access the browser extension page.
2. The extensions page will then open in a new tab, showing all installed plugins on the browser. Once you have found it, deactivate the browser extension by toggling the blue switch below its name and description (We will be using AdBlock as an example). After that, you may now click the remove button to get rid of the extension virus from the Chrome browser.
3. If the switch is disabled, then you will need to remove it directly from the extensions folder of the browser. To do this, first, you have to select the plugin and look at its ID as shown in the URL bar. (See the image below for an example.)
4. Open File Explorer and go to the folder where Chrome stores the browser extension you have downloaded and installed. The default location would be at:
C:\Users\YOUR NAME\AppData\Local\Google\Chrome\User Data\Default\Extensions
5. You will see a list of folders, each with different hashes. Find the folder matching the ID of the malicious extension, then right-click and delete it. Make sure the browser is closed before proceeding to delete the folder.
The next time you open the Google Chrome browser, you will see that the extension has been removed.

Mozilla Firefox
1. Launch the Firefox browser and open the menu by clicking the three horizontal lines, which can be located in the upper-right corner of the program. Once the drop-down menu opens, click on Add-ons and Themes. On the other hand, you may also type about:addons on the browser URL bar to enter the Add-ons Manager.
2. From the left-side menu, go to the Extensions page and view all of your browser extensions installed on Firefox. Toggle the blue switch to deactivate the plugin, then click the three horizontal dots beside the toggle and select Remove to get rid of it from the browser (We will be using Adblock Plus as an example).
3. If the toggle is locked or unable to be removed, then you will have to manually remove the extension from the browser's extension file directory. Open File Explorer and go to the following directory where Mozilla Firefox keeps its browser extensions; this will be located at:
C:\Users\Your Username\AppData\Roaming\Mozilla\Firefox\Profiles
4. You will see Mozilla Firefox profiles, and depending on how many browser profiles you have, go to the default ones you have, such as default-release in some cases, and click on the extensions folder inside the profile.
5. It will be difficult to determine the extensions of the folders you see because they have generated IDs. To make things simple, users should delete every .xpi extension file and make sure the Microsoft Edge browser is closed when they do so.
When you open the browser, every extension you have will have been removed. After the virus has been wiped out, install the extensions that you frequently use again.

Microsoft Edge
1. Open Microsoft Edge and enter the following URL to enter the extensions manager page of the browser: edge://extensions on the other hand, you may click the horizontal three-dot menu and click Extensions from the multiple options shown. Then a small window of extensions will show; click on the Manage extensions to enter the same page.
2. The page will then show all of your installed extensions within the Microsoft Edge browser. Find the one you think may be infected with a virus or is a malicious plugin and disable it by toggling the blue switch (We will be using the AdBlock extension as an example). Then proceed to uninstall it by clicking the remove button right next to Details.
3. If you were unable to remove the malware plugin, then you will have to head over to the browser's extension files via File Explorer to remove it manually. To do so, please head over to the extensions tab first, and now click the details next to the remove option.
4. Open File Explorer and head over to the following directory where all browser plugins within Microsoft Edge are stored:
C:\Users\Your Username\AppData\Local\Microsoft\Edge\User Data\Default\Extensions
5. Now find the folder with the same extension ID as the plugin we want to remove. It indicates that the following folder contains the files for the particular virus extension: Right-click it and delete it.
The next time you open the browser, the malware-infected extension has now been completely removed.

Safari Browser
1. Open the Safari browser application, hover over Safari in the top menu bar near the Apple icon, and click it to open the drop-down menu of Safari settings. From the drop-down menu, click on Preferences from the options provided on the menu.
2. Once the Safari settings window opens up, you will be on the General tab of the settings. Head over to the Extensions tab, which can be seen in the upper menu of the settings.
3. Choose the suspicious extension that you may think is infected with malware and disable it by unchecking the box next to the plugin's name. Now, to delete the extension completely, select the plugin you wish to remove and click the Uninstall button. (We will be using AdBlock Engine as an example.)
4. The extension you wanted to delete would now be removed; however, if it was unable to be removed due to being a part of an application, click on Show in Finder. Find the unwanted application, right-click it, and from the drop-down menu, click Move to Trash. You may be prompted to enter your password to confirm the app's removal.
5. To finish off, click the trash bin application and find the application you have moved to trash. Right-click it and select Delete Immediately to get rid of it from the virus application on the Mac OS.
After doing the steps and removing the malware-infected extension from the web browser, you can now browse the internet without having to worry whether someone is tracking your activities.
Step 3: Uninstall unwanted programs from the computer
The advertisements that were previously displayed before we removed Fake McAfee Renewal Notice from the browser may have also led to the installation of adware, also known as advertisement-supported software. Adware will probably be the culprit if pop-ups start to appear again.
Many users may not know this, but adware can automatically configure the browser to show pop-ups and redirect web pages. When it detects that users have removed the current configuration, it will immediately replace it again without requesting the users' consent.
Additionally, malware can also be installed in such cases, which is why it's crucial to verify the applications that are already installed on your computer to determine whether any malware has possibly been installed.
How will I know what to uninstall?
Giving the exact name of the malicious program may be complicated, but there are ways to make it easier to detect it. One of which is to simply remove all unknown programs you do not recognize or think you have not installed. You may have applications that you don't even know the use for; that is a sign that they can be malware.
Unless it is a system process, which you can see by checking the developer of the application, some trojan viruses also use recognized and legitimate names to obfuscate their programs. If the publisher name or source of the program is unknown to you, it is best to uninstall it.
Another thing to do is to look at the version number; the majority of adware and dangerous programs will have version 1.0 because they don't need to be updated and are merely running as background applications.
To remove malicious programs from your computer, we have provided two ways to do so: one is through normal uninstallation, and if that does not work, we also provide an advanced uninstall method to make sure it will be removed without issues.
Remove software via the Control Panel
The most common way to remove malware from your computer is to uninstall the program through the Control Panel. You may view all of your installed apps as well as the developer's name in the list of applications.
You can eventually remove the cause of Fake McAfee Renewal Notice pop-ups and other adware-related browser troubles by uninstalling the programs you do not recognize.
1. From the Windows search bar at the bottom of your screen, search for Control Panel and click the result that matches the same application.
2. You will see different options, such as System and Security, as well as User Accounts. But what you want to click is the Uninstall a program under the Programs section. Depending on your Windows version, hovering over the uninstall section will be relatively the same.
3. Now that you are on the Programs and Features page, it will show you all the installed programs. There will be filters you may want to use, such as viewing them in lists with details such as the publisher, version number, and when they were installed.
4. Right-click the suspected virus program and click Uninstall to get rid of it (We will be using Adaware as an example). It will then proceed to remove the application, or you will be presented with an uninstaller that will guide you to remove it; either way, it will be removed.
There is a chance that the program may not be uninstalled successfully, and when that happens, it is important to use the power of an uninstaller program such as Revo Uninstaller.
It is widely known to be enough to remove malicious programs that are evading uninstallation. If you encounter such an issue when proceeding to uninstall the app, you may utilize the uninstaller to do the job for you.
Remove malicious programs via Revo Uninstaller
For computer users who are not sure of what to do. You may resort to using Revo Uninstaller since it is much more effective and easy to use. Revo Uninstaller is a handy tool for Windows users.
This uninstaller not only removes programs from the computer but also deletes their changes from the Windows Registry, Host File, etc. The steps below will guide you on how to install and use Revo Uninstaller to get rid of the source of Fake McAfee Renewal Notice pop-ups.
1. Click the button below to proceed with installing Revo Uninstaller on your computer since we have made an in-depth guide on how to use it on the following page. On the other hand, you can also head over to Revouninstaller.com and download it from there.
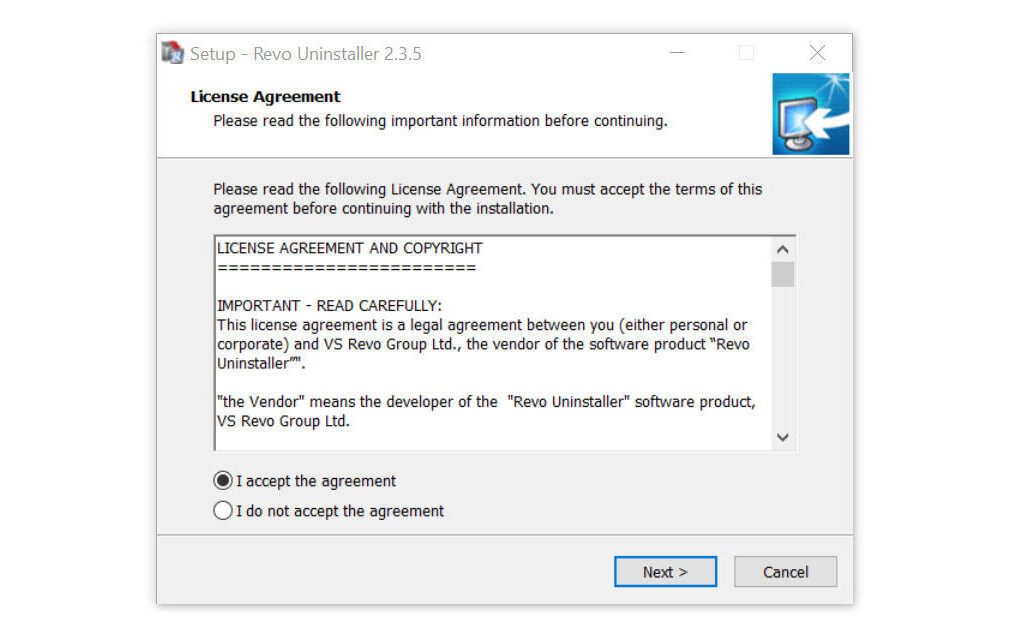
2. After the setup file (revosetup.exe) has finished downloading, run the installation wizard, read the license agreement, and click agree to proceed to the next step of the installation. Follow the procedure and wait until the installation of the software is complete.
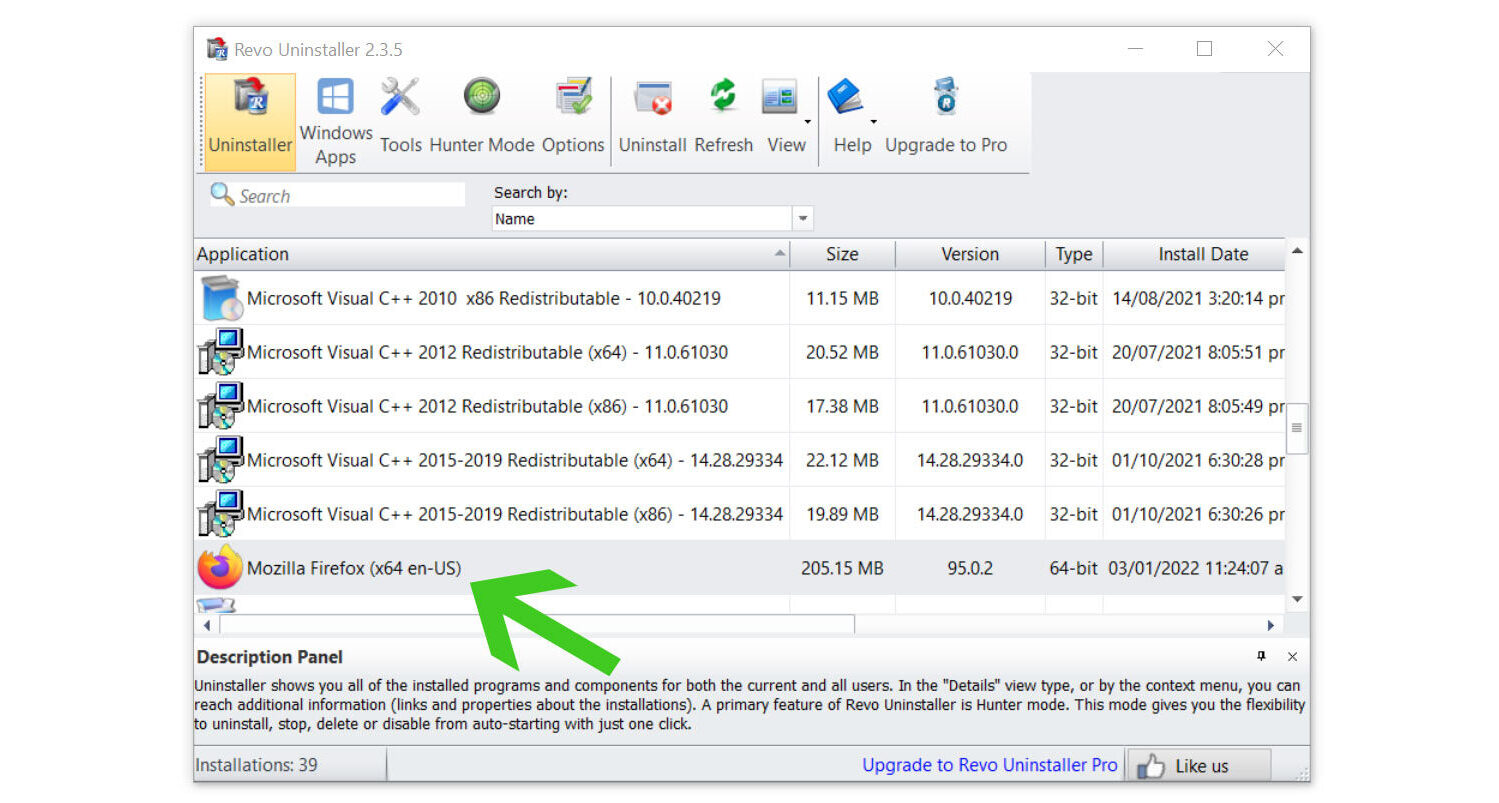
 3. Once the software has launched, find the unwanted application that needs to be removed and double-click the program to uninstall it. (We will be using the Mozilla Firefox browser as a demonstration.)
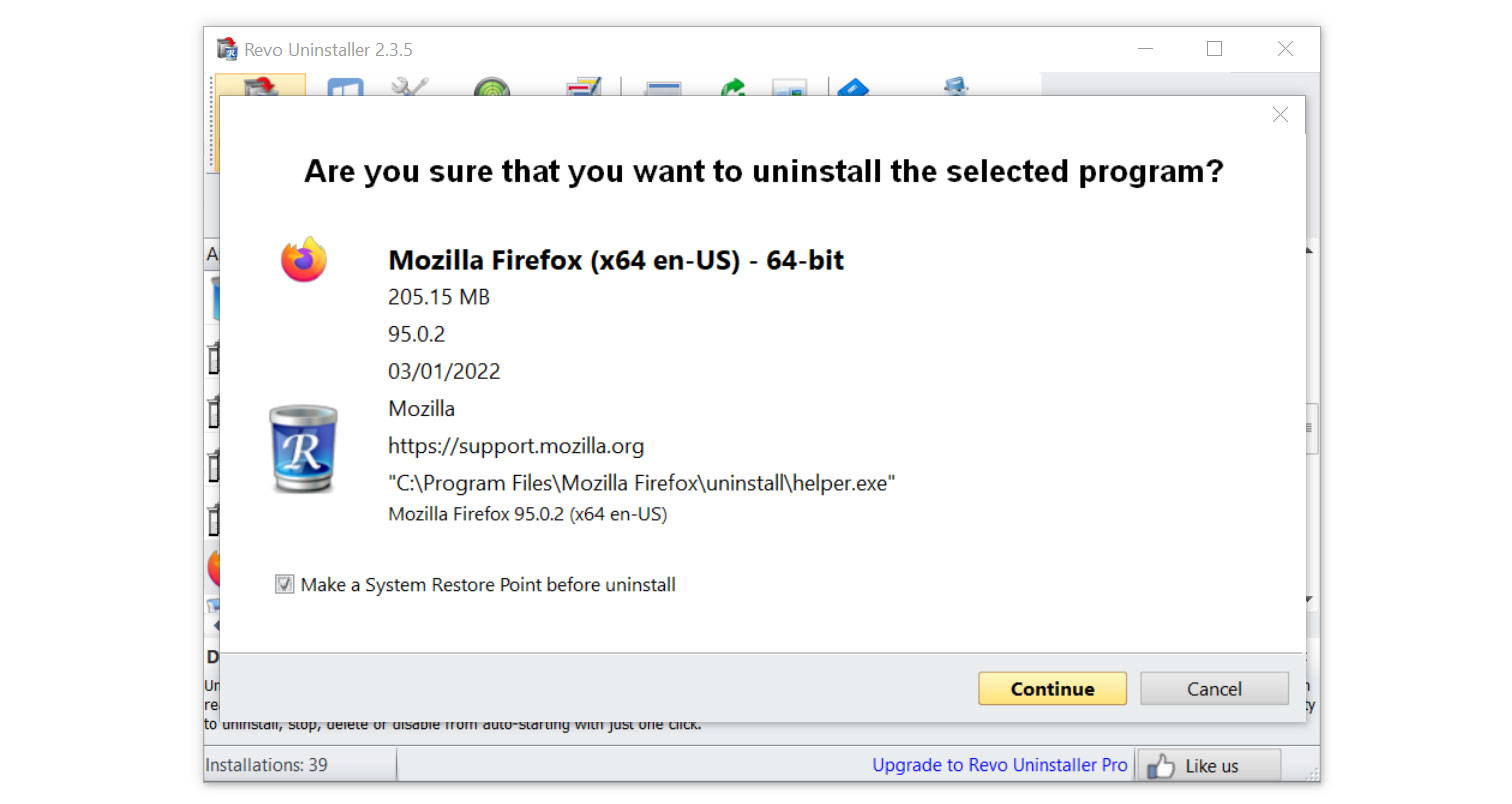
4. Click on the Continue button and follow the procedure to start uninstalling the program. It is also advised to make sure that a System Restore Point is made before the uninstallation, just in case.
5. You will be prompted to choose a scanning mode. From the three options available, select Advanced mode, then click Scan. 6. A window will pop up and show all of the leftovers and changes made by the uninstalled program. Click the Select All button and hit Delete to remove the leftovers found in the Windows Registry.
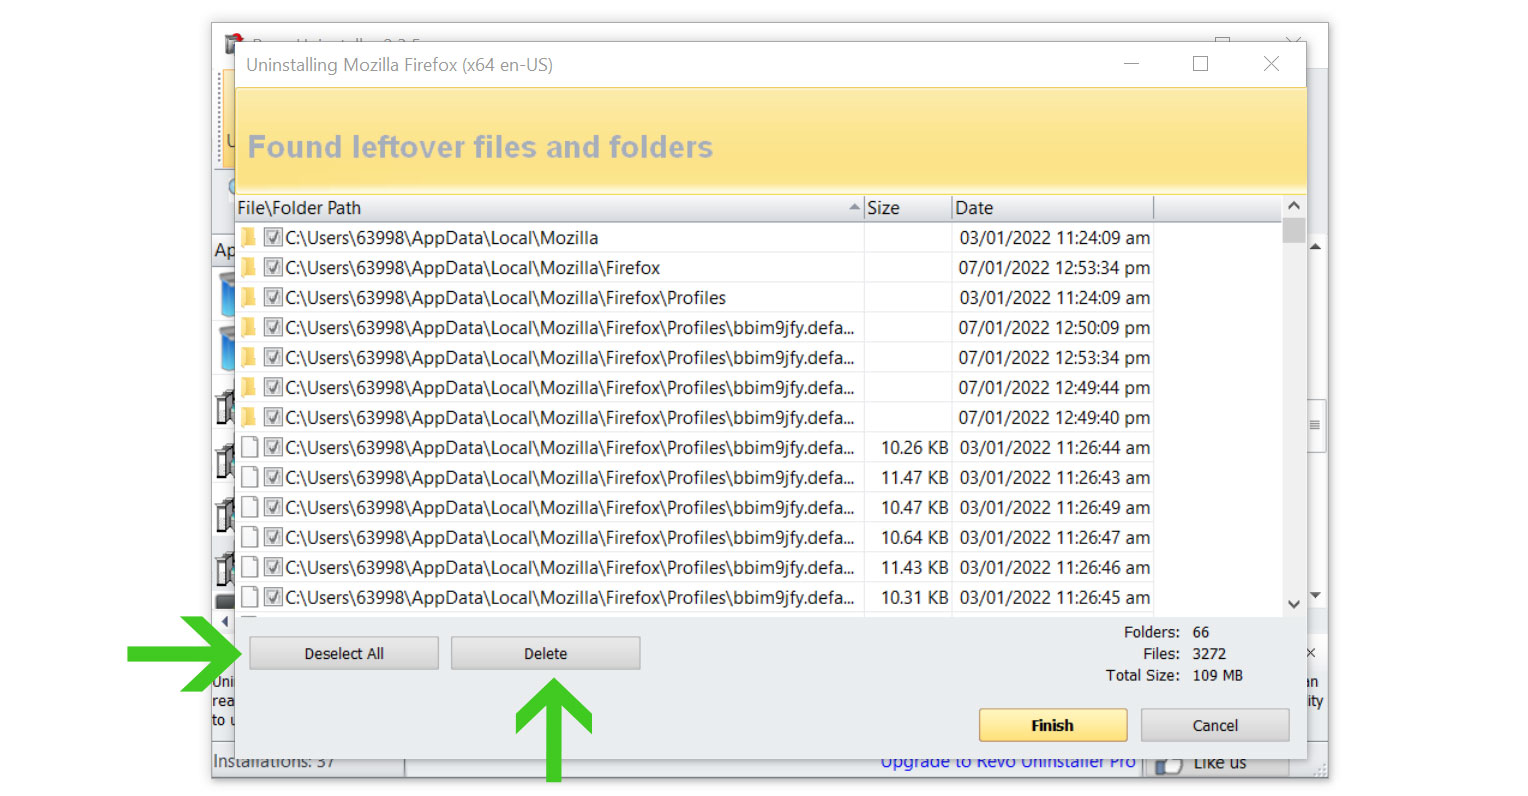
Once the window closes, you have successfully removed the malware threat from your system. We believe with absolute certainty that once the malicious program has been removed, the Fake McAfee Renewal Notice browser issue will now be fixed, and you can continue browsing the web without seeing advertisements.
Step 4: Scan with powerful malware removal software
Malware often hides entirely within the system files and registry, making it impossible to detect it by merely looking at the programs or browser extensions.
Fake McAfee Renewal Notice pop-ups are generated by the web browser's notifications, but because they display pop-ups and redirect the browser, such dangerous malware may have already been installed on the system without the user being aware of it.
The pop-ups might have already installed system-exploiting viruses and possibly time-triggered malware infections if they weren't immediately removed.
Running a complete system virus scan with Malwarebytes Anti-Malware is advised to remove these malware threats. When it comes to getting rid of viruses from the system, this software is well-known and respected by security professionals.
Doing this step will be the final nail in the coffin for the malware that has infected your computer.
Remove Fake McAfee Renewal Notice with Malwarebytes Anti-Malware
We have also been using this software on our systems ever since, and it has always been successful in detecting viruses. It has blocked the most common browser threats as shown from our tests with the software, and we assure you that it can remove the malware brought upon by the pop-ups from Fake McAfee Renewal Notice.
Not to mention, it is free to use and does not come at any cost to remove the viruses it finds on your computer.
To use Malwarebytes and remove malicious threats from the computer, follow the steps below:
1. Download Malwarebytes by clicking the button below, as we have made an additional and in-depth tutorial on how to use it. Otherwise, you may go to their official website via Malwarebytes.com (Avoid misspelling as it may lead to scams).
Download Malwarebytes Anti-Malware
2. Visit their download section and start a Free Download to begin installing the software on your computer.
3. Once the Malwarebytes setup file (MBsetup.exe) has finished downloading, open the executable file in File Explorer, then right-click the setup and select run as administrator to give the highest system authority and make sure Malwarebytes is installed correctly.
4. Make sure to carefully follow the installation setup wizard's instructions and provide the relevant information it requires. You will be prompted with questions such as Personal or Business Use, Email Address, and others.
5. From the application's home screen, go to the scan tab and begin running a system scan. This will scan the whole computer, including memory, startup items, the registry, and the file system. Ensuring that malware has been inspected for and detected in all of the places where it frequently hides.
6. Since it can take a while, you should either relax and wait for it to finish or find something else to do. The length of the scan depends on the size of the files you have and the hardware capabilities of your computer. Here are some ways to make scanning faster.
7. Once the scan is finished, Malwarebytes will show the malicious viruses and threats it found on your PC. The program will show the detection results, and the malware it found will be given a threat name such as Generic.Trojan.Injector.DDS, and many more.
8. Select all the detected files from the report and click the quarantine button to remove the malicious items from the computer into the protected safe quarantine zone of the anti-malware program so that they would not affect and do malicious actions on the PC again.
9. After placing the virus files in the program’s quarantine, it may prompt you to restart the computer to finalize the full system scan procedure. Please restart your computer if prompted, as it is essential. After the restart, Malwarebytes will open and display a message that the scan was complete.
Note: Don't forget to delete the quarantined files afterward.
Simply quarantining the malware files is not enough to make sure they are completely removed. This is a very common misconception: once you click the quarantine button, it is all good and gone.
But, while its effects and harmful activities are halted, the malware is still in the system, only placed in the anti-malware program's quarantine folders. To completely remove it from the computer, go to Detection History from the home screen, select all Quarantined items, and click Delete.
You have successfully removed Fake McAfee Renewal Notice as well as the hidden threats on your computer. Rest assured they would not resurface again since Malwarebytes offers a premium trial for 14 days, so you could take advantage of it for free and prevent malware from infecting your system.
Malwarebytes offers free malware detection and cleanup, but its premium version also comes with real-time protection to keep your computer secure at all times. Although we advise using the premium trial, if you find it beneficial, you are encouraged to buy the full version.
The software is an anti-malware solution that eliminates malicious threats including trojan horses, worms, stealers, miners, keyloggers, and several other types of malware and computer viruses.
You shouldn't be concerned if the scan turned up no instances of malware or viruses, which indicates that there isn't any malware on your computer. If two independent programs declare your computer safe, then that's probably the case.
Step 5: Reset the browser to its default settings (Optional)
With browser threats such as Fake McAfee Renewal Notice where potential malware exploits are possible, it may be scary to think of browsing again. So to ease your mind, you can reset the browser to its default configuration to make sure that any suspicious elements within the browser are also removed, even after clearing every speck of malware, trojan, and virus.
If the Fake McAfee Renewal Notice pop-ups continue to override the permission, resetting the browser also ensures that any additional settings it has set will be deleted, making the browser operate as though it had just been downloaded.
Resetting the browser includes complete reversal and wiping out history, homepage settings, default search engines, and browser permissions, which may be used by malware actors to show pop-ups via the Fake McAfee Renewal Notice domain. In addition, the browser reset does not include the favorites tabs, bookmarks, or saved passwords in some cases.
To reset your browser to its default settings, please follow the steps below for the browser you are using.

Google Chrome
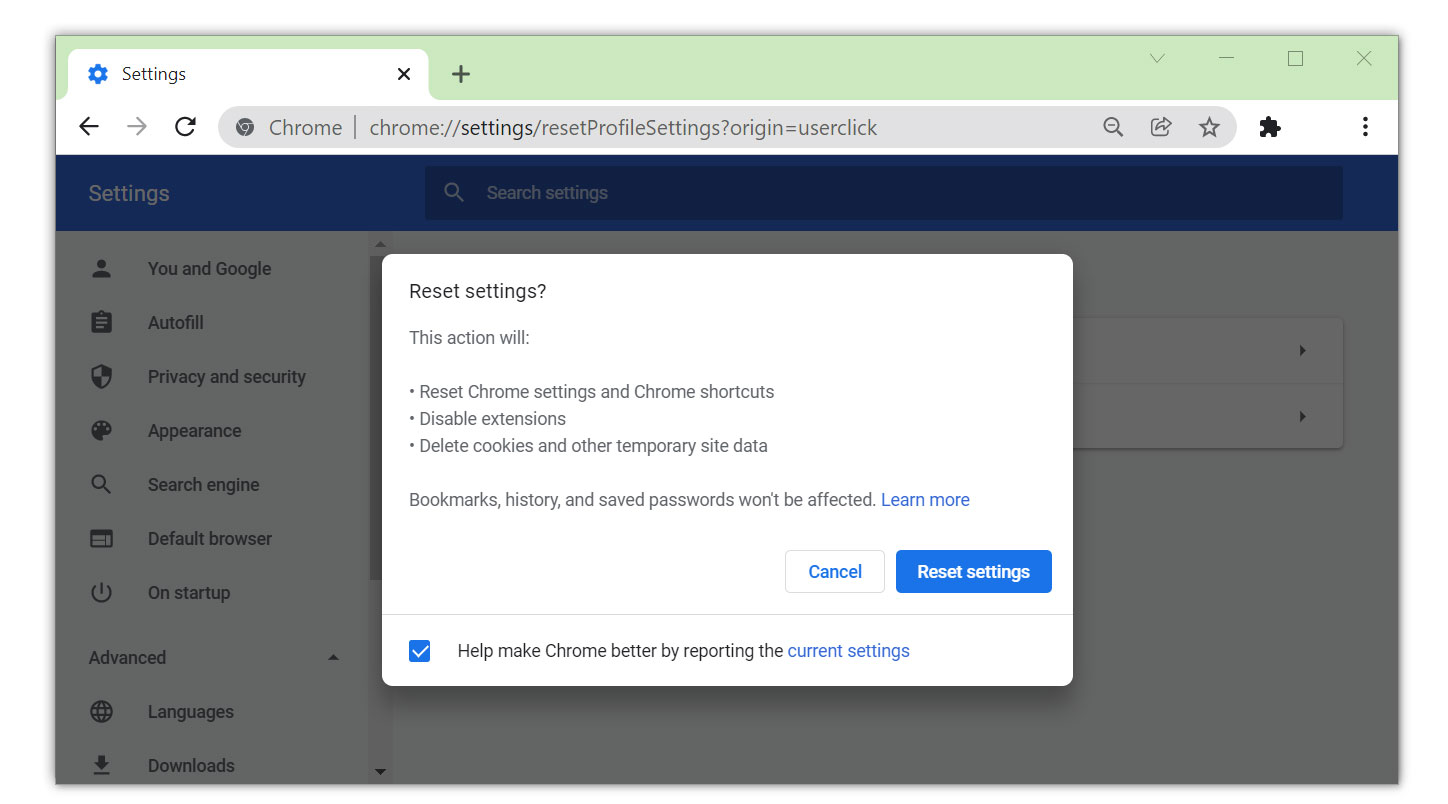
1. Open the Google Chrome browser and click the three dots in the upper-right corner of your screen to access the drop-down menu.
2. From the menu presented, select the Settings button, then click the Advanced menu on the left side of the screen from the settings.
3. On the drop-down menu presented on the screen, select Reset and Clean up.
4. Click on the Restore settings to their original defaults.
5. Then a small confirmation window will appear; click the Reset Settings.

Mozilla Firefox
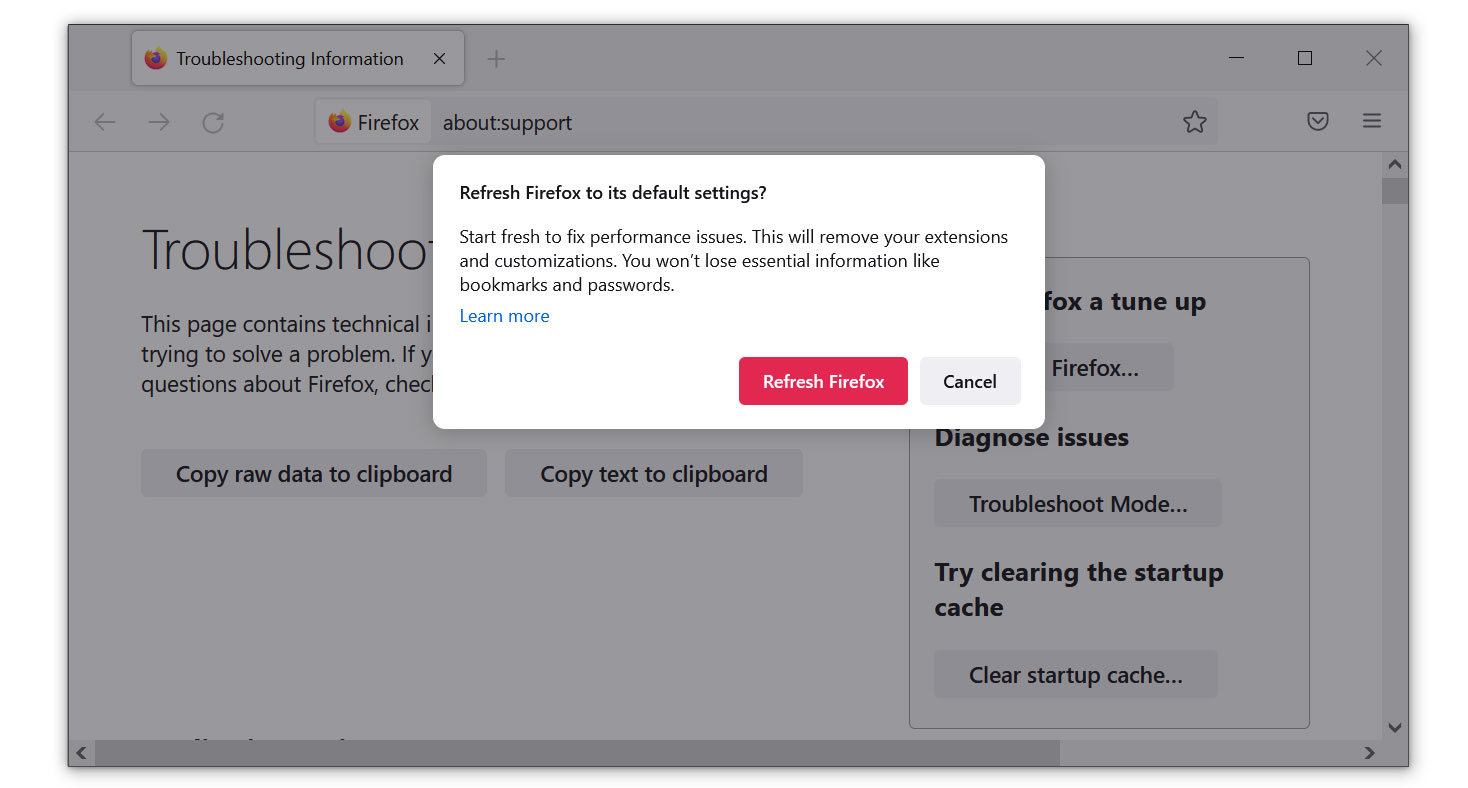
1. Launch the Mozilla Firefox browser, then open the menu by clicking on the three horizontal lines located in the upper-right corner.
2. Navigate down and click Help, then select More Troubleshooting Information from the options given.
3. Select the Refresh Firefox button. Then click Refresh Firefox on the confirmation window that appears.

Microsoft Edge
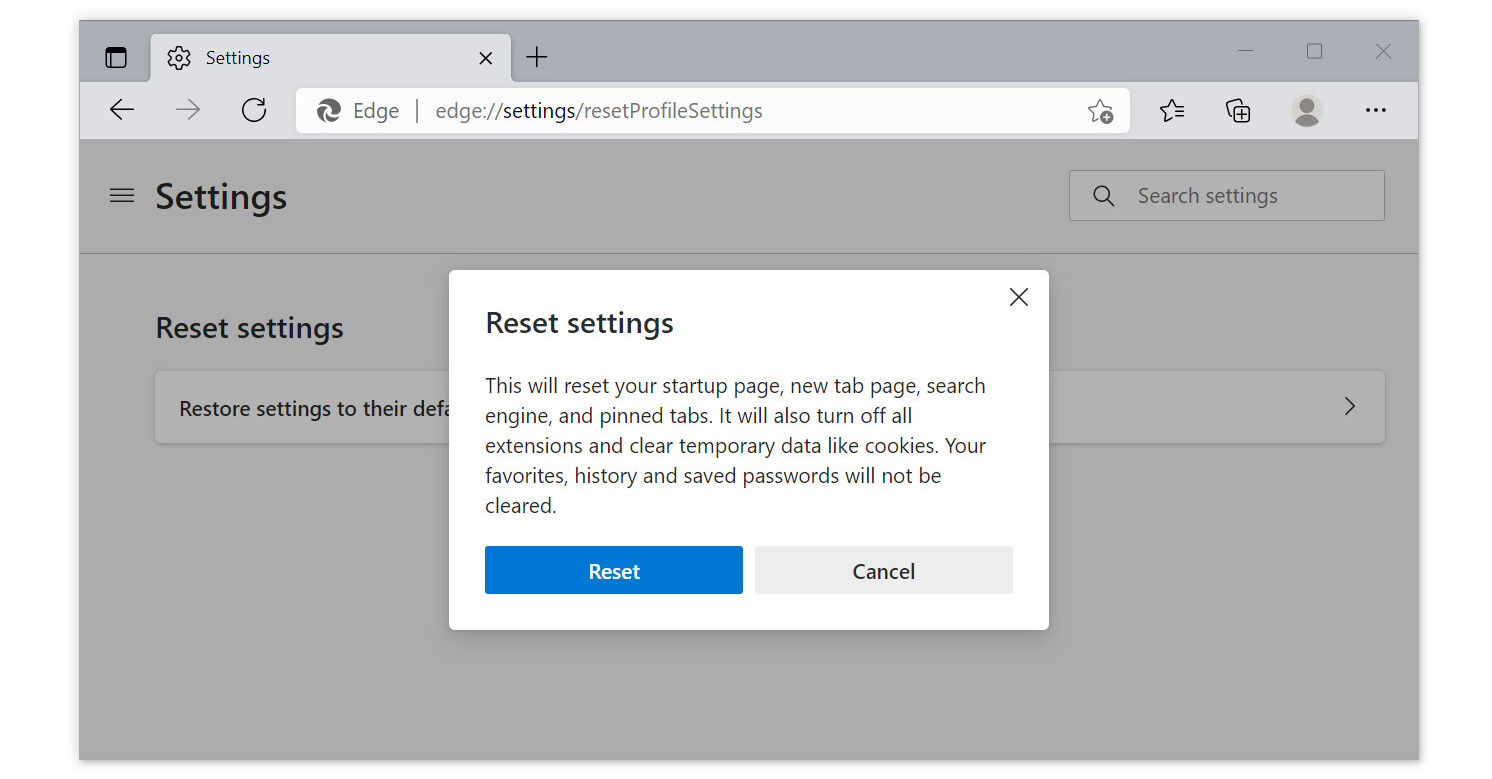
1. Run Microsoft Edge on the computer and click the three-dot icon in the upper-right corner.
2. Click on the Settings button from the drop-down menu.
3. Find and click Reset Settings from the left sidebar. Then click on the option Restore settings to their default values.
4. A warning window will appear, telling you that you are about to reset the browser. Click Reset, and the browser should return to its default settings.
The configurations added by adware and browser hijackers have all been removed, and your browser has now been entirely reset to the settings it had when you initially installed it. You can use your browser with complete security now. Rest assured that pop-ups from Fake McAfee Renewal Notice won't appear again.
For a better and safer web browsing experience, we've provided a few security measures and advice below that will safeguard your browser and computer from harmful threats like worms, malware, trojans, keyloggers, stealers, and other kinds of computer viruses that will harm user data.
Protective measures for better overall security
Removing trojan viruses and malware from your computer is one thing; keeping it secure for the future and for a long period is a different thing and will require certain things to make sure you are secured, especially if you do not know most of the ins and outs of the device you are using.
Cybercriminals are always stepping up their game to make sure they infect users and extract data and money from them.
We encourage you to take the actions listed below to ensure complete security before leaving this page because we strongly promote web security and having a secure online presence.
Safeguard your privacy and data by using a VPN application
VPNs, also known as virtual private networks, guarantee your safety and complete anonymity while you browse the internet.
In contrast to a firewall, which monitors and blocks potentially harmful connections in the network, A VPN hides the user's connection via a tunnel so that it would appear to third parties as a different IP address and location.
This ensures that your data won't be leaked because the program hides it. Be aware that visiting infected websites may cause your IP address and location to be disclosed; however, if you use a VPN, this will prevent your true IP address from being revealed to malware actors.
Use an adblocker when browsing the internet
Installing an adblocker on the browser is the best way to get rid of unwanted pop-up advertisements from Fake McAfee Renewal Notice as well as other threats such as redirections, browser hijackers, and unwanted toolbars.
Additionally, by blocking malicious websites before users can even access them, it is possible to prevent malware from being downloaded.
In this case, we recommend uBlock Origin, which is an open-source AdBlock extension that comes at no cost and is free forever. It is one of the most reliable plugins out there, ensuring that every advertisement on a webpage will be blocked.

For Google Chrome
1. Go to the Chrome Web Store and search for the browser extension, or click here to go directly to the extension page.
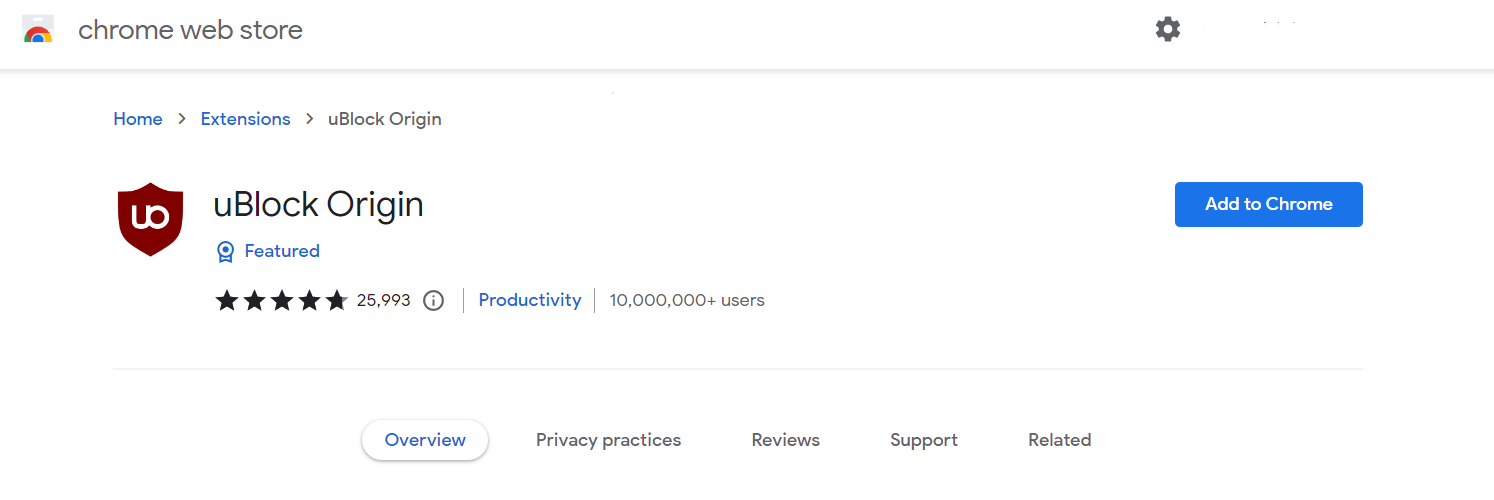
2. Click the Add to Chrome button. Then click Add extension when the confirmation window appears.

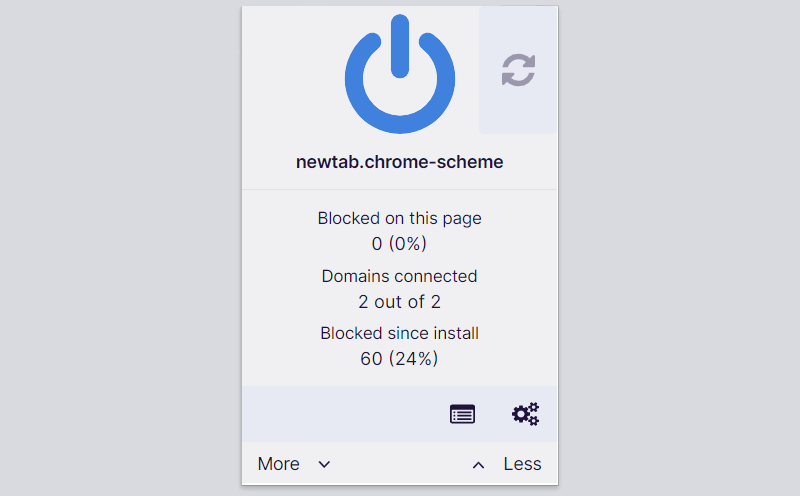
3. uBlock Origin is now installed in Google Chrome. The adblocker is turned on by default; you can click the power button if you wish to turn it off for a while. The menu can be found by clicking the puzzle icon in the upper-right corner next to the search bar.

For Mozilla Firefox
1. Visit the Firefox Add-ons Store and search for uBlock Origin, or click here to automatically go to the extension's webpage.
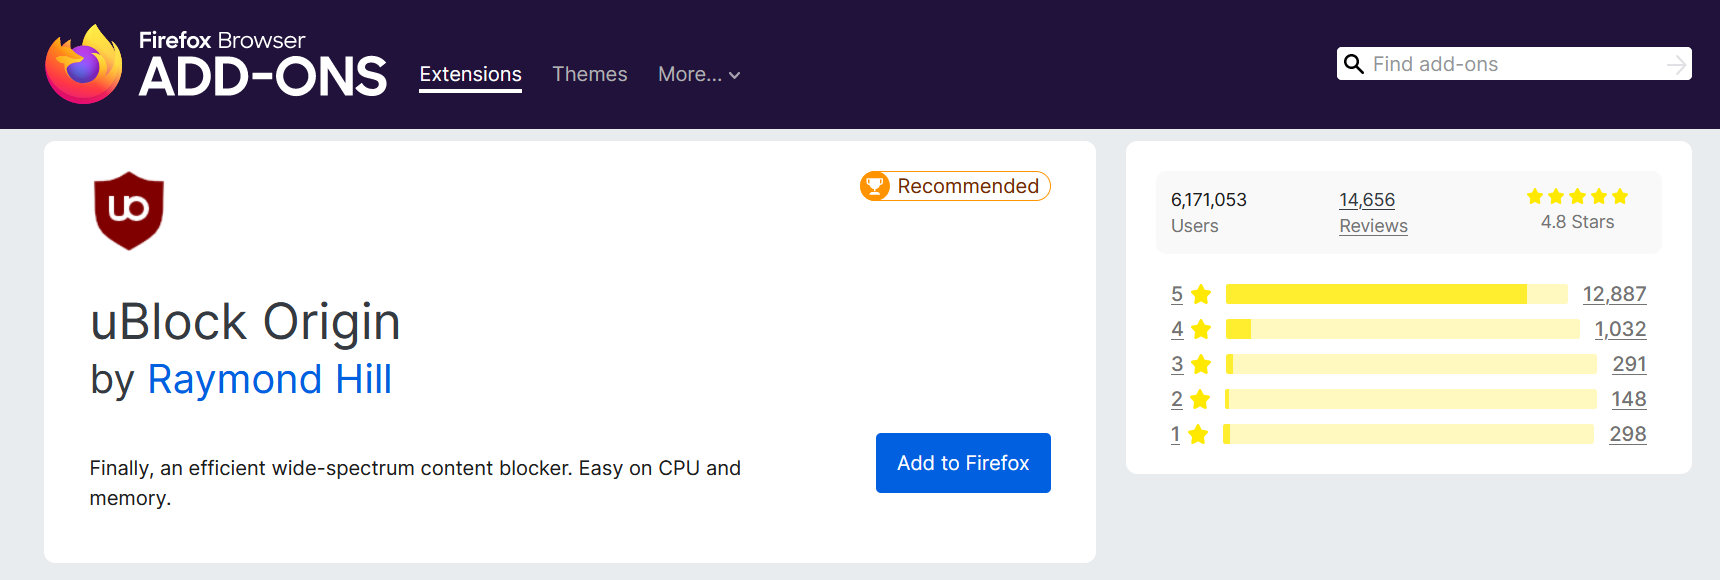
2. Click Add to Firefox, and after that, a confirmation window will appear stating the permissions it will grant the addon. Finally, to add it to the browser, click Add.

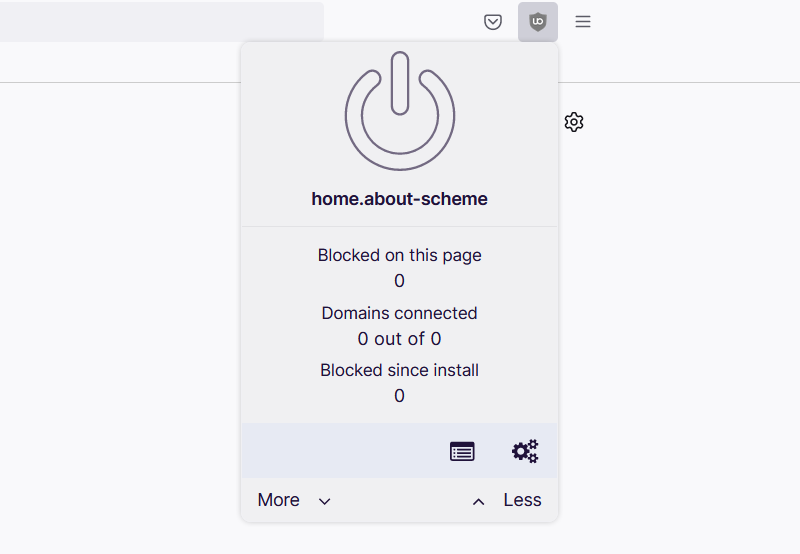
3. Mozilla Firefox now has uBlock Origin installed. The adblocker is activated by default; if you want to disable it for some reason, simply click the power button. The menu can be found in the upper-right corner of the web browser, next to the search bar.

For Microsoft Edge
1. Go to the Edge Addon Store and search for the said browser extension. You can also click here to go directly to the plugin page of the Adblocker.

2. Click the Get button, and a confirmation window will appear. Continue installing the extension by selecting Add extension.

3. Now that uBlock Origin is installed on the browser, you can choose to disable the Adblocker by clicking the power button. The menu can be accessed by hovering over the extension's icon next to the search bar.
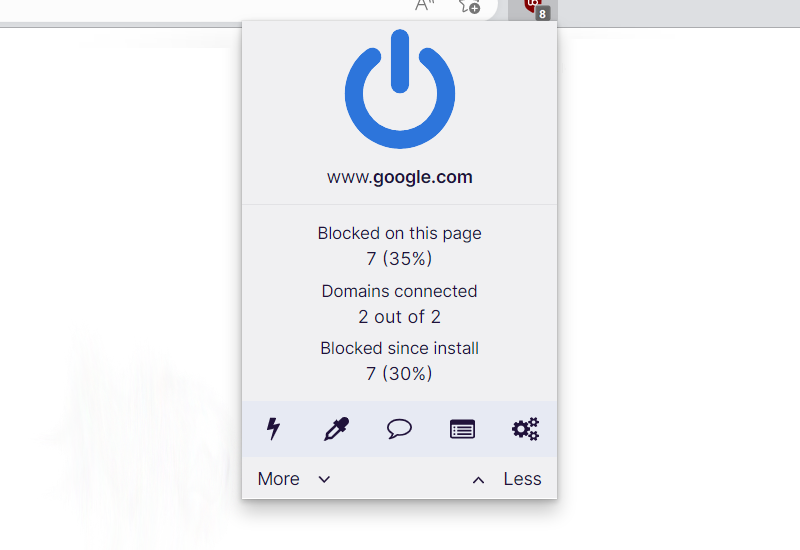
The majority of pop-up advertisements, whether they include malware or not, will be filtered by the extension and no longer be displayed to you. Currently, uBlock Origin is not available for Mac or iOS users, but there are plenty of free options on the market, such as AdBlock for Safari.
Utilize a firewall to prevent cyber attacks
A security firewall is required for every internet connection that is made. It is an essential tool that enhances security and stops online attacks. Through a security mechanism, it controls incoming and outgoing network connections on your system and network and filters the undesirable ones. Consider it a further barrier against malicious assaults and zero-day exploits.
Bottom Line
While this may appear to be typical advice, we recommend users not visit illegal streaming or torrenting websites and more importantly, do not download anything from them because doing so may result in the installation of malware and viruses.
Because these websites are illegal, they are unable to make a profit from legitimate advertising. As a result, they host questionable advertisements from unidentified marketers who want to publicize their content, which are most likely dangerous codes being propagated by cybercriminals.
Always make sure that your device is protected against sneaky exploits and stealthy cyberattacks. While taking precautions and avoiding dubious websites are crucial, having a solid line of defense is essential to ensuring the security of your network and data.
The threat posed by Fake McAfee Renewal Notice is not the only one on the internet, and there are many more surfacing every day. We are glad to have assisted you in resolving your browser-related problem and are proud of our expertise in this area.
If you experience another virus attack on your device, please visit our website to find a malware removal solution for your problem or get in touch with us, and SecuredStatus will be happy to assist you once again.

