Random files have occasionally been formed on a user’s device, and the majority of the time this is due to malware that is concealed in the computer.
This situation should not be taken lightly since if the virus is not eliminated right away, it can have severe implications on both the computer and the user.
Why Does Malware Create Random Files?
In order to develop backdoors and load further malware into the computer, some malware creates arbitrarily generated files like .exe and .dll on the computer along random pathways that users may not suspect.
It is created with unreadable names on some paths, such as the local temporary folder or the Appdata, which are rarely visited.

In addition, it might also be created on specific routes that antivirus software can miss, like those where the user has placed exclusions for system files and directories. Moreover, in order to escape detection, it can specify an exclusion for its own path as well.
The following are the most typical methods used by malware to inject its harmful files:
- AppData
- Local
- Temp
- Documents
Not only does the user have to delete the files that were generated randomly, the user must also delete the infection’s primary source in order to completely remove this kind of malware.
A strong antivirus program will be necessary for this, and if you think your computer has been infected with malware that creates random files, please follow the removal instructions provided below to remove the infection completely from the system.
Procedure to Remove Malware That Creating Random Files
The following procedure will guide you to fix your browser problem. It will also help on getting rid of other malware lurking on your system that is why we recommend you do not skip a step.
We have provided a basic step-by-step instructions below . Given that our staff has tried and tested the guides, we are confident they will work effectively.
Step 1: Remove the Virus Automatically with Malwarebytes
When it comes to removing malware-related problems on the computer, it is best to utilize the anti malware software provided by Malwarebytes. We have determined that it can remove most types of malicious threats when we conducted malware tests.

Additionally, since the free version of this application can remove the malware by itself, using it costs you nothing. Malwarebytes also offers a free 14-day trial when you download it for the first time, so you might want to use the remaining time of the trial to test out the premium features.
1 Click the button above to download the latest version of Malwarebytes Anti-malware.

2 Open the installation file after the download and follow the procedure shown.
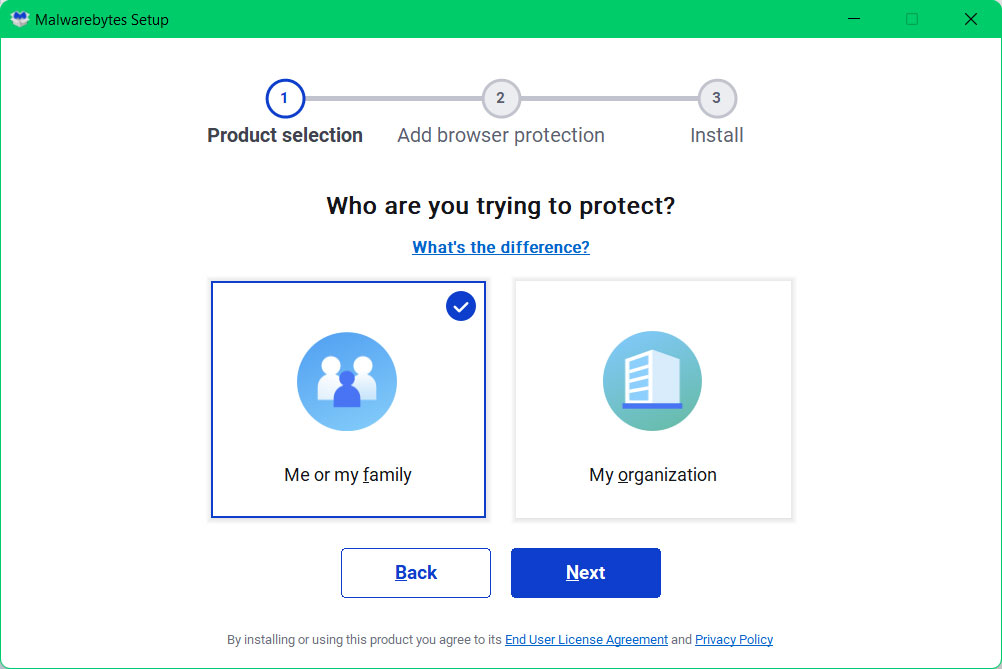
3 After following the software setup instructions, wait for the application to finish installing.

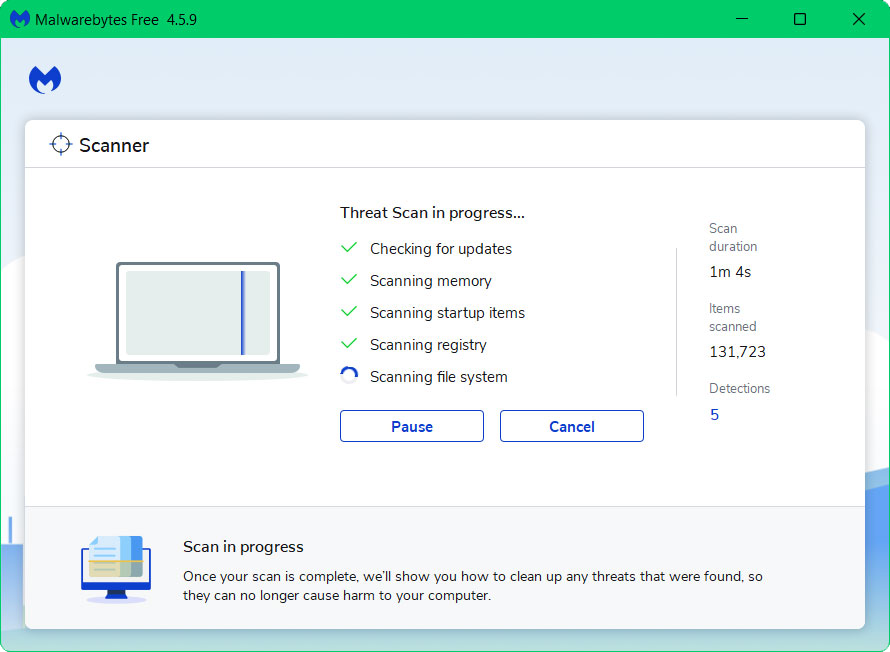
4 Once the application is installed, you may now run your first computer scan and wait for it to finish.
5 All discovered malware on the computer will be displayed on the screen, and you can eliminate them by pressing the “quarantine” button.
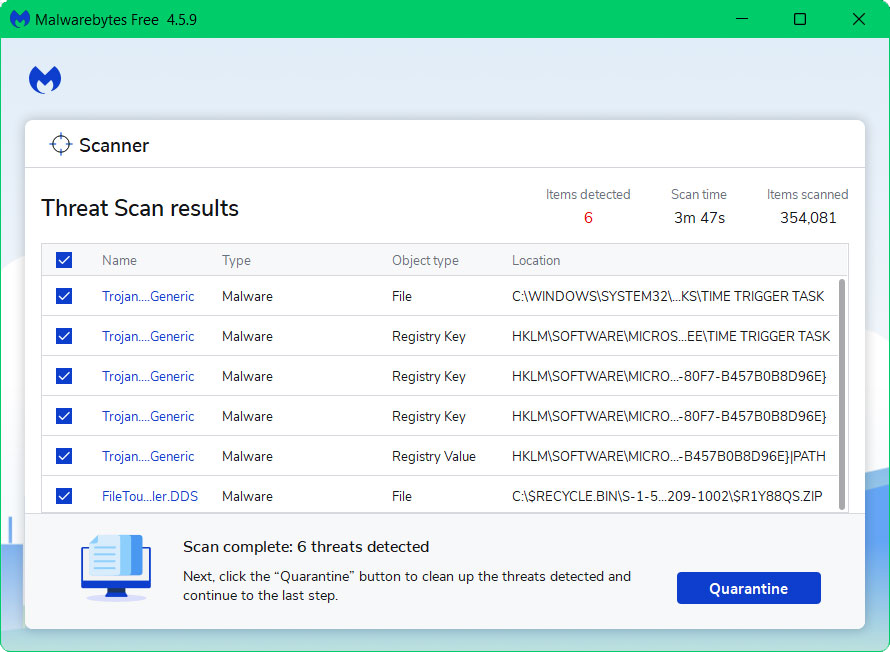
The malware lurking on your system would have been removed now and your computer has become safer to use now. As we have stated above, downloading Malwarebytes for the first time will grant you a premium trial. You may utilize Malwarebytes Real Time Protection to protect your device from malicious threats and viruses as soon as they surface.
You have the option to uninstall the application if you wish to do so after getting rid of the malware from the computer. While doing so will turn off Windows Defender Real Time Protection, you can use this guide to activate it once more after removing Malwarebytes.
Step 2: Remove Unwanted Programs Not Installed By The User
As we previously said, malicious hackers also loader malware to install their harmful software on users’ computers.
If you think that a certain executable file was installed during one of your browsing sessions, it is best to uninstall any doubtful and undesired apps that have been installed, if any, as a certain drive-by download may have taken place.
It is worth noting that locating the program can be tricky because many malicious programs disguise as legitimate programs or system files.
You may locate the program by utilizing the Task Manager and finding suspicious applications that are currently running when you are facing the browser hijacker symptoms.
Remove Program via Control Panel

1 Search Control Panel in the Windows search bar then click it.
2 The Control Panel should open, from there click Programs then Programs and Features.
3 A list of installed software will show on the screen after a moment.
4 Scroll down and find any suspicious programs you did not download then right click the application and select Uninstall.
Utilize Revo Uninstaller
For computer users who are not sure of what to do. You may resort to using Revo Uninstaller since it is much more effective and easy to use. Revo Uninstaller is a very useful tool for Windows users.
This uninstaller not only removes programs from the computer but it also deletes their changes from the Windows Registry, Host File and etc.
- Click the button above and download the latest software that is compatible with your system.

- Open the downloaded file and it should guide you through the setup.

- Follow the installation procedure and wait until the installation of the software is complete.
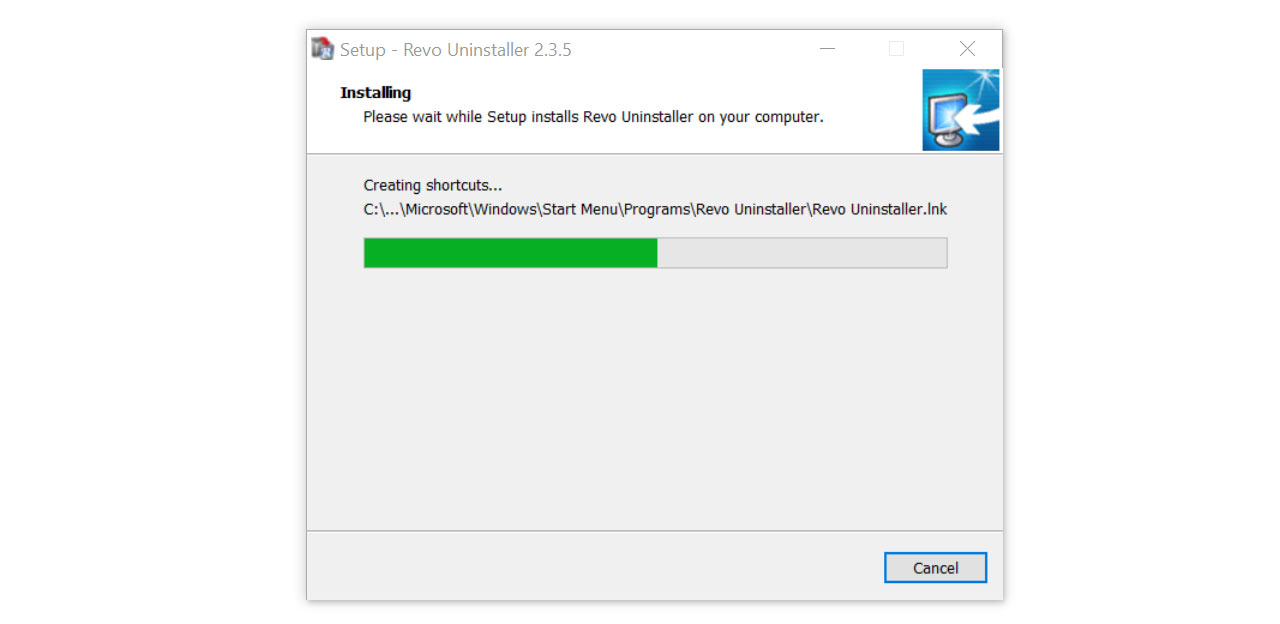
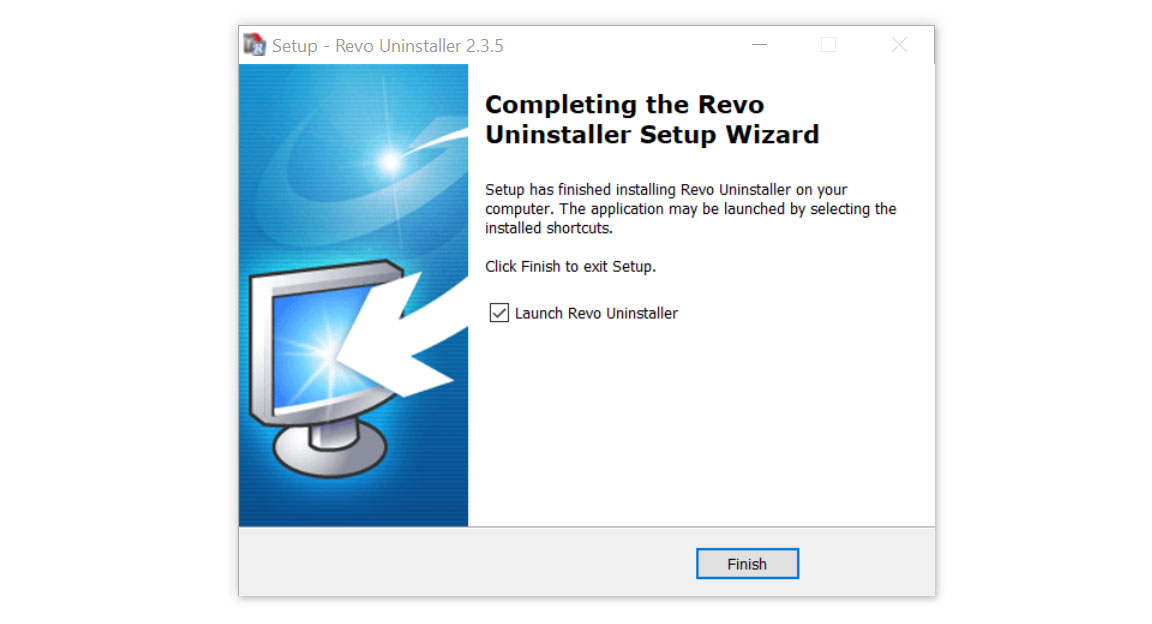
- After the installation is finished, tick the box that says Launch Revo Uninstaller then click finish.
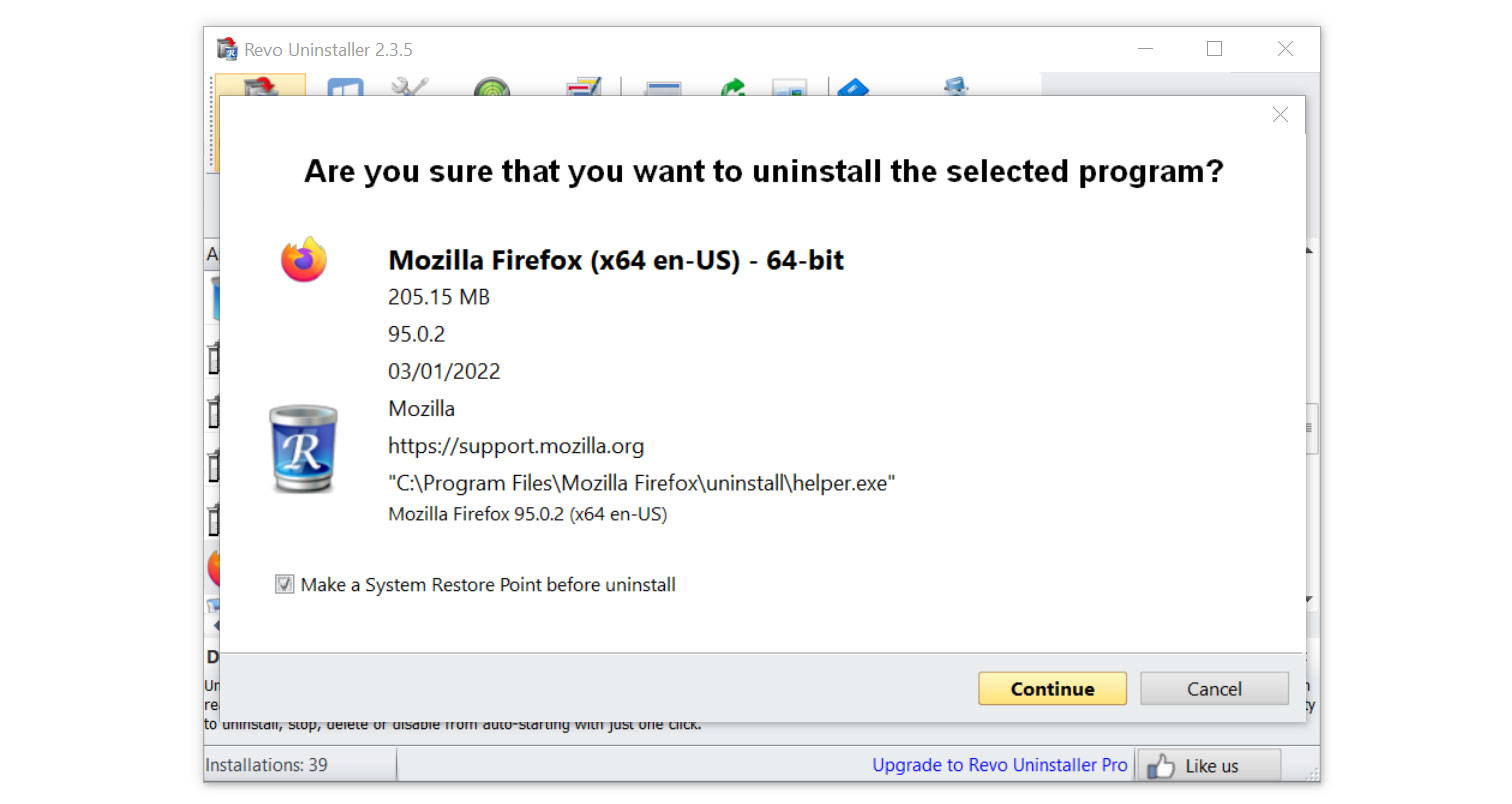
- Once the software has launched, find the unwanted application that is needed to be removed, double click the program to uninstall.

- Click on the Continue button and follow the procedure to start uninstalling the program.
- Once it is uninstalled, a window will pop-up. Select the Advanced option for the scanning mode then click Scan to find remnants of the malware.

- A window will pop-up and show all of the leftovers and changes made by the program uninstalled a while ago.
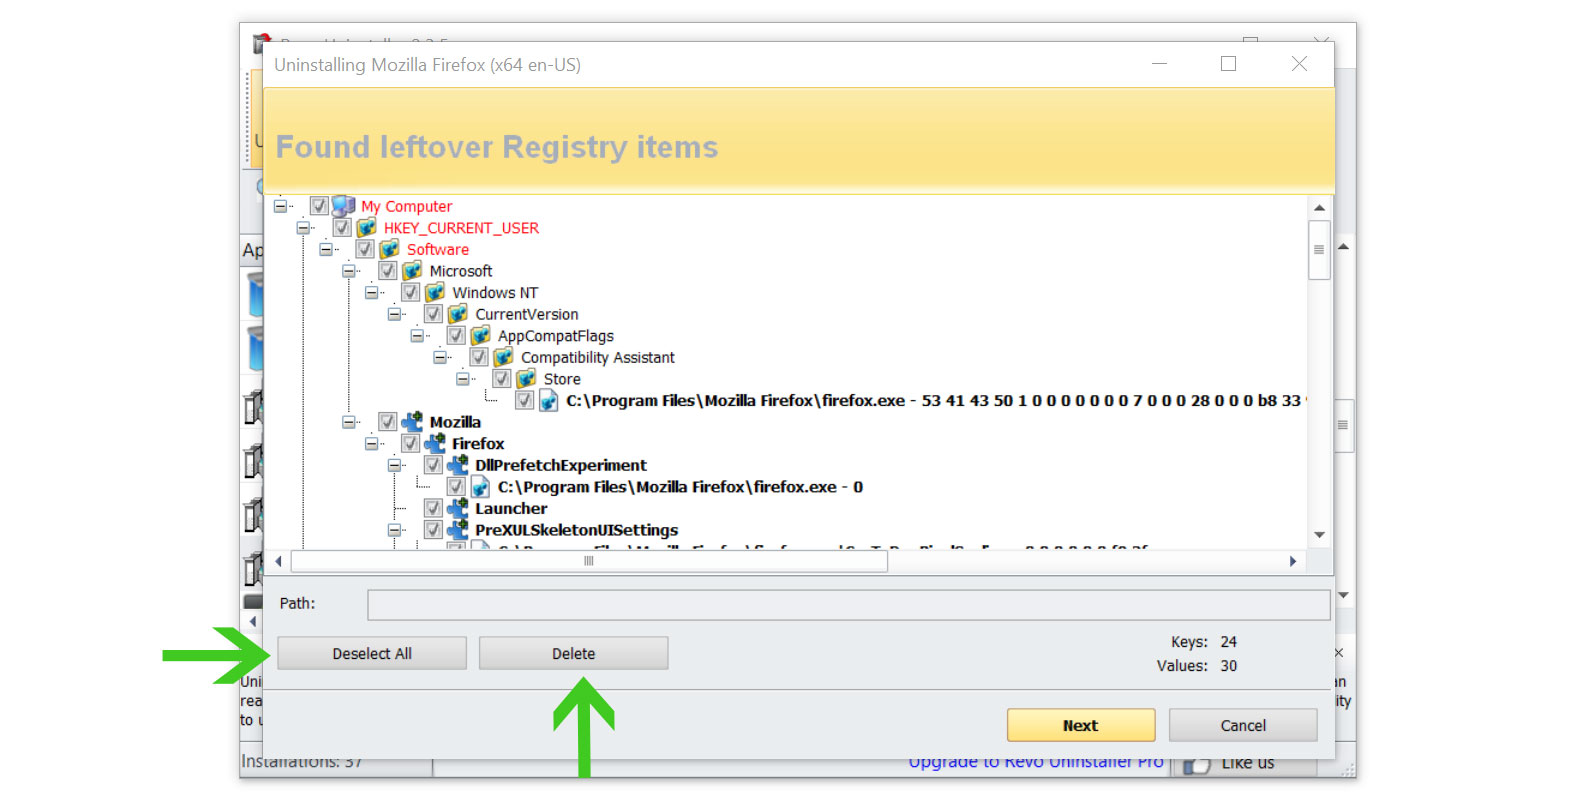
- Click the Select All button and hit Delete to remove the leftovers found on the Windows Registry.
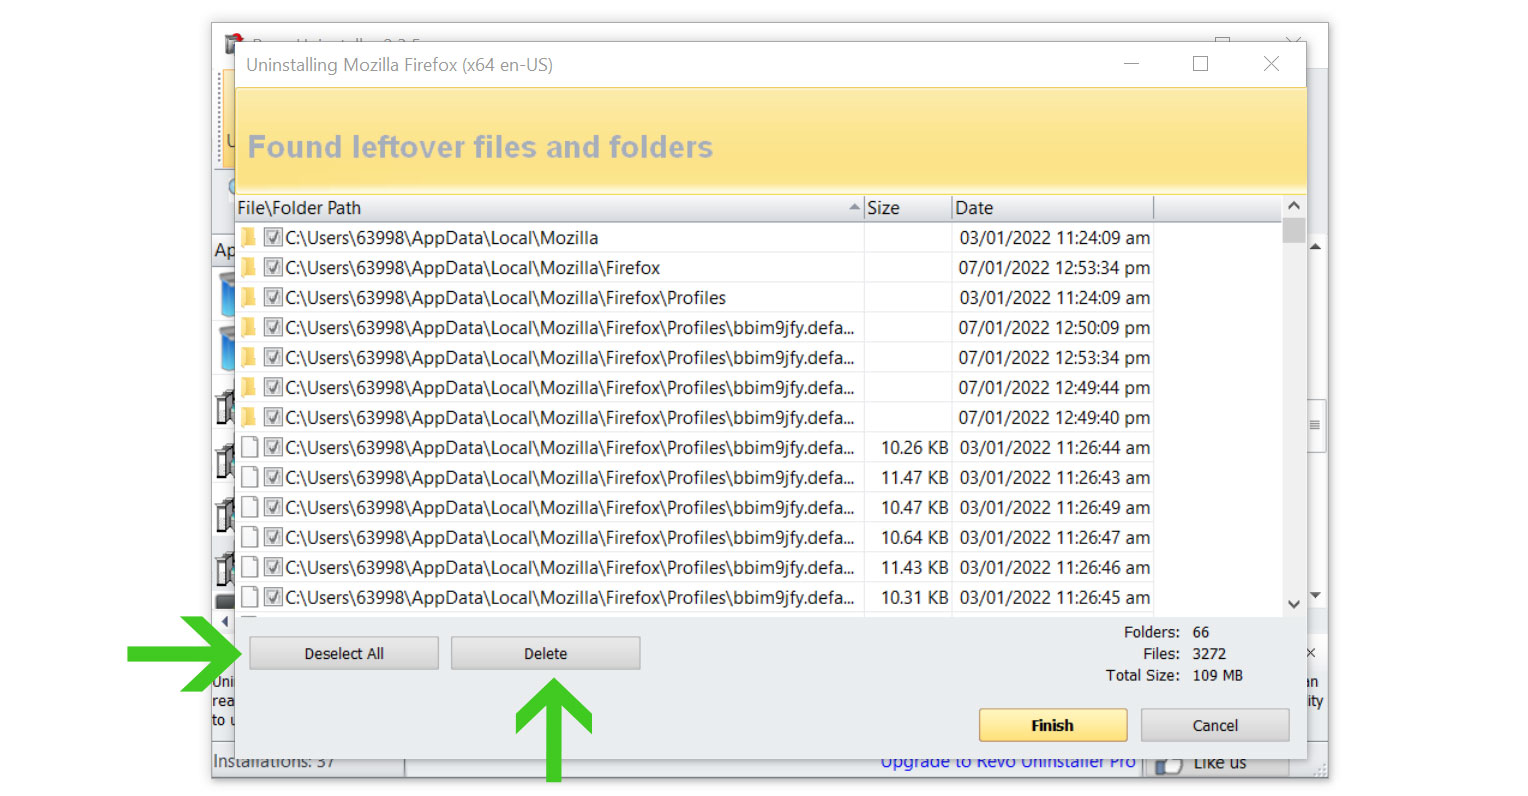
- Some leftover files may be found, click Select All then Delete them as well.
- Once the window closes, you have successfully removed the adware threat from your system.
Step 3: Use System File Checker and DISM Cleanup to Fix System Alterations by Malware
DISM Cleanup and the command-line tool Windows System file checker can be used to verify the stability of all significant system files. Additionally, it checks to determine whether any system files are missing or corrupted by comparing them to their original versions.
1 Click the Windows Button from the keyboard and search for CMD or Command Prompt.
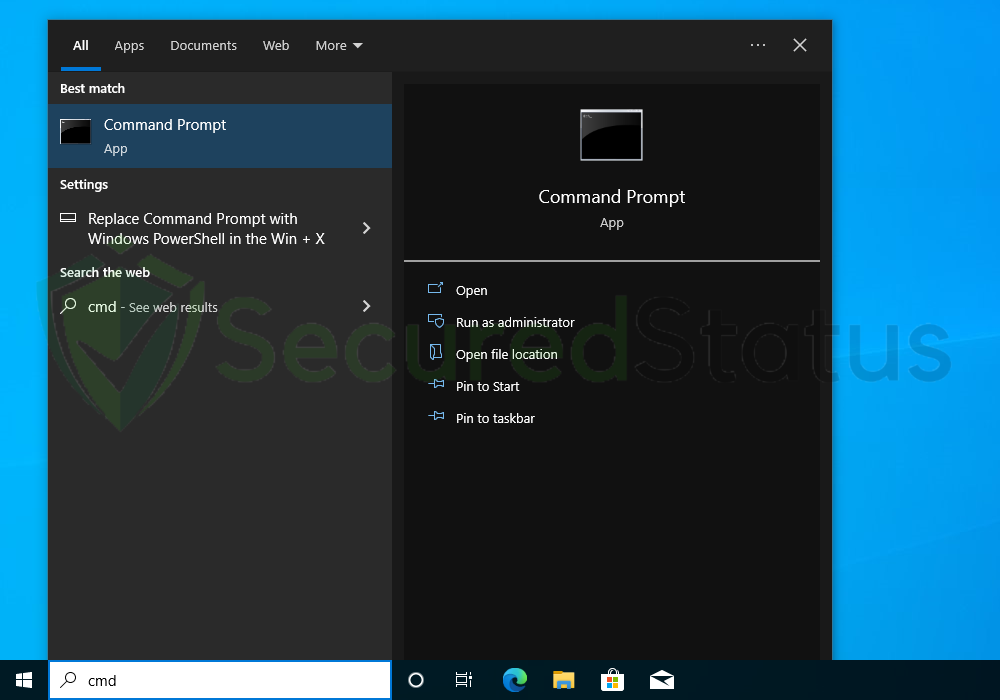
2 Right click the Command Prompt application and select Run as administrator.

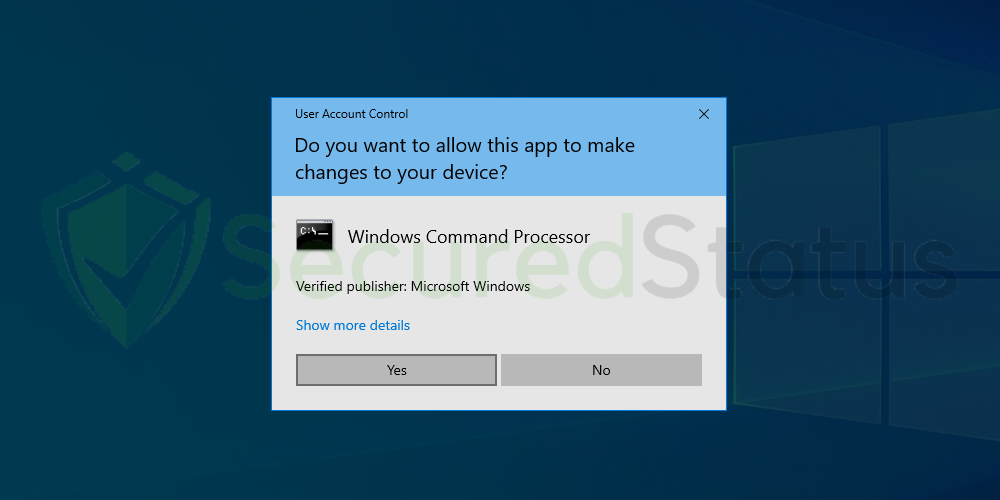
3 The User Account Control confirmation message will pop-up, click Yes to proceed.
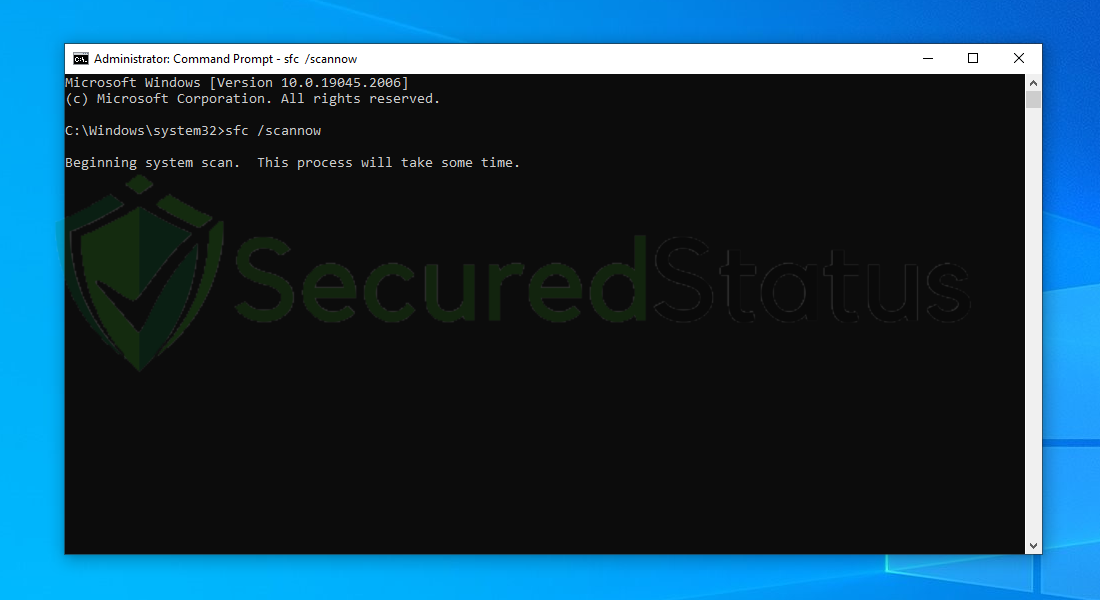
4 Once the Command Prompt opens, type sfc /scannow and hit enter. Please be patient for a few minutes as the scan will start and could take some time.
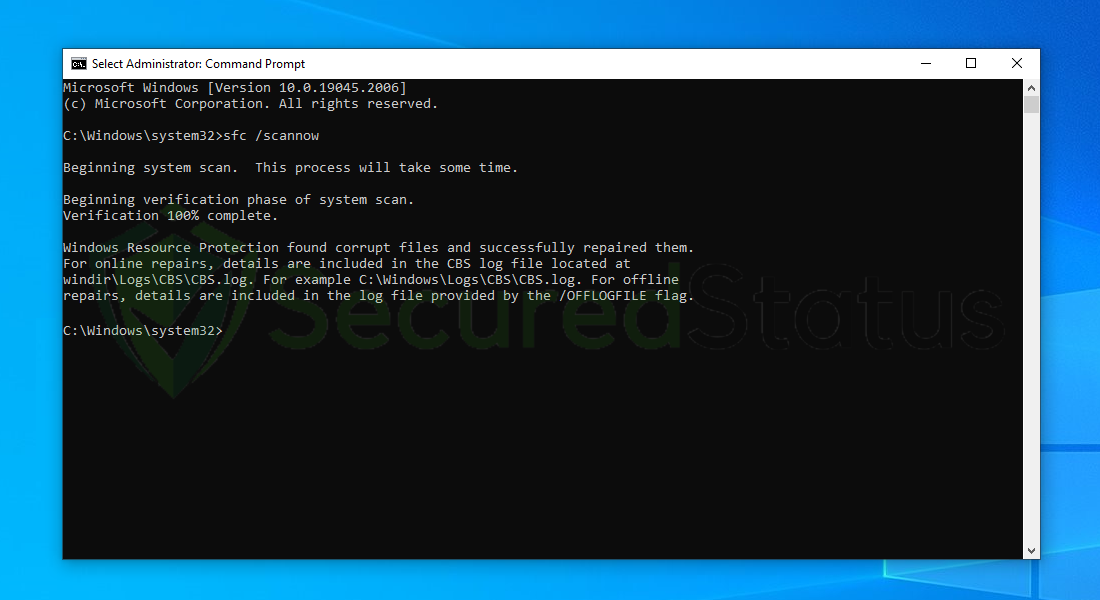
5 After the scanning process it will report that it have successfully found corrupt files and have repaired them.
6 Next is to use the DISM Cleanup to patch faulty files in the computer system. Type dism /online /cleanup-image /scanhealth onto the command line and hit enter. Wait for a few minutes while it is scanning.
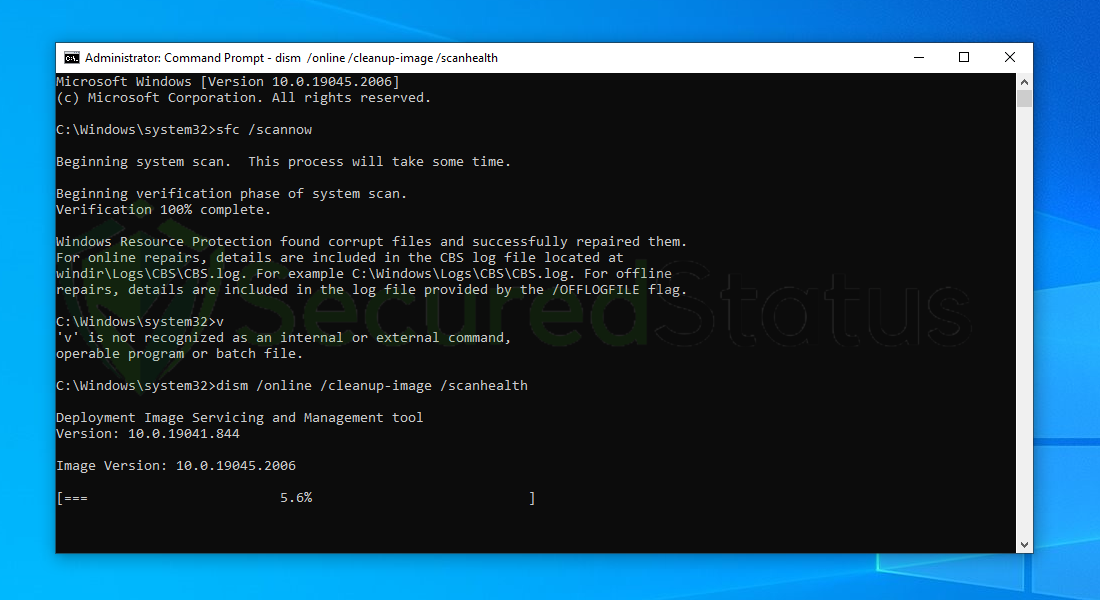
7 After the scan is complete, it will report that the operation is successful and that all corrupted components will be fixed.
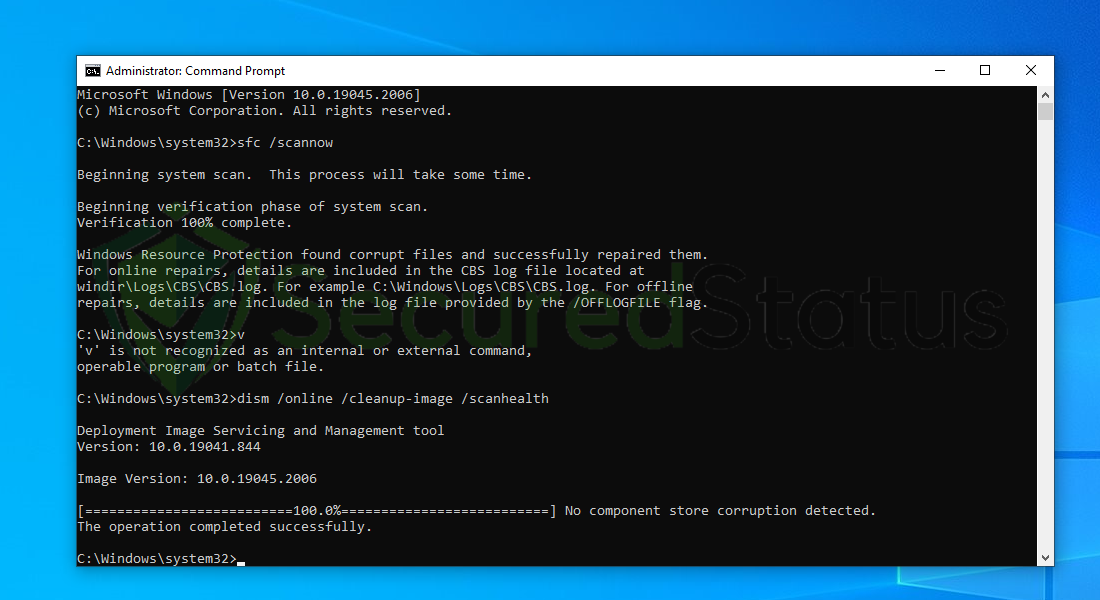
8 Lastly, in order to fix serious windows errors, we will use the restore health command. Type dism /online /cleanup-image /restorehealth and hit enter once again to start the scanning process.
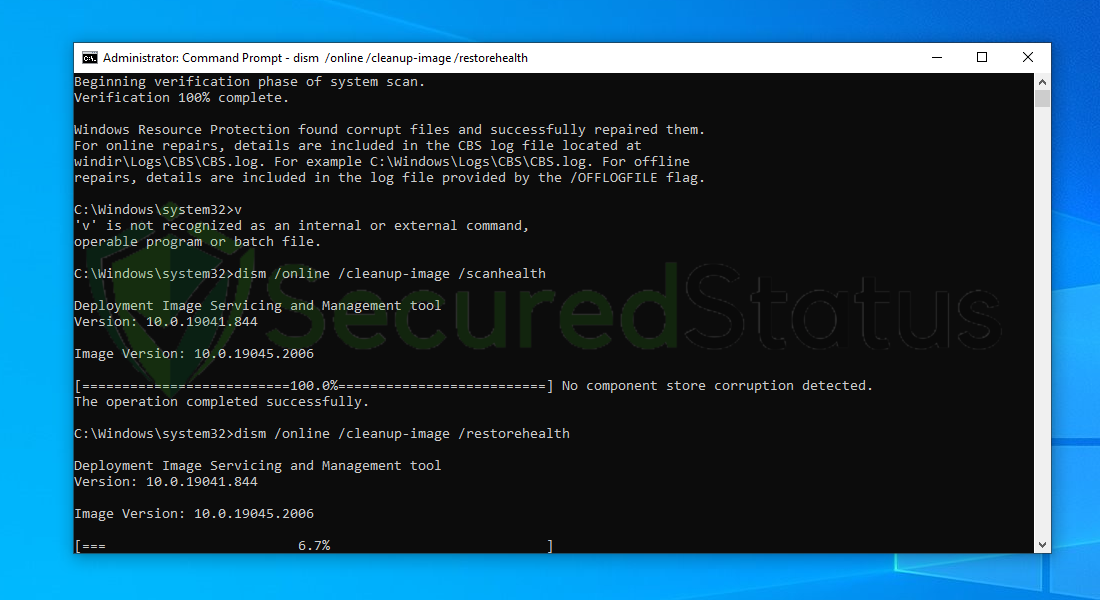
9 Once the scan is complete, it will report that the operation was successful and corrupted files and entries are resolved.
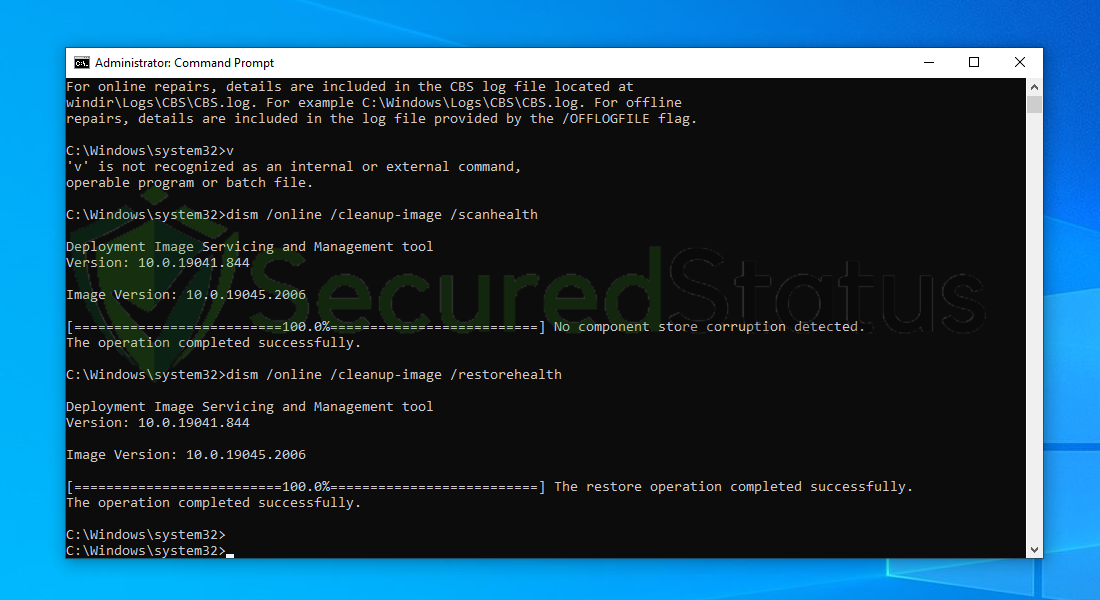
Since we performed a DISM cleanup, all malware that was still present in the system has been eliminated, and any damage it had caused to the Windows system files has been repaired. You can rest assure that all malware has been totally removed from your PC.
Step 4: Run a Second Opinion Scan with Kaspersky Antivirus
If you visit numerous forums and websites, you will see most users agree that Kaspersky is one of the best antivirus tool available.
There is a chance that malware may still be present in the computer system specially if you have already encountered drive-by download malware.

Since each antivirus application has its own threat database, Kaspersky’s detection technology may be able to find viruses that the prior program missed.
To ensure sure the malware is completely removed from the system, we advise running a scan just in case. If you are downloading the application for the first time, you will also receive a 31-day premium trial.
1 Download the Kaspersky Security Cloud by clicking the button above.

2 Once the setup has finished downloaded, open the file and start the installation.

3 Wait until the wizard finds the latest version of the application or click Skip to install the current version stored.

4 Review the License Agreement. If you agree to its terms, click Continue.

5 Follow the installation instructions as shown then finally click install. (You may choose to uncheck the options shown if you do not want those features.)

6 Wait for the application to finish installing, then after the process is complete, click done.

7 Apply the recommended settings then start the application by clicking apply. Feel free to untick the options you do not desire.

8 You will be prompt to create an account and once you are finished, you will be redirected to the main screen. Select the Scan tab then click the run full scan and wait for it to complete. (Before scanning, we recommend you update the database to ensure any new malware variants are detected.)

9 After the scan has finished, the detected threats will be deleted from the computer.

Common Internet Safety Tips
- Websites with distinctive domain extensions should be avoided. Domain extensions other than .com, .org, .net, and .edu should be avoided because most infected websites have very distinct TLDs, always check the last section of a domain to make sure you’re on a safe site, unless it’s been reputable for a long time.
- Never download software or programs from unknown sources. This is one of the most popular ways for adware and other malware to infiltrate your computer. Download only from recognized and legal sources. To be secure, avoid torrent downloads and cracked software download sites, as the files will almost always contain viruses.
- One of the most reliable ways to be safe online is to use a firewall. It protects users from potentially hazardous websites by acting as a first line of protection. It keeps intruders out of the user’s network and device. In today’s world, a firewall will protect a user from the risks that lurk on the huge internet.
- Anti-virus software must be kept up to date. These programs should always be updated on a computer since hundreds of new malware threats are produced every day that aim to infect the machine’s weaknesses. Antivirus updates contain the most recent files needed to combat new threats and protect your computer.
- Only visit websites with a secure connection. Since HTTP connections do not encrypt the data they receive, they are not considered secure. Entering personal information like email addresses, phone numbers, and passwords on a website that uses an HTTP connection is hazardous since your information could be stolen. Websites that use HTTPS connections, on the other hand, are more secure because data is encrypted and attackers are less likely to obtain access to information shared within the site.
Final Thoughts
You may bid farewell to randomly generated files since the malware has been removed from the computer.
The appropriate removal tools makes removing malware a straightforward process. Nonetheless, it’s crucial to start safeguarding your device now to avoid the dangers posed by viruses, which are much more harmful than pop-ups and redirects.
We are proud of our expertise in this area and are pleased to have assisted you with your malware issue. If you happen to face another virus on your system, SecuredStatus will be readily available to offer support once again.
